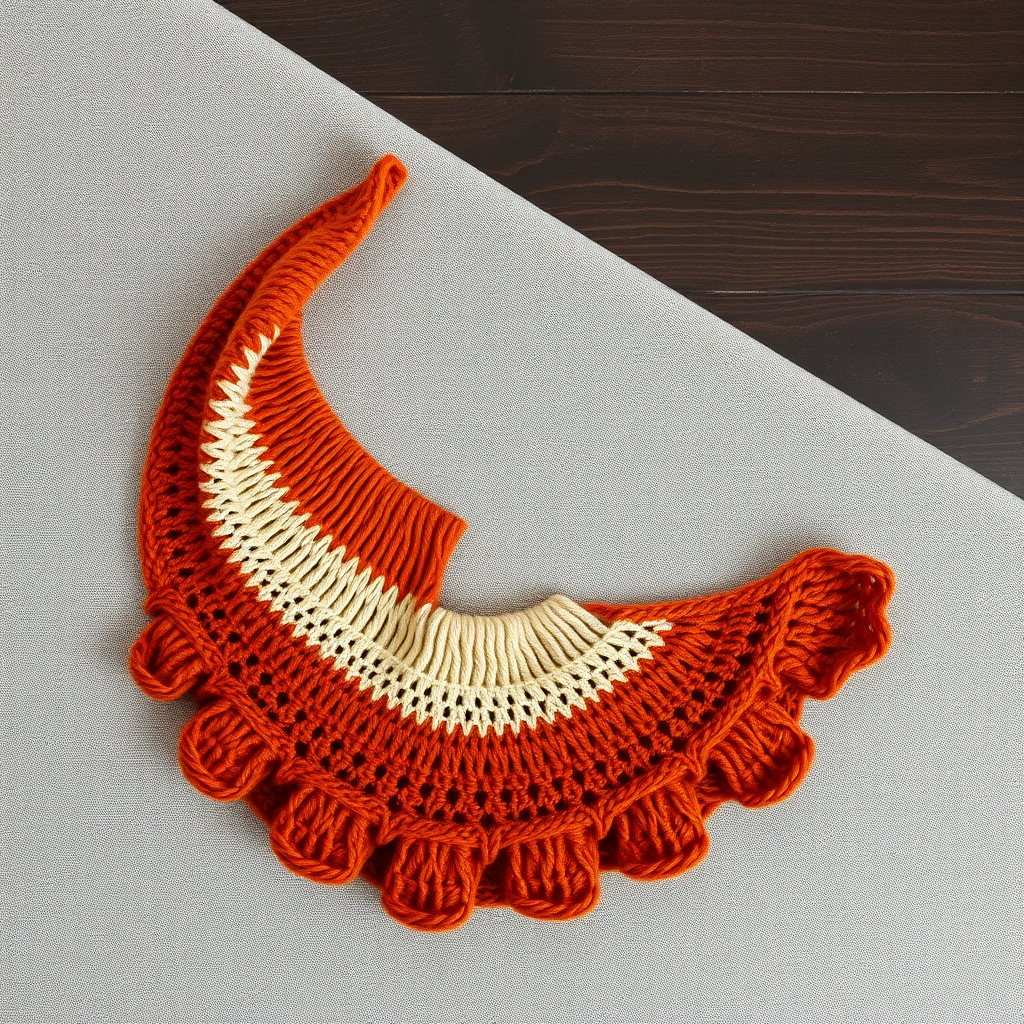
Emberfall Crescent Shawl Free Pattern – Knit a Smoldering Sunset Wrap

Emberfall Crescent Shawl Free Pattern – Knit a Smoldering Sunset Wrap
Wrap yourself in the warm, gradient glow of a sunset with this crescent-shaped knitted shawl, featuring a delicate lace edge that dances like flickering embers. This pattern offers a soothing, rhythmic knit that builds from a single point into a cozy, drapey accessory. Whether you're a seasoned knitter or a confident beginner looking for a rewarding project, the Emberfall Crescent Shawl is the perfect way to capture the essence of autumn and wear it wherever you go.
The magic of this design lies in its construction: you begin with just five stitches and watch them bloom into a generous, crescent-shaped wrap. The smooth stockinette body transitions through a gradient of deep burgundy, burnt orange, and golden yellow—reminiscent of a smoldering sunset—before culminating in an airy, scalloped lace border. The rhythmic increases and simple lace repeats make this an ideal project for cozy evenings, and the result is a stunning, handmade heirloom piece.
Materials Needed
Before you begin, gather the following materials to ensure a smooth and enjoyable knitting experience:
- Yarn: Fingering weight yarn in 3 colors:
- Color A: Deep burgundy (approx. 150g)
- Color B: Burnt orange (approx. 150g)
- Color C: Golden yellow (approx. 100g)
- Needles: US 6 (4.0 mm) circular knitting needle, 32-inch or longer (to accommodate the growing number of stitches)
- Notions: Stitch markers (at least 4), tapestry needle for weaving in ends, blocking pins and mats
Gauge: 20 stitches and 28 rows = 4 inches in stockinette stitch (after blocking). Gauge is important for achieving the correct drape and size, so take a moment to knit a swatch before starting.
Step-by-Step Instructions
This shawl is knit from the center top down, increasing at the edges and center to create a crescent shape. The lace border is worked at the end. Follow along carefully, and you'll have a beautiful shawl in no time.
Abbreviations
- k = knit
- p = purl
- yo = yarn over
- k2tog = knit two together (right-leaning decrease)
- ssk = slip, slip, knit (left-leaning decrease)
- pm = place marker
- sm = slip marker
- RS = right side
- WS = wrong side
Setup: Cast On and Foundation Rows
We'll begin by casting on just a few stitches and working increases to establish the center spine of the shawl.
- Cast on 5 stitches with Color A.
- Row 1 (RS): k2, yo, k1, yo, k2 (7 stitches)
- Row 2 (WS): k2, p3, k2
- Row 3 (RS): k2, yo, k1, yo, k1, yo, k1, yo, k2 (11 stitches)
- Row 4 (WS): k2, p7, k2
- Row 5 (RS): k2, yo, k3, yo, k1, yo, k3, yo, k2 (15 stitches)
- Row 6 (WS): k2, p11, k2
- Row 7 (RS): k2, yo, k5, yo, k1, yo, k5, yo, k2 (19 stitches)
- Row 8 (WS): k2, p15, k2
- Row 9 (RS): k2, yo, k7, yo, k1, yo, k7, yo, k2 (23 stitches)
- Row 10 (WS): k2, p19, k2
Now you have 23 stitches. It's time to place your markers to define the sections of the shawl:
- Place a marker after the first 2 stitches (edge section)
- Place a marker after the next 9 stitches (side section)
- Place a marker after the next 1 stitch (center stitch)
- Place a marker after the next 9 stitches (side section)
- You should have 2 stitches remaining at the end (edge section)
Body: Increase Section
Now we'll work the main body of the shawl, increasing four stitches on every right-side row to create the crescent shape. We'll also change colors to create the beautiful gradient effect.
Color Sequence: Continue with Color A for 10 more rows, then switch to Color B for 10 rows, then Color C for 10 rows, then back to Color B, then Color A, etc. Continue this gradient sequence until the body is complete. For a smoother transition, you can alternate yarns for a few rows (e.g., knit 2 rows with Color A and 2 rows with Color B) to create a gradual fade.
- Row 1 (RS): k2, yo, knit to marker, yo, sm, knit to center marker, yo, sm, knit to next marker, yo, sm, knit to last 2 stitches, yo, k2. (This creates 4 increases: one at each edge and one on each side of the center stitch.)
- Row 2 (WS): k2, purl to last 2 stitches, k2.
Repeat these 2 rows until the shawl measures approximately 24 inches from the cast-on edge, ending with a WS row. The number of stitches will grow significantly—don't be alarmed! The circular needle will accommodate them all. Remember to maintain the 2-stitch garter edge on each side (knit on both RS and WS) for a clean, finished look.
Lace Border
Once the body reaches the desired length, it's time to add the delicate lace border. Switch to Color C (or your final color) and work the lace pattern across all stitches, maintaining the edge stitches and increases as before.
- Row 1 (RS): k2, yo, *k2tog, yo* repeat from * to * until 2 stitches before center marker, k2tog, yo, sm, k1, sm, yo, ssk, *yo, ssk* repeat from * to * until 2 stitches before end, yo, k2. (Note: the center stitch is knit plain, and the increases at edges and center continue.)
- Row 2 (WS): k2, purl to last 2 stitches, k2.
- Row 3 (RS): k2, yo, *k1, yo, k2tog* repeat from * to * until 2 stitches before center marker, k1, yo, k2tog, sm, k1, sm, ssk, yo, k1, *ssk, yo, k1* repeat from * to * until 2 stitches before end, yo, k2.
- Row 4 (WS): k2, purl to last 2 stitches, k2.
Repeat these 4 rows until the lace border measures about 6 inches, ending with a WS row. The lace pattern will create beautiful eyelets and a scalloped edge that opens up beautifully after blocking.
Bind Off (Loosely)
A stretchy bind-off is essential for a lace shawl to ensure the edge can be blocked out to its full potential.
- On RS: k2, *yo, k2tog* repeat from * to * until 2 stitches before end, yo, k2. (This sets up the stretchy edge.)
- Bind off all stitches knitwise, doing a yo before each bind-off to keep it stretchy. To do this: knit the first stitch, yarn over, knit the next stitch, then pass the first stitch and the yarn over over the second stitch. Repeat this process across the row.
Finishing
The final steps are crucial for transforming your knitting into a beautiful, professional-looking shawl.
- Weave in all ends using a tapestry needle. Be sure to weave them in securely along the wrong side, following the path of the yarn to keep them invisible.
- Block the shawl gently. Soak it in lukewarm water with a mild wool wash for about 20 minutes. Gently squeeze out excess water (do not wring or twist).
- Lay the shawl on a blocking mat and pin out the lace points to open up the pattern. Stretch it gently to the desired dimensions, focusing on the scalloped edges of the lace border.
- Allow to dry completely before unpinning. This can take 24-48 hours depending on humidity.
Once dry, your Emberfall Crescent Shawl is ready to wear! Drape it over your shoulders on a cool autumn evening, and enjoy the warm, smoldering glow of your handmade creation. The gradient colors and delicate lace make this a truly special piece that you'll treasure for years to come.
Happy knitting!