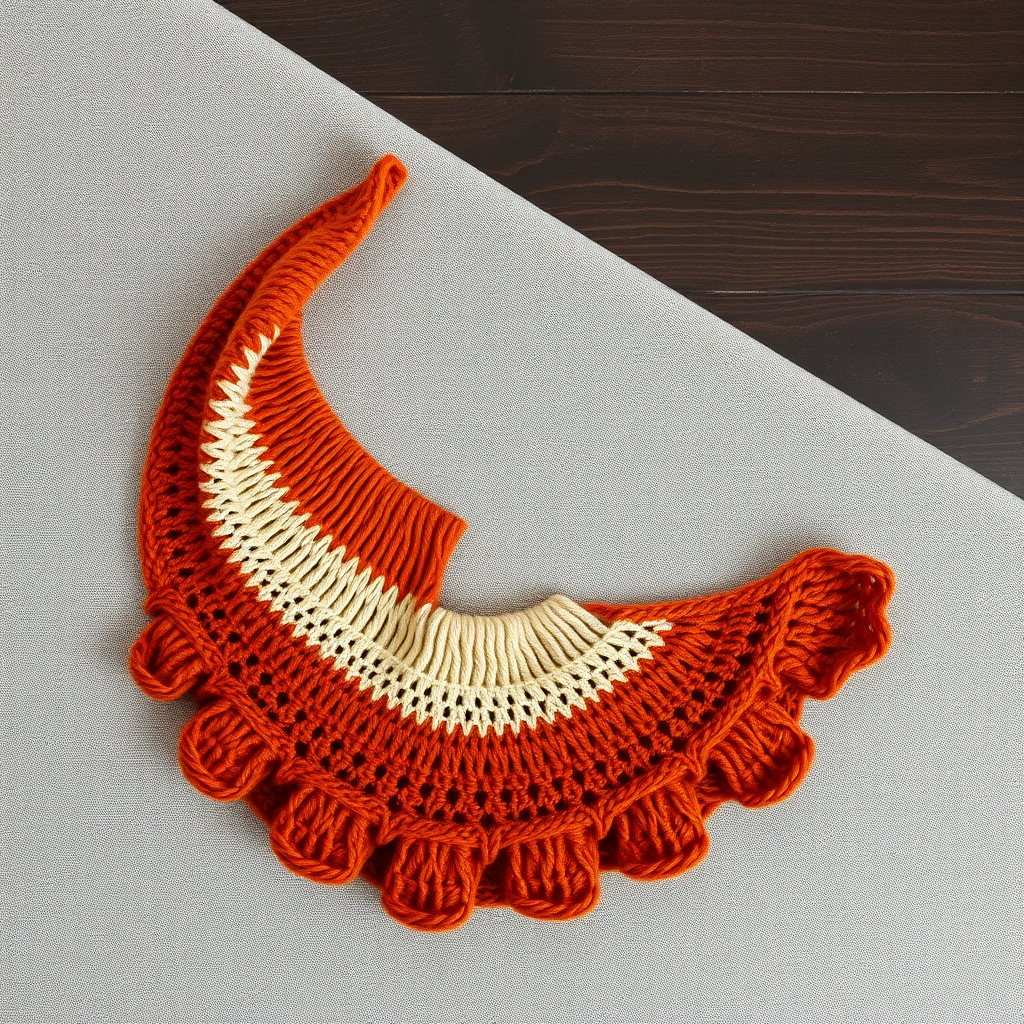
Aurora Dune Crescent Shawl Free Knitting Pattern

The Aurora Dune Crescent Shawl: A Free Knitting Pattern for Dreamy Gradient Yarns
Wrap yourself in the shifting colors of a desert sunset with the Aurora Dune Crescent Shawl. This stunning, crescent-shaped accessory is knitted from the top down in a soft, gradient fingering-weight yarn, creating a modern, heirloom-quality piece that drapes beautifully over your shoulders. The combination of textured lace and garter ridges makes this an engaging yet relaxing project, perfect for intermediate knitters looking to expand their skills or adventurous beginners ready for a rewarding challenge. Best of all, this is a free knitting pattern that will guide you every step of the way to create a cozy, wearable work of art.
This pattern is designed to showcase the beautiful color transitions of a gradient yarn, but it will also look spectacular in a solid or semi-solid colorway. The crescent shape is achieved through strategic increases along the edges, while the delicate lace panel in the center adds a touch of elegance and airy texture.
Materials Needed
Before you begin your knitting journey, gather the following materials to ensure a smooth and enjoyable crafting experience. The beauty of this pattern is that it requires minimal supplies, making it a perfect travel project.
Yarn
- Fingering weight yarn in a gradient colorway (e.g., 100g / 400m).
- Suggested yarn: Malabrigo Sock in 'Cactus Flower' or any similar gradient sock yarn. The color transitions will mimic the warm hues of a desert sunset—think deep terracotta, burnt orange, golden amber, and soft cream.
Needles & Notions
- US 5 (3.75 mm) circular needle, 32-inch (80 cm) or longer. The long cable is essential to accommodate the growing number of stitches.
- Stitch markers (at least 2).
- Tapestry needle for weaving in ends.
- Lifeline (scrap yarn or a specialized lifeline tool) – highly recommended for safety.
Gauge
- 20 stitches and 28 rows = 4 inches in stockinette stitch, after blocking.
- Note: Gauge is not critical for a shawl, but it will affect the final size and drape. A looser gauge will create a drapier fabric, while a tighter gauge will be more structured.
Step-by-Step Instructions: Knitting the Aurora Dune Shawl
This shawl is worked from the top center outwards, increasing on both sides to create the crescent shape. The pattern is divided into three main sections: the Setup, the Body, and the Border. Follow along carefully, and don't forget to use a lifeline every 20 rows for peace of mind—if you make a mistake, you can easily rip back to the lifeline without losing all your progress.
Abbreviations
- k = knit
- p = purl
- yo = yarn over
- k2tog = knit two together (right-leaning decrease)
- ssk = slip slip knit (left-leaning decrease)
- pm = place marker
- sm = slip marker
- RS = right side
- WS = wrong side
Section 1: The Setup (Creating the Foundation)
We begin by casting on a small number of stitches and working a few short rows to establish the center spine of the shawl. This is where the magic starts!
- Cast on 5 stitches using your preferred method (long-tail cast on is recommended).
- Row 1 (WS): Knit all stitches. (5 sts)
- Row 2 (RS): K2, yo, k1, yo, k2. (7 sts) — You have increased 2 stitches.
- Row 3: Knit all stitches. (7 sts)
- Row 4 (RS): K2, yo, k to last 2 sts, yo, k2. (9 sts) — Increase 2 stitches.
- Row 5: Knit all stitches. (9 sts)
- Repeat Rows 4-5 until you have 31 stitches on your needle, ending with a WS row (a knit row).
Pro Tip: The edge stitches (the first 2 and last 2) will form the garter stitch border of the shawl. They are always knitted on every row, creating a neat, non-curling edge.
Section 2: The Body (Introducing the Lace Pattern)
Now that the foundation is set, we will introduce the lace pattern. Place your markers to delineate the central lace panel from the garter stitch edges.
Placement: On the next RS row, you will place markers 2 stitches in from each edge. This means the lace pattern will be worked between the markers, and the garter edge will be worked outside the markers.
- Row 1 (RS): K2, yo, k1, pm, *k2tog, yo* repeat from * to * until 3 sts before marker, k1, yo, k1, sm, k to last 2 sts, yo, k2. (Increase 2 sts)
- Row 2 (WS): K2, yo, k to marker, sm, p to marker, sm, k to last 2 sts, yo, k2. (Increase 2 sts)
- Row 3 (RS): K2, yo, k to marker, sm, *yo, ssk, k1* repeat from * to * until 2 sts before marker, yo, k2, sm, k to last 2 sts, yo, k2. (Increase 2 sts)
- Row 4 (WS): Same as Row 2.
- Row 5 (RS): K2, yo, k to marker, sm, *k3, yo, ssk, k1* repeat from * to * until 3 sts before marker, k3, sm, k to last 2 sts, yo, k2. (Increase 2 sts)
- Row 6 (WS): Same as Row 2.
Repeat Rows 1-6 until the shawl measures 20 inches from the cast-on edge, or until you have used most of your yarn, leaving enough for a 10-row border (approximately 10-15 yards).
Understanding the Pattern: The increases happen on every row (both RS and WS) at the edges, just inside the garter stitch border. This creates the crescent shape. The lace pattern in the center is a simple repeat of yarn overs and decreases, creating a beautiful, airy mesh of eyelets.
Section 3: The Border (A Scalloped Finish)
The border adds a delicate, scalloped edge to the shawl, giving it a polished, professional finish. It follows a similar structure to the body but with a different lace repeat.
- Row 1 (RS): K2, yo, k to marker, sm, *k2tog, yo* repeat to marker, sm, k to last 2 sts, yo, k2.
- Row 2 (WS): K2, yo, k to marker, sm, p to marker, sm, k to last 2 sts, yo, k2.
- Row 3 (RS): K2, yo, k to marker, sm, *yo, ssk* repeat to marker, sm, k to last 2 sts, yo, k2.
- Row 4 (WS): Same as Row 2.
- Row 5 (RS): K2, yo, k to marker, sm, *k1, yo, ssk* repeat to marker, sm, k to last 2 sts, yo, k2.
- Row 6 (WS): Same as Row 2.
- Row 7 (RS): K2, yo, k to marker, sm, *k2, yo, ssk* repeat to marker, sm, k to last 2 sts, yo, k2.
- Row 8 (WS): Same as Row 2.
- Row 9 (RS): K2, yo, k to marker, sm, *k3, yo, ssk* repeat to marker, sm, k to last 2 sts, yo, k2.
- Row 10 (WS): Knit all stitches.
Bind off loosely on the next RS row (knitwise). A loose bind-off is crucial to ensure the edge remains stretchy and doesn't pucker. You can use a larger needle or a stretchy bind-off method like the "Jeny's Surprisingly Stretchy Bind-Off" for best results.
Finishing: Blocking Your Shawl
Blocking is the most important step in lace knitting. It opens up the stitches, defines the lace pattern, and gives the shawl its final shape and drape.
- Weave in all ends using a tapestry needle.
- Soak the shawl in lukewarm water with a drop of wool wash (like Eucalan or Soak) for 20 minutes.
- Gently squeeze out excess water (do not wring or twist).
- Lay flat on a clean towel and roll up to remove more water.
- Place the shawl on a blocking mat or a dry towel.
- Shape into a crescent, pinning out the edges and gently stretching the lace points to open them up.
- Allow to dry completely before unpinning. This may take 24-48 hours depending on humidity.
Once dry, your Aurora Dune Crescent Shawl is ready to wear! Drape it over your shoulders for a cozy evening, or gift it to a loved one as a handmade treasure. The gradient colors will shift beautifully as you wear it, reminiscent of a desert sunset. Happy knitting!