Aurora Frost Braided Crown Hat Free Pattern
Aurora Frost Braided Crown Hat: A Cozy First Project
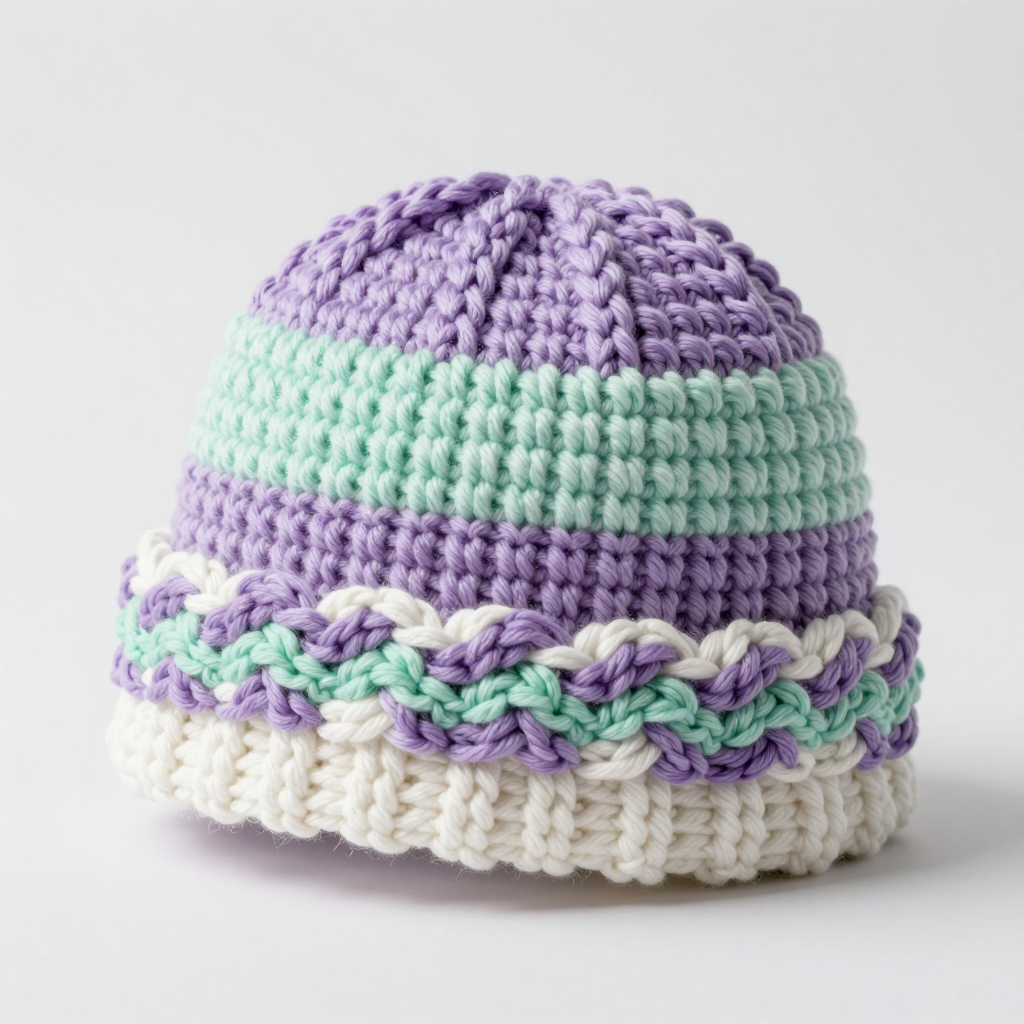
If you have ever looked at a handmade hat and thought, "I could never make that," this pattern is here to prove you wrong. The Aurora Frost Braided Crown Hat is designed for the confident beginner — someone who may have just learned a few basic stitches and is ready to make something genuinely beautiful. It is worked almost entirely in one simple stitch (half double crochet), so you can build muscle memory and rhythm while the hat practically makes itself. The finished hat is soft, squishy, and warm, with a rounded crown in icy lavender, a pale mint stripe, and a soft white brim, all wrapped in a thick three-strand braid that looks like a little crown. It feels like wearing a winter sky.
Materials Needed
- Yarn: Worsted weight (Category 4) acrylic or wool-blend yarn, approximately 180–200 yards total:
- 120 yards Main Color (icy lavender)
- 40 yards Contrast A (pale mint)
- 40 yards Contrast B (soft white)
- Crochet hook: 6.0 mm (US size J/10)
- Stitch markers: At least 4 (to mark the first stitch of each round)
- Tapestry needle: A large-eyed blunt needle for weaving in ends and sewing the braid
- Scissors
- Measuring tape (for checking gauge and braid length)
- Optional: A small faux fur pom-pom for the top
- Finished size: Approximately 20–22 inches (51–56 cm) circumference and 8–9 inches (20–23 cm) tall, to fit an average adult head. The half double crochet fabric has natural stretch.
Abbreviations and Beginner Glossary
Every abbreviation used in this pattern is listed below with a plain-English explanation. If you have never crocheted before, read this section twice before you begin.
- ch — chain. Make a loop with the yarn, then pull a new loop through it. Each loop you pull through counts as one chain stitch. Chains are used to start a round and add a tiny bit of height.
- hdc — half double crochet. Yarn over (wrap the yarn around your hook once), insert the hook into the next stitch, yarn over again, pull up a loop (you now have 3 loops on your hook), yarn over one more time, and pull through all 3 loops at once. This is the main stitch of the hat.
- sl st — slip stitch. Insert your hook into the stitch, yarn over, and pull the yarn through both the stitch and the loop on your hook at the same time. It creates an almost invisible join.
- st / sts — stitch / stitches. One completed unit of crochet work.
- rep — repeat. Do the instruction again the number of times indicated.
- * ... ; rep from * — the asterisk marks the beginning of a repeating section. Work the instructions between the asterisk and the semicolon, then repeat that same section as many times as the pattern says.
- join — after working all the stitches in a round, insert your hook into the first stitch of that round and make a slip stitch. This closes the round into a circle.
- magic ring — an adjustable loop of yarn that you crochet into to begin working in the round. It lets you pull the center closed tightly so there is no hole at the top of the hat.
- 2 hdc in next st — work two half double crochet stitches into the same single stitch. This is an increase and makes the round wider.
- fasten off — cut the yarn a few inches from your work, then pull the tail all the way through the last loop on your hook to lock it.
- weave in ends — use the tapestry needle to thread the loose yarn tails back through the inside of the fabric so they are hidden and secure.
Gauge
Gauge: 12 hdc x 10 rows = 4 inches (10 cm) in half double crochet.
Gauge means how many stitches and rows fit into a set measurement. It matters because it is how you make sure your hat turns out the right size. If your stitches are looser than the pattern writer's, your hat will be too big; if they are tighter, it will be too small. To check your gauge, crochet a small practice square: chain 18, then work 12 rows of half double crochet. Lay the square flat and measure a 4-inch section in the middle. Count how many stitches across and how many rows tall fit in that 4 inches. If you have more than 12 stitches in 4 inches, your stitches are too tight — try a larger hook. If you have fewer than 12, your stitches are too loose — try a smaller hook. Do this before you start the hat; it takes 15 minutes and saves hours of frustration.
Beginner Tips Before You Start
- Use a stitch marker on the first stitch of every round. Because the hat is worked in joined rounds, it is very easy to lose track of where a round begins. Place a marker in the first stitch after each join, and move it up as you go.
- Do not pull your yarn too tight. Beginners often grip the yarn hard, which makes stiff, small stitches. Keep your tension relaxed and even — the hook should glide, not fight.
- Count your stitches at the end of every round. The stitch count in parentheses tells you exactly how many stitches you should have. If the number is wrong, fix it before moving on, because every later round depends on it.
- Change colors at the join. When the pattern says to change color, finish the last stitch of the round with the old color, then pull the new color through the final slip stitch join. This keeps the color change neat.
- Keep your braid loose. When you braid the crown band, braid gently. A tight braid will pull the hat out of shape and make it too small.
- Try the hat on as you go. After Round 8, slip the hat onto your head (or a large bowl) to check the fit. The crown should sit comfortably without being tight.
Step-by-Step Instructions
Note: The hat is worked in joined rounds from the crown down, then a braided band is added around the brim. All rounds are joined with a slip stitch to the first stitch of the round. The chain 1 at the start of each round does not count as a stitch.
Crown (Main Color — Icy Lavender)
Round 1: Make a magic ring, ch 1, work 8 hdc into the ring, join with sl st to the first hdc. (8 sts)
Round 2: Ch 1, work 2 hdc in each stitch around, join. (16 sts)
Round 3: Ch 1, *2 hdc in next st, hdc in next st; rep from * around, join. (24 sts)
Round 4: Ch 1, *2 hdc in next st, hdc in next 2 sts; rep from * around, join. (32 sts)
Round 5: Ch 1, *2 hdc in next st, hdc in next 3 sts; rep from * around, join. (40 sts)
Round 6: Ch 1, *2 hdc in next st, hdc in next 4 sts; rep from * around, join. (48 sts)
Round 7: Ch 1, *2 hdc in next st, hdc in next 5 sts; rep from * around, join. (56 sts)
Round 8: Ch 1, *2 hdc in next st, hdc in next 6 sts; rep from * around, join. (64 sts)
Round 9: Ch 1, hdc in each stitch around, join. (64 sts)
Round 10: Ch 1, hdc in each stitch around, join. (64 sts)
Round 11: Ch 1, hdc in each stitch around, join. (64 sts)
Colorwork Band (Contrast A — Pale Mint)
Round 12: Change to Contrast A, ch 1, hdc in each stitch around, join. (64 sts)
Round 13: Ch 1, hdc in each stitch around, join. Fasten off Contrast A. (64 sts)
Main Body (Main Color — Icy Lavender)
Round 14: Change back to Main Color, ch 1, hdc in each stitch around, join. (64 sts)
Round 15: Ch 1, hdc in each stitch around, join. (64 sts)
Round 16: Ch 1, hdc in each stitch around, join. (64 sts)
Round 17: Ch 1, hdc in each stitch around, join. (64 sts)
Round 18: Ch 1, hdc in each stitch around, join. (64 sts)
Round 19: Ch 1, hdc in each stitch around, join. (64 sts)
Round 20: Ch 1, hdc in each stitch around, join. (64 sts)
Brim (Contrast B — Soft White)
Round 21: Change to Contrast B, ch 1, hdc in each stitch around, join. (64 sts)
Round 22: Ch 1, hdc in each stitch around, join. Fasten off and weave in ends. (64 sts)
Braided Crown Band
Step 1: Cut 6 strands of yarn — 2 strands each of Main Color, Contrast A, and Contrast B — each about 40 inches long.
Step 2: Tie one end of all 6 strands together securely in a knot.
Step 3: Divide the strands into 3 groups of 2 strands each.
Step 4: Braid the groups loosely (cross the right group over the middle, then the left group over the middle, and so on) until the braid measures about 20 inches.
Step 5: Tie off the other end securely.
Step 6: Using the tapestry needle, sew the braid around the base of the hat, covering Rounds 21–22. Overlap the ends at the back of the hat and stitch them together neatly.
Step 7: Weave in all ends.
Assembly and Finishing
Seaming the braid: Thread the tapestry needle with a 12-inch length of matching yarn. Starting at the back of the hat, stitch the braid to the hat by passing the needle through the braid and into the hat fabric every inch or so. Keep your stitches small and hidden between the braid strands. When you reach the starting point, overlap the braid ends by about 1 inch and sew them together with a few firm stitches, then sew the overlap down to the hat.
Weaving in ends: Turn the hat inside out. Thread each loose yarn tail onto the tapestry needle and weave it through the inside of the fabric for about 2 inches, changing direction once so it cannot work loose. Trim the tail close to the fabric.
Blocking: Gently steam block the hat to settle the stitches and even out the fabric. Hold a steam iron 2–3 inches above the hat (never touch the iron to acrylic yarn, as it can melt) and let the steam penetrate the fabric. Shape the hat with your hands into a round dome and let it dry completely. If you used wool, you can lightly mist the hat with water and pat it into shape instead.
Optional pom-pom: Sew a small faux fur pom-pom to the top center of the hat using the tapestry needle and a few firm stitches.
Pro Tips and Variations
- Change the color story: Swap the icy lavender, pale mint, and soft white for any three colors you love. A deep navy, silver, and cream combination gives a classic winter look, while blush pink, peach, and ivory feels soft and spring-like.
- Adjust the size: For a smaller hat (child size), stop the crown increases at Round 7 (56 sts) and work the body rounds without increasing. For a larger hat (large adult), add one more increase round — Round 9 becomes *2 hdc in next st, hdc in next 7 sts; rep from * around (72 sts) — and work all following rounds with 72 sts.
- Substitute yarn: Any worsted weight (Category 4) yarn will work. A wool blend gives warmth and elasticity; acrylic is easy to care for and machine washable. Just check your gauge with the new yarn before starting.
- Make the braid removable: Instead of sewing the braid down, attach it with small safety pins or a few loose stitches at the back only, so you can remove it for washing or swap it for a different color braid.