Aurora Sky Gradient Knit Shawl Free Pattern
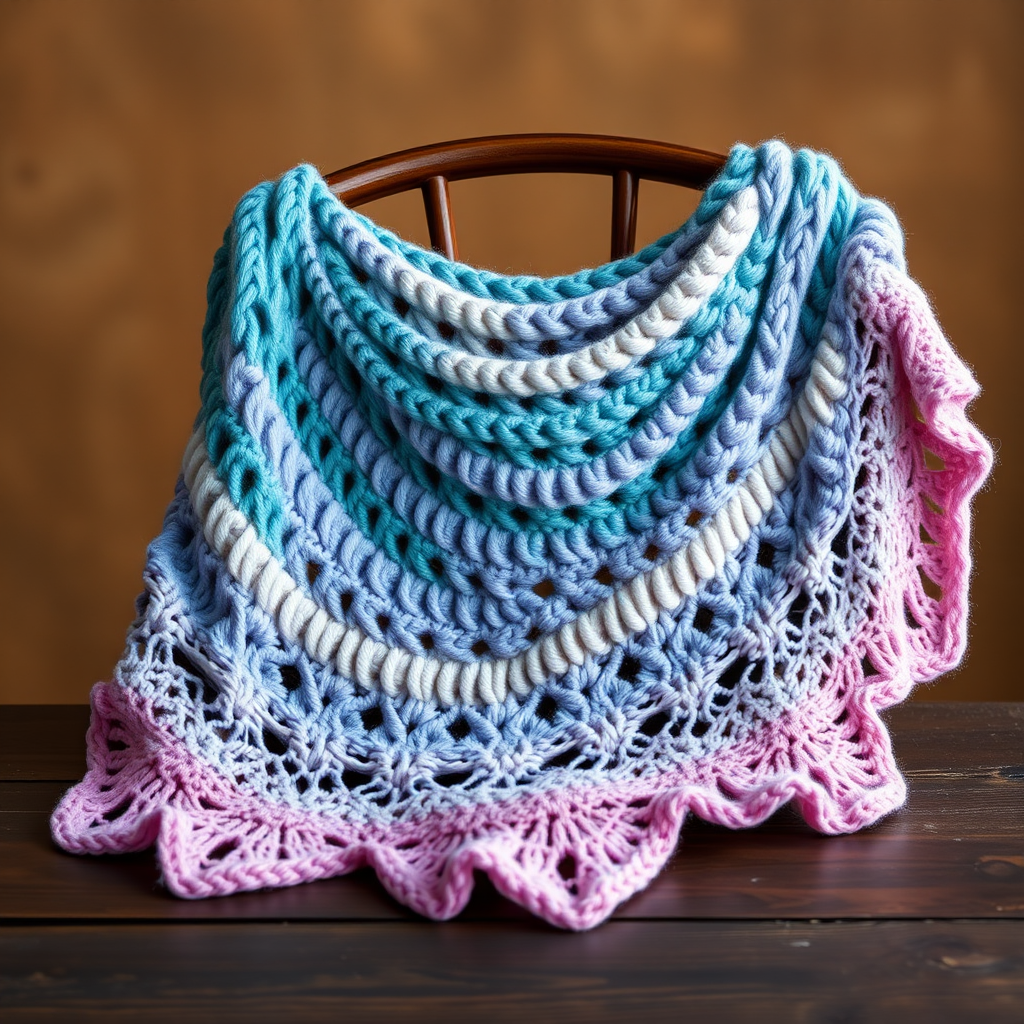
Aurora Sky Gradient Knit Shawl: A Beginner-Friendly Lace Knitting Pattern
Imagine wrapping yourself in the ethereal beauty of the northern lights—swirling ribbons of deep teal, soft lavender, and pale pink cascading over your shoulders. The Aurora Sky Gradient Knit Shawl captures this breathtaking natural phenomenon in a wearable piece of art. This free knitting pattern is designed with beginners in mind, featuring a simple yet stunning lace repeat that creates a delicate ripple effect. Worked from the top center down, this triangular shawl grows organically as you knit, making it a meditative and rewarding project. Whether you're new to lace knitting or a seasoned crafter looking for a relaxing project, this gradient shawl will become a cherished addition to your handmade wardrobe.
Materials Needed
Before you begin your knitting journey, gather these essential supplies. The beauty of this pattern lies in its simplicity—you only need three colors of fingering weight yarn and one circular needle.
Yarn
- Fingering weight yarn in 3 colors (approximately 400 yards each):
- Color A: Deep teal (representing the darkest part of the aurora)
- Color B: Soft lavender (the middle transition)
- Color C: Pale pink (the lightest, most ethereal shade)
Tip: Choose yarns with similar fiber content (wool, merino, or a wool-blend) to ensure consistent drape and blocking behavior.
Needles & Notions
- US 6 (4.0 mm) circular knitting needle, 32 inches or longer (the long cable is essential to accommodate the growing number of stitches)
- Stitch markers (at least 2, to mark the center of the shawl)
- Tapestry needle for weaving in ends
- Blocking mats and pins (for the finishing touch)
Gauge
20 stitches and 28 rows = 4 inches in stockinette stitch (blocked). While gauge is not critical for a shawl, maintaining a consistent tension will ensure your finished piece has the right drape and size. If your gauge is significantly off, adjust your needle size accordingly.
Step-by-Step Instructions
This shawl is worked from the top center down, increasing on each side to create a triangular shape. The lace pattern is simple but creates a beautiful ripple effect. Follow these detailed instructions carefully, and you'll have a stunning gradient shawl in no time.
Abbreviations
- k = knit
- p = purl
- yo = yarn over (bring yarn to front, then over needle to back, creating a new stitch)
- k2tog = knit two together (right-leaning decrease)
- ssk = slip, slip, knit (left-leaning decrease: slip two stitches knitwise one at a time, then knit them together through the back loop)
- kfb = knit front and back (increase: knit into the front of the stitch, then knit into the back of the same stitch before slipping it off)
- pm = place marker
- sm = slip marker
Setup Section
Let's begin by establishing the foundation of your shawl. This section creates the center spine and sets up the increasing pattern.
Cast on 3 stitches with Color A.
Row 1 (RS): kfb, k1, kfb (5 stitches)
Row 2 (WS): k2, p1, k2
Row 3 (RS): kfb, k1, yo, k1, yo, k1, kfb (9 stitches)
Row 4 (WS): k2, purl to last 2 stitches, k2
Note: The first and last 2 stitches of every row are knit on both sides (garter stitch edge). This creates a neat, non-curling border. The center stitch (the one between the yarn overs) is your center marker point.
Body of the Shawl
Now we'll establish the increasing pattern that forms the triangular shape. Continue with Color A for the first 20 rows, then switch to Color B for the next 20 rows, then Color C for the final 20 rows. Repeat this color sequence until you have used all yarn or reached your desired size.
Row 5 (RS): kfb, k1, yo, k3, yo, k1, yo, k3, yo, k1, kfb (13 stitches)
Row 6 (WS): k2, purl to last 2 stitches, k2
Row 7 (RS): kfb, k1, yo, k5, yo, k1, yo, k5, yo, k1, kfb (17 stitches)
Row 8 (WS): k2, purl to last 2 stitches, k2
Row 9 (RS): kfb, k1, yo, k7, yo, k1, yo, k7, yo, k1, kfb (21 stitches)
Row 10 (WS): k2, purl to last 2 stitches, k2
Notice the pattern: each RS row adds 4 stitches (2 at each edge via kfb, and 2 via yarn overs around the center stitch). The center stitch remains the focal point, with yarn overs on either side.
Lace Pattern (Repeat Section)
This is where the magic happens! The lace pattern creates the beautiful ripple effect. Repeat Rows 11-20 until the shawl measures approximately 60 inches across the top edge, or until you have used all your yarn. Always end with a WS row before changing colors or starting the edging.
Row 11 (RS): kfb, k1, yo, *k2tog, yo* repeat from * to * until 1 stitch before center marker, k1, yo, k1, yo, k1, *yo, ssk* repeat from * to * until 3 stitches before end, yo, k1, kfb
Row 12 (WS): k2, purl to last 2 stitches, k2
Row 13 (RS): kfb, k1, yo, *k2tog, yo* repeat from * to * until 1 stitch before center marker, k1, yo, k1, yo, k1, *yo, ssk* repeat from * to * until 3 stitches before end, yo, k1, kfb
Row 14 (WS): k2, purl to last 2 stitches, k2
Row 15 (RS): kfb, k1, yo, *k2tog, yo* repeat from * to * until 1 stitch before center marker, k1, yo, k1, yo, k1, *yo, ssk* repeat from * to * until 3 stitches before end, yo, k1, kfb
Row 16 (WS): k2, purl to last 2 stitches, k2
Row 17 (RS): kfb, k1, yo, *k2tog, yo* repeat from * to * until 1 stitch before center marker, k1, yo, k1, yo, k1, *yo, ssk* repeat from * to * until 3 stitches before end, yo, k1, kfb
Row 18 (WS): k2, purl to last 2 stitches, k2
Row 19 (RS): kfb, k1, yo, *k2tog, yo* repeat from * to * until 1 stitch before center marker, k1, yo, k1, yo, k1, *yo, ssk* repeat from * to * until 3 stitches before end, yo, k1, kfb
Row 20 (WS): k2, purl to last 2 stitches, k2
Understanding the lace pattern: The *k2tog, yo* section on the left side of the center creates a right-leaning lace pattern, while the *yo, ssk* section on the right side creates a left-leaning pattern. This symmetry creates the beautiful ripple effect. The yarn overs add stitches, while the decreases (k2tog and ssk) remove them, keeping the stitch count consistent within each repeat.
Color changes: When switching colors, do so at the beginning of a RS row. Simply drop the old color and pick up the new one, leaving a tail to weave in later. For a smoother gradient effect, you can overlap the colors by knitting 2 rows with both strands held together, but this is optional.
Edging
Once your shawl reaches the desired size (approximately 60 inches across the top edge), it's time to add the finishing edging. Use Color C (or your final color) for a cohesive look.
Row 1 (RS): kfb, k1, yo, *k2tog, yo* repeat from * to * until 1 stitch before center marker, k1, yo, k1, yo, k1, *yo, ssk* repeat from * to * until 3 stitches before end, yo, k1, kfb
Row 2 (WS): k2, purl to last 2 stitches, k2
Row 3 (RS): kfb, k1, yo, *k2tog, yo* repeat from * to * until 1 stitch before center marker, k1, yo, k1, yo, k1, *yo, ssk* repeat from * to * until 3 stitches before end, yo, k1, kfb
Row 4 (WS): Bind off loosely in purl.
Tip: To bind off loosely, use a needle one size larger or bind off in pattern (purl the knit stitches and knit the purl stitches) to maintain elasticity.
Finishing
The final steps are crucial for transforming your knitted fabric into a beautiful, flowing shawl.
1. Weave in all ends: Using your tapestry needle, carefully weave in all yarn tails along the edges or through the wrong side of the work. Be sure to weave in the color change tails securely.
2. Block the shawl: This step is essential for lace knitting! Soak the shawl in lukewarm water with a gentle wool wash for 20-30 minutes. Gently squeeze out excess water (never wring or twist). Lay the shawl on blocking mats and pin it out to its full dimensions, stretching the lace pattern to open it up. Focus on the points along the edges to create the scalloped effect. Allow it to dry completely, which may take 24-48 hours.
3. Enjoy your creation: Once dry, unpin the shawl and admire your handiwork. The blocking will have transformed the stitches, opening up the lace and enhancing the beautiful gradient effect.
Tips for Success
- Use stitch markers: Place a marker on either side of the center stitch to help you identify where the pattern repeats begin and end.
- Count your stitches: After each RS row, count your stitches to ensure you haven't missed any yarn overs or decreases. The stitch count should increase by 4 on each RS row.
- Keep a lifeline: If you're new to lace knitting, thread a contrasting piece of scrap yarn through your stitches every 10-20 rows. If you make a mistake, you can easily rip back to the lifeline without losing your work.
- Choose your yarn wisely: For the best gradient effect, select yarns that are similar in weight and fiber content. Hand-dyed yarns with tonal variations will create an even more stunning aurora effect.
- Be patient with blocking: The shawl may look small and scrunched before blocking, but it will grow significantly. Trust the process!
The Aurora Sky Gradient Knit Shawl is more than just a knitting project—it's a creative journey that captures the magic of the northern lights in every stitch. As you watch the colors transition from deep teal through soft lavender to pale pink, you'll feel a sense of accomplishment and connection to the natural world. This pattern is perfect for beginners who want to try lace knitting, as the repeat is simple and rhythmic once you get the hang of it. Whether you're knitting for yourself or as a gift for someone special, this shawl is sure to be treasured for years to come.
Happy knitting, and may your stitches always be even and your yarn never tangle!



