Ember Ridge Pullover Free Pattern – Knit a Rugged Textured Sweater
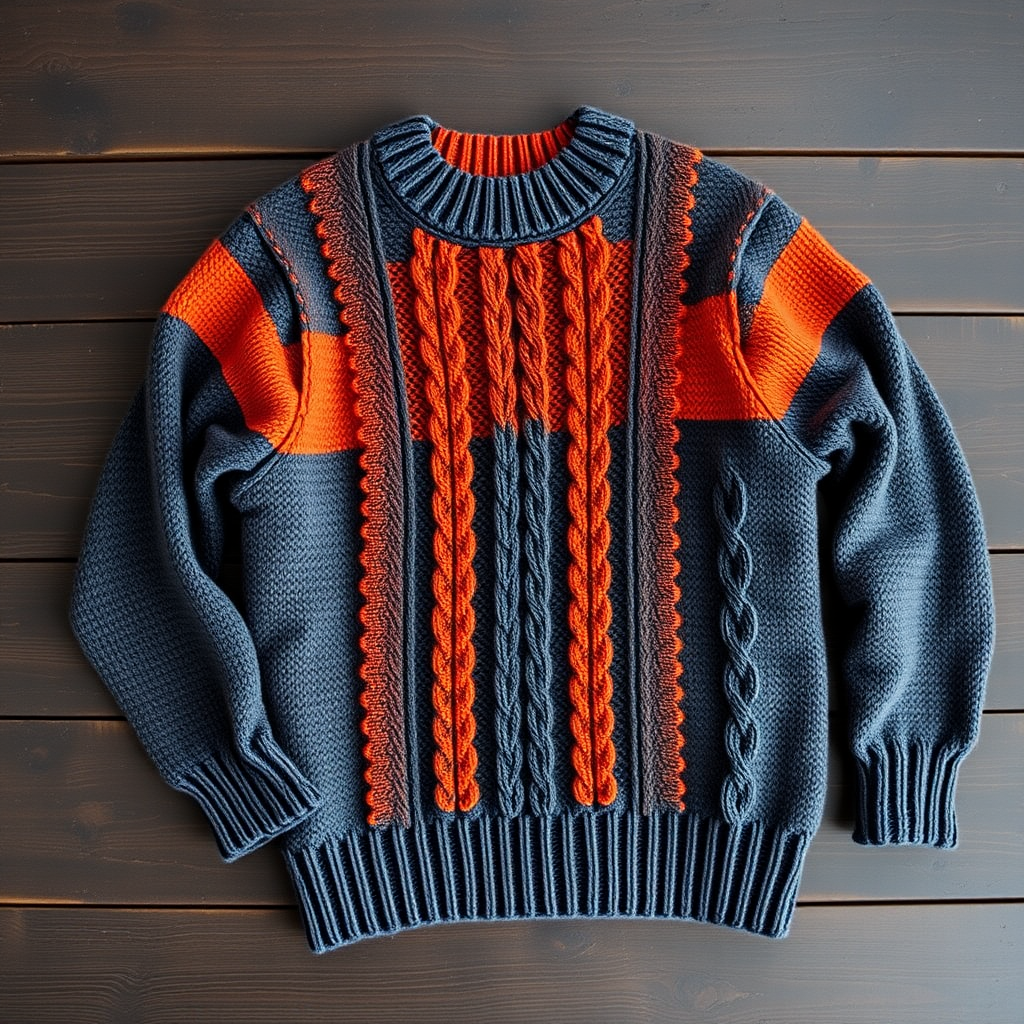
Ember Ridge Pullover Free Pattern – Knit a Rugged Textured Sweater
There's something deeply satisfying about knitting a sweater that feels like it was made for adventure. The Ember Ridge Pullover channels the raw beauty of a mountain trail at dusk, with a deep charcoal base and a smoldering ember-orange yoke. This isn't just another stockinette sweater—it's a statement piece built with intricate honeycomb cables and moss stitch panels that create a dense, warm fabric. From the first wear, it feels like a well-worn favorite, and with this free pattern, you'll be able to knit it yourself, even if you're new to cable work.
This pattern is designed for intermediate knitters who are ready to tackle their first (or next) textured pullover. The combination of cables, moss stitch, and strategic decreases creates a garment that's both visually stunning and incredibly cozy. Whether you're knitting for yourself or as a gift for someone special, the Ember Ridge Pullover is a project you'll be proud to say you made by hand.
Materials Needed
Before you cast on, gather the following materials. Having everything ready will make your knitting experience smooth and enjoyable.
Yarn
- Main Color (MC): Worsted weight wool blend (e.g., Cascade 220) in Charcoal Heather – 6 (7, 8, 9) skeins
- Contrast Color (CC): Worsted weight wool blend in Burnt Orange – 2 (2, 3, 3) skeins
Needles
- US 7 (4.5 mm) 16-inch circular needle for collar
- US 8 (5.0 mm) 24-inch circular needle for body
- US 8 (5.0 mm) double-pointed needles for sleeves
Notions
- Stitch markers (at least 8)
- Cable needle
- Stitch holders or waste yarn
- Tapestry needle for weaving in ends
- Measuring tape
Gauge
- Stockinette stitch: 18 stitches and 24 rows = 4 inches on US 8 needles
- Honeycomb cable pattern: 20 stitches and 26 rows = 4 inches on US 8 needles
Always take time to check your gauge. Getting the correct gauge ensures your sweater will fit as intended.
Sizes and Measurements
This pattern is written for sizes S (M, L, XL). The finished chest measurements are:
- Small: 38 inches
- Medium: 42 inches
- Large: 46 inches
- X-Large: 50 inches
Choose the size that gives you 2-4 inches of positive ease for a relaxed, rugged fit.
Abbreviations
Before you begin, familiarize yourself with these standard knitting abbreviations:
- k = knit
- p = purl
- k2tog = knit two stitches together (decrease)
- ssk = slip, slip, knit (decrease)
- yo = yarn over
- C4B = slip 2 stitches to cable needle, hold to back, knit 2, knit 2 from cable needle
- C4F = slip 2 stitches to cable needle, hold to front, knit 2, knit 2 from cable needle
- pm = place marker
- sm = slip marker
Special Stitches
These two stitch patterns are the heart of the Ember Ridge Pullover. Practice them on a swatch first to get comfortable with the cable movements.
Honeycomb Cable (worked over 8 stitches)
- Row 1: k8
- Row 2: p8
- Row 3: C4B, C4F
- Row 4: p8
- Row 5: k8
- Row 6: p8
- Row 7: C4F, C4B
- Row 8: p8
Repeat rows 1-8 for the pattern.
Moss Stitch (worked over a multiple of 2 stitches)
- Row 1: *k1, p1* repeat to end
- Row 2: *p1, k1* repeat to end
Repeat rows 1-2 for the pattern.
Step-by-Step Instructions
Now that you have all your materials and understand the special stitches, it's time to cast on. Follow these instructions carefully, and you'll have a beautiful Ember Ridge Pullover in no time.
Body (worked in the round)
Step 1: Cast On and Ribbing
With MC and US 8 circular needle, cast on 180 (200, 220, 240) stitches. Place a marker for the beginning of the round and join in the round, being careful not to twist your stitches.
Step 2: Work Ribbing
Work in k2, p2 ribbing for 2 inches. This creates a sturdy, stretchy hem that will hold its shape.
Step 3: Set Up Pattern Rounds
Next round: *work 20 (22, 24, 26) stitches in moss stitch, pm, work 8 stitches in honeycomb cable, pm, work 20 (22, 24, 26) stitches in moss stitch, pm, work 42 (48, 54, 60) stitches in stockinette, pm* repeat from * to * once more.
This sets up the pattern: you'll have a moss stitch panel, a honeycomb cable, another moss stitch panel, and a large stockinette section for the front and back of the sweater.
Step 4: Continue in Pattern
Continue working in pattern, maintaining the honeycomb cables and moss stitch panels as established. Work the stockinette sections for the front and back. Continue until the body measures 16 (17, 18, 19) inches from the cast-on edge, ending at the beginning of round marker.
Divide for Armholes
Step 5: Bind Off for Armholes
Next round: Bind off 8 (10, 12, 14) stitches, work in pattern to 8 (10, 12, 14) stitches before the next marker, bind off 16 (20, 24, 28) stitches, work in pattern to 8 (10, 12, 14) stitches before the end of round, bind off remaining 8 (10, 12, 14) stitches.
Step 6: Place on Holders
Place the front and back sections on separate stitch holders or waste yarn. You will have 82 (90, 98, 106) stitches for the front and the same number for the back.
Yoke (worked in the round)
Step 7: Pick Up Stitches
With CC and US 8 circular needle, pick up and knit 82 (90, 98, 106) stitches from the back holder, then 82 (90, 98, 106) stitches from the front holder, placing a marker at each underarm. Total: 164 (180, 196, 212) stitches. Join in the round.
Step 8: Begin Yoke
Work in stockinette stitch for 2 rounds. This establishes the beautiful burnt orange yoke that gives the sweater its signature look.
Step 9: First Decrease Round
Round 1: *k2tog, k18 (20, 22, 24), ssk* repeat around – 148 (162, 176, 190) stitches remain.
Step 10: Work Even
Work 3 rounds even in stockinette stitch.
Step 11: Second Decrease Round
Round 5: *k2tog, k16 (18, 20, 22), ssk* repeat around – 132 (144, 156, 168) stitches remain.
Step 12: Continue Decreasing
Work 3 rounds even. Continue in this manner, decreasing 16 (18, 20, 22) stitches every 4th round, working 2 fewer stitches between decreases each time. Repeat until 68 (72, 76, 80) stitches remain.
Step 13: Finish Yoke
Work 2 rounds even. Switch to US 7 circular needle and work in k2, p2 ribbing for 2 inches. Bind off loosely in pattern. This creates the cozy crew neck collar.
Sleeves (worked in the round)
Step 14: Pick Up Sleeve Stitches
With MC and US 8 double-pointed needles, pick up and knit 40 (44, 48, 52) stitches around the armhole. Place a marker for the beginning of the round.
Step 15: Work Sleeve Body
Work in stockinette stitch for 2 inches.
Step 16: Decrease Round
Decrease round: k1, k2tog, knit to last 3 stitches, ssk, k1 – 38 (42, 46, 50) stitches remain.
Step 17: Continue Decreasing
Work 7 (7, 6, 6) rounds even. Repeat the decrease round and even rounds until 30 (32, 34, 36) stitches remain.
Step 18: Finish Sleeve
Work even until the sleeve measures 18 (19, 20, 21) inches from the underarm. Switch to US 7 needles and work in k2, p2 ribbing for 1.5 inches. Bind off loosely.
Step 19: Repeat for Second Sleeve
Repeat steps 14-18 for the second sleeve.
Finishing
Step 20: Weave in Ends
Using a tapestry needle, weave in all loose ends carefully. Make sure to secure them well so they don't unravel with wear.
Step 21: Block Your Sweater
Block the sweater to the specified measurements, paying special attention to the cable panels. Wet blocking will help the cables relax and open up, making the texture more defined. Lay flat to dry.
Step 22: Admire Your Work
Once dry, your Ember Ridge Pullover is ready to wear. The yoke will have a beautiful gradient effect from the CC yarn, and the honeycomb cables will be crisp and defined.
Tips for Success
- Swatch first: Always knit a gauge swatch in both stockinette and the honeycomb cable pattern. This ensures your sweater will fit properly.
- Use locking markers: When placing markers for the cable panels, use locking stitch markers so they don't fall out while you're working.
- Count your stitches: After each decrease round on the yoke, count your stitches to make sure you haven't made a mistake.
- Take breaks: Cable knitting can be intense on your hands. Take regular breaks to stretch and rest.
The Ember Ridge Pullover is more than just a sweater—it's a testament to the beauty of handmade craftsmanship. With its rugged texture, warm color palette, and comfortable fit, it's destined to become a favorite in any wardrobe. Happy knitting!


