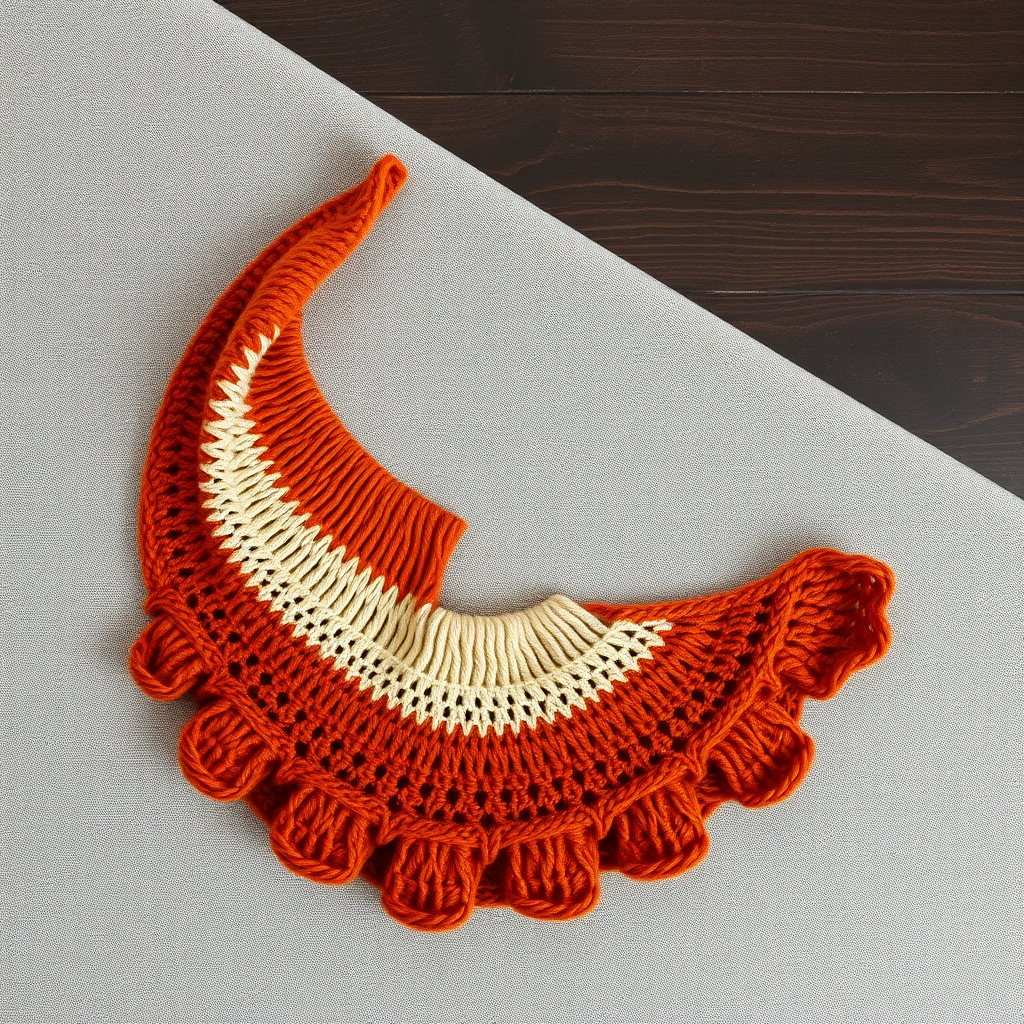
Emberfall Forest Floor Shawl Free Pattern

Wrap Yourself in Autumn: The Emberfall Forest Floor Shawl
There's a certain magic in the air when the leaves begin to turn—that golden hour when sunlight filters through the canopy and paints the forest floor in shades of amber, rust, and deep green. The Emberfall Forest Floor Shawl captures that exact moment in yarn. This crescent-shaped wrap uses a clever slipped-stitch mosaic technique to create a woven, leaf-like texture that feels both cozy and sophisticated. Best of all, it's a free pattern designed with beginners in mind, so you can create a stunning heirloom piece without the intimidation factor.
Whether you're a seasoned knitter looking for a meditative project or a newbie ready to tackle your first shawl, this pattern delivers. The mosaic technique is simpler than it looks—you're just slipping stitches and letting the colors do the talking. The result is a dense, warm fabric that drapes beautifully over your shoulders on crisp autumn evenings.
Materials Needed
Before you cast on, gather these supplies. The pattern calls for worsted weight yarn in three complementary autumn shades, which you can easily find at your local yarn shop or online.
Yarn
- Color A (Burnt Orange): 150g (approximately 300 yards)
- Color B (Deep Forest Green): 120g (approximately 240 yards)
- Color C (Golden Yellow): 80g (approximately 160 yards)
Total yarn needed: approximately 350g (700 yards) of worsted weight yarn.
Needles & Notions
- US 8 (5.0 mm) circular knitting needle, 32 inches or longer (the long cord is essential for holding all those stitches)
- Stitch markers (optional, but helpful for tracking increases)
- Tapestry needle for weaving in ends
- Blocking mats and pins (for the finishing touch)
Gauge
18 stitches and 24 rows = 4 inches in stockinette stitch, after blocking.
Gauge isn't critical for a shawl, but matching it will ensure you use the right amount of yarn and achieve the intended drape. If you're a loose or tight knitter, adjust your needle size accordingly.
Step-by-Step Instructions
This shawl is worked from the top center down, increasing on each side to form a crescent shape. The mosaic pattern is created by slipping stitches with the yarn held in front (wyf) or back (wyb) as indicated. Don't worry—it's much easier than it sounds!
Abbreviations
- K = knit
- P = purl
- Sl = slip (purlwise unless otherwise noted)
- Wyf = with yarn in front
- Wyb = with yarn in back
- Yo = yarn over
- K2tog = knit two together
- RS = right side
- WS = wrong side
Important Notes Before You Begin
- Always slip stitches purlwise (as if to purl) unless the pattern says otherwise.
- Carry the unused color loosely up the side of the work—don't cut yarn between color changes.
- When slipping stitches with wyf or wyb, keep the yarn on the correct side of the work as indicated.
Setup Section
With Color A, cast on 3 stitches.
Row 1 (RS): K1, yo, k1, yo, k1. (5 stitches)
Row 2 (WS): K2, purl to last 2 stitches, k2.
Row 3 (RS): K1, yo, knit to last stitch, yo, k1. (7 stitches)
Row 4 (WS): K2, purl to last 2 stitches, k2.
Repeat Rows 3 and 4 until you have 31 stitches, ending with a WS row. This creates the foundation of your shawl—a simple triangular shape that will grow into a crescent as you add the mosaic pattern.
Begin Mosaic Pattern
Now the fun begins! You'll alternate between Color B and Color A to create the woven leaf effect. Remember to carry the unused color up the side of your work.
Row 1 (RS, Color B): K1, yo, *sl 1 wyb, k1* repeat from * to * until 1 stitch remains, yo, k1. (33 stitches)
Row 2 (WS, Color B): K2, *sl 1 wyf, p1* repeat from * to * until 3 stitches remain, sl 1 wyf, k2.
Row 3 (RS, Color A): K1, yo, *k1, sl 1 wyb* repeat from * to * until 2 stitches remain, k1, yo, k1. (35 stitches)
Row 4 (WS, Color A): K2, purl to last 2 stitches, k2.
Row 5 (RS, Color B): K1, yo, *sl 1 wyb, k1* repeat from * to * until 1 stitch remains, yo, k1. (37 stitches)
Row 6 (WS, Color B): K2, *sl 1 wyf, p1* repeat from * to * until 3 stitches remain, sl 1 wyf, k2.
Row 7 (RS, Color A): K1, yo, knit to last stitch, yo, k1. (39 stitches)
Row 8 (WS, Color A): K2, purl to last 2 stitches, k2.
Repeat Rows 1-8, maintaining the increase pattern (yo at beginning and end of RS rows), until you have 99 stitches, ending with a WS row.
Next Section: Leaf Motif
This section introduces Color C (Golden Yellow) to create the leaf-like shapes that give the shawl its name. The k2tog, yo combination creates a subtle eyelet pattern that mimics the veins of autumn leaves.
Row 1 (RS, Color C): K1, yo, *k2tog, yo, k1* repeat from * to * until 2 stitches remain, k1, yo, k1. (101 stitches)
Row 2 (WS, Color C): K2, purl to last 2 stitches, k2.
Row 3 (RS, Color A): K1, yo, *sl 1 wyb, k1* repeat from * to * until 1 stitch remains, yo, k1. (103 stitches)
Row 4 (WS, Color A): K2, *sl 1 wyf, p1* repeat from * to * until 3 stitches remain, sl 1 wyf, k2.
Row 5 (RS, Color B): K1, yo, *k1, sl 1 wyb* repeat from * to * until 2 stitches remain, k1, yo, k1. (105 stitches)
Row 6 (WS, Color B): K2, purl to last 2 stitches, k2.
Row 7 (RS, Color A): K1, yo, knit to last stitch, yo, k1. (107 stitches)
Row 8 (WS, Color A): K2, purl to last 2 stitches, k2.
Repeat Rows 1-8 of this section until you have 155 stitches, ending with a WS row.
Final Border
Almost there! The final border uses Color C to create a delicate, slightly ruffled edge that frames your work beautifully.
Row 1 (RS, Color C): K1, yo, *k2tog, yo* repeat from * to * until 2 stitches remain, k1, yo, k1. (157 stitches)
Row 2 (WS, Color C): K2, purl to last 2 stitches, k2.
Row 3 (RS, Color C): K1, yo, knit to last stitch, yo, k1. (159 stitches)
Row 4 (WS, Color C): K2, purl to last 2 stitches, k2.
Bind off loosely knitwise on the next RS row.
Finishing Touches
Weave in all ends with your tapestry needle, being careful not to pull too tightly. Then comes the most satisfying part—blocking!
Soak your shawl in lukewarm water with a gentle wool wash for about 20 minutes. Gently squeeze out excess water (never wring!), then lay it flat on blocking mats. Pin out the points of the crescent shape, stretching it gently to open up the mosaic pattern. Allow it to dry completely—this can take 24-48 hours depending on your climate.
Once dry, unpin and marvel at your handiwork. The slipped stitches will have relaxed into a beautiful, woven texture that catches the light just like autumn leaves.
Tips for Success
- Count your stitches regularly—especially after the increase rows. It's much easier to fix a mistake early than to rip back 50 rows.
- Use stitch markers to mark the center of your work if you find it helpful for tracking your increases.
- Don't pull your slipped stitches too tightly—they should sit loosely on the needle to maintain the fabric's drape.
- Blocking is non-negotiable for this pattern. It transforms the fabric from a crumpled mess into a beautiful, drapey shawl.
The Emberfall Forest Floor Shawl is more than just a knitting project—it's a meditation on the beauty of autumn, a wearable piece of art that you'll reach for year after year. Whether you gift it to a loved one or keep it for yourself, this shawl is sure to become a treasured favorite.
Happy knitting, and may your stitches be as warm as the colors of fall!