Enchanted Forest Fern Shawl Free Knitting Pattern
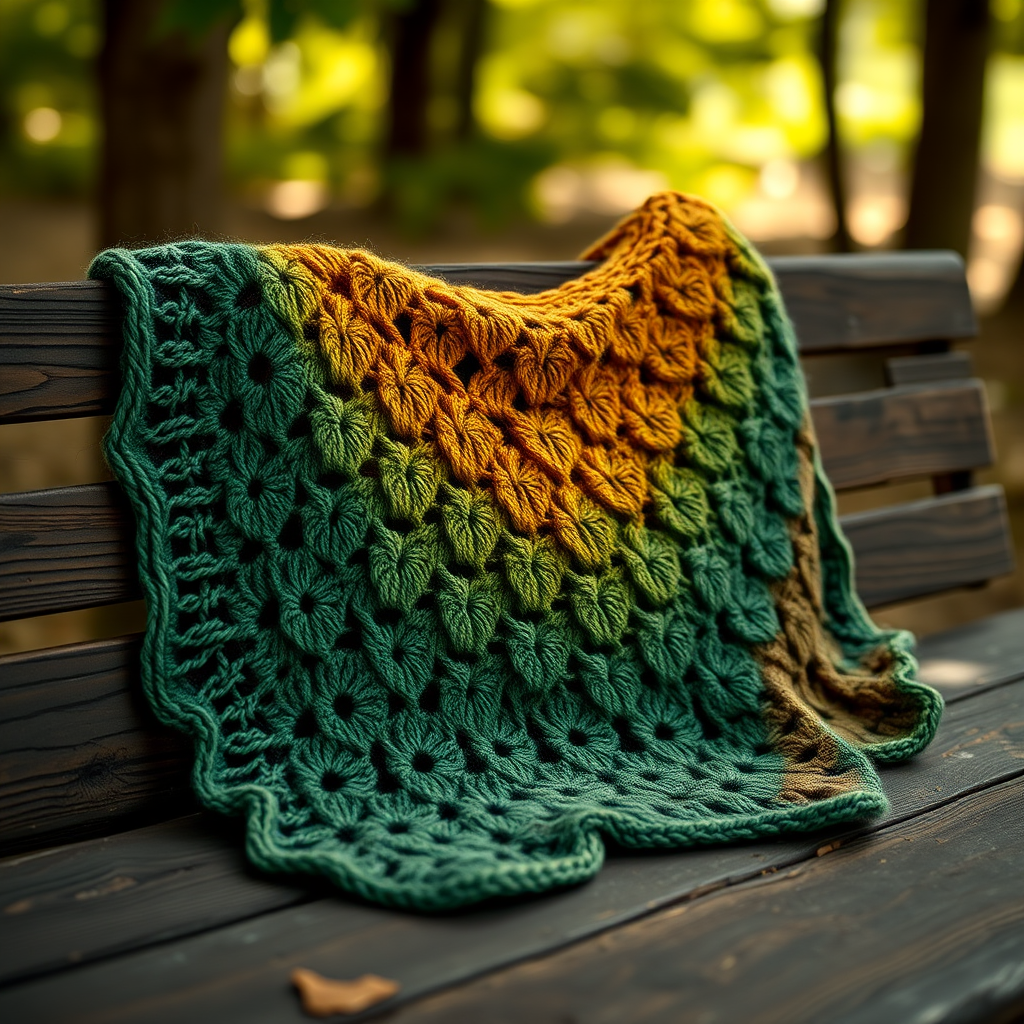
Enchanted Forest Fern Shawl: A Free Knitting Pattern for a Woodland-Inspired Lace Shawl
Wrap yourself in the dappled light of an ancient woodland with this breathtaking asymmetrical shawl. Knit in a lush gradient of mossy greens and earthy browns, the Enchanted Forest Fern Shawl captures the quiet beauty of a forest floor through a delicate leaf-and-lace pattern. This is not just a knitting project—it's an artistic journey that transforms simple yarn into a botanical masterpiece. Whether you're an experienced lace knitter or a confident beginner ready for a challenge, this pattern will guide you through creating a truly unique accessory that feels both cozy and ethereal.
The shawl's clever construction—worked from the top center down—creates a graceful asymmetrical triangle that drapes beautifully over the shoulders. The gradient color transition from deep forest green to mossy green to warm brown mimics the natural layering of a woodland landscape, making every row a delight to knit.
Materials Needed
Before you begin your woodland knitting adventure, gather these essential supplies:
Yarn
- Fingering weight yarn in 3 shades (approximately 400g total):
- Yarn A: Deep forest green (150g)
- Yarn B: Moss green (150g)
- Yarn C: Warm brown (100g)
Pro tip: Choose yarns with similar fiber content and weight to ensure a consistent drape. A merino-silk blend works beautifully for lace projects, offering both stitch definition and a soft, fluid feel.
Needles
- US 6 (4.0 mm) circular knitting needle, 32-inch or longer (the long cord is essential to accommodate the growing number of stitches)
Notions
- Stitch markers (at least 2)
- Yarn needle for weaving in ends
- Blocking mats and pins (for finishing)
- Scissors
Gauge
- 20 stitches and 28 rows = 4 inches in stockinette stitch, after blocking
Note: Gauge is important for achieving the correct size and drape. If your gauge is off, adjust your needle size accordingly. Remember that lace patterns stretch significantly when blocked, so always measure after blocking.
Step-by-Step Instructions
This shawl is worked from the top center down, increasing at the edges and center to create an asymmetrical triangle shape. The pattern combines garter stitch, stockinette, and a simple leaf lace motif. Follow along carefully, and you'll be amazed at how the forest comes to life in your hands.
Abbreviations
- k = knit
- p = purl
- yo = yarn over
- k2tog = knit two together (right-leaning decrease)
- ssk = slip, slip, knit (left-leaning decrease)
- pm = place marker
- sm = slip marker
- RS = right side
- WS = wrong side
Setup Section
Cast on: With yarn A, cast on 3 stitches.
Row 1 (RS): k1, yo, k1, yo, k1 (5 stitches)
Row 2 (WS): k2, p1, k2
Row 3 (RS): k1, yo, k1, yo, pm, k1, yo, k1, yo, k1 (9 stitches)
Row 4 (WS): k2, p to last 2 stitches, k2
Tip: The center stitch (between the markers) will become the spine of your shawl. The garter stitch edges (first and last 2 stitches) create a neat, non-curling border.
Increase Section (Work with Yarn A)
Row 5 (RS): k1, yo, k to marker, yo, sm, k1, yo, k to last stitch, yo, k1 (4 increases)
Row 6 (WS): k2, p to last 2 stitches, k2
Repeat Rows 5-6 until you have 45 stitches on the needle, ending with a WS row.
Understanding the increases: Each RS row adds 4 stitches—one at each edge and one on each side of the center marker. This creates the asymmetrical triangular shape. The WS rows are simple purl rows with garter stitch edges to maintain the border.
Leaf Lace Section (Switch to Yarn B)
Now the magic begins! Switch to yarn B and work the leaf lace pattern. The repeat is 8 rows, and you'll work it until the shawl measures approximately 20 inches from the cast-on edge.
Row 1 (RS): k1, yo, k2, (yo, ssk, k3, k2tog, yo, k1) repeat to marker, yo, sm, k1, yo, k2, (yo, ssk, k3, k2tog, yo, k1) repeat to last 3 stitches, yo, k2, yo, k1
Row 2 (WS): k2, p to last 2 stitches, k2
Row 3 (RS): k1, yo, k3, (yo, ssk, k1, k2tog, yo, k3) repeat to marker, yo, sm, k1, yo, k3, (yo, ssk, k1, k2tog, yo, k3) repeat to last 4 stitches, yo, k3, yo, k1
Row 4 (WS): k2, p to last 2 stitches, k2
Row 5 (RS): k1, yo, k4, (yo, ssk, yo, k1, yo, k2tog, yo, k4) repeat to marker, yo, sm, k1, yo, k4, (yo, ssk, yo, k1, yo, k2tog, yo, k4) repeat to last 5 stitches, yo, k4, yo, k1
Row 6 (WS): k2, p to last 2 stitches, k2
Row 7 (RS): k1, yo, k5, (yo, ssk, k3, k2tog, yo, k5) repeat to marker, yo, sm, k1, yo, k5, (yo, ssk, k3, k2tog, yo, k5) repeat to last 6 stitches, yo, k5, yo, k1
Row 8 (WS): k2, p to last 2 stitches, k2
Repeat Rows 1-8 until the shawl measures approximately 20 inches from the cast-on edge, ending with a WS row. Then switch to yarn C for the final section.
Reading the lace pattern: The repeated section in parentheses creates the leaf shapes. The yarn overs (yo) paired with decreases (ssk and k2tog) form the eyelet holes and leaf veins. Don't worry if it looks a bit chaotic at first—the pattern will emerge beautifully once blocked.
Final Border (with Yarn C)
Switch to yarn C for a warm, earthy finish.
Row 1 (RS): k1, yo, k to marker, yo, sm, k1, yo, k to last stitch, yo, k1 (4 increases)
Row 2 (WS): k2, p to last 2 stitches, k2
Repeat Rows 1-2 until the shawl measures 24 inches from the cast-on edge, ending with a WS row.
Bind Off (RS)
This decorative bind-off creates a stretchy, picot-like edge that complements the organic feel of the shawl:
k2, *slip both stitches back to left needle, k2tog through back loop, k1, repeat from * until 1 stitch remains. Cut yarn and pull through.
Step-by-step bind-off breakdown:
- Knit 2 stitches.
- Slip both stitches back to the left needle (they'll be twisted).
- Knit those 2 stitches together through the back loop.
- Knit 1 more stitch.
- Repeat steps 2-4 until only 1 stitch remains.
- Cut the yarn, leaving a 6-inch tail, and pull through the last loop.
Finishing
Weave in all ends carefully with a yarn needle, following the path of the yarn to keep the wrong side neat.
Block the shawl gently: This is the most magical step! Soak the shawl in lukewarm water with a drop of wool wash for 20-30 minutes. Gently squeeze out excess water (never wring or twist). Lay the shawl on blocking mats and pin out the points of the leaves to open up the lace pattern. Stretch it to the desired dimensions—the lace will open up dramatically. Allow to dry completely before unpinning.
Blocking tip: Use rust-proof pins and pin every leaf point and scallop edge. This is what transforms your knitting from a crumpled mass into a breathtaking lace shawl. The gradient colors will blend seamlessly, creating that natural, woodland-inspired look.
Wearing and Caring for Your Shawl
This shawl is designed to be draped over the shoulders, with the asymmetrical shape allowing for multiple styling options. The fingering weight yarn makes it perfect for transitional weather—light enough for a cool summer evening, yet cozy enough for a crisp autumn day.
To care for your hand-knit treasure, hand wash in cold water with a gentle wool wash and lay flat to dry. Store it folded in a drawer or on a hanger with padded shoulders to maintain its shape.
As you knit this shawl, imagine the forest floor—the ferns unfurling, the moss creeping over stones, the warm earth beneath your feet. Each stitch brings you closer to that tranquil woodland scene, and when you wear it, you carry a piece of that peace with you.
Happy knitting, and may your needles always find their rhythm!



