Meadow Breeze Linen Stitch Vest Free Knitting Pattern
Meadow Breeze Linen Stitch Vest: A Free Knitting Pattern for Beginners
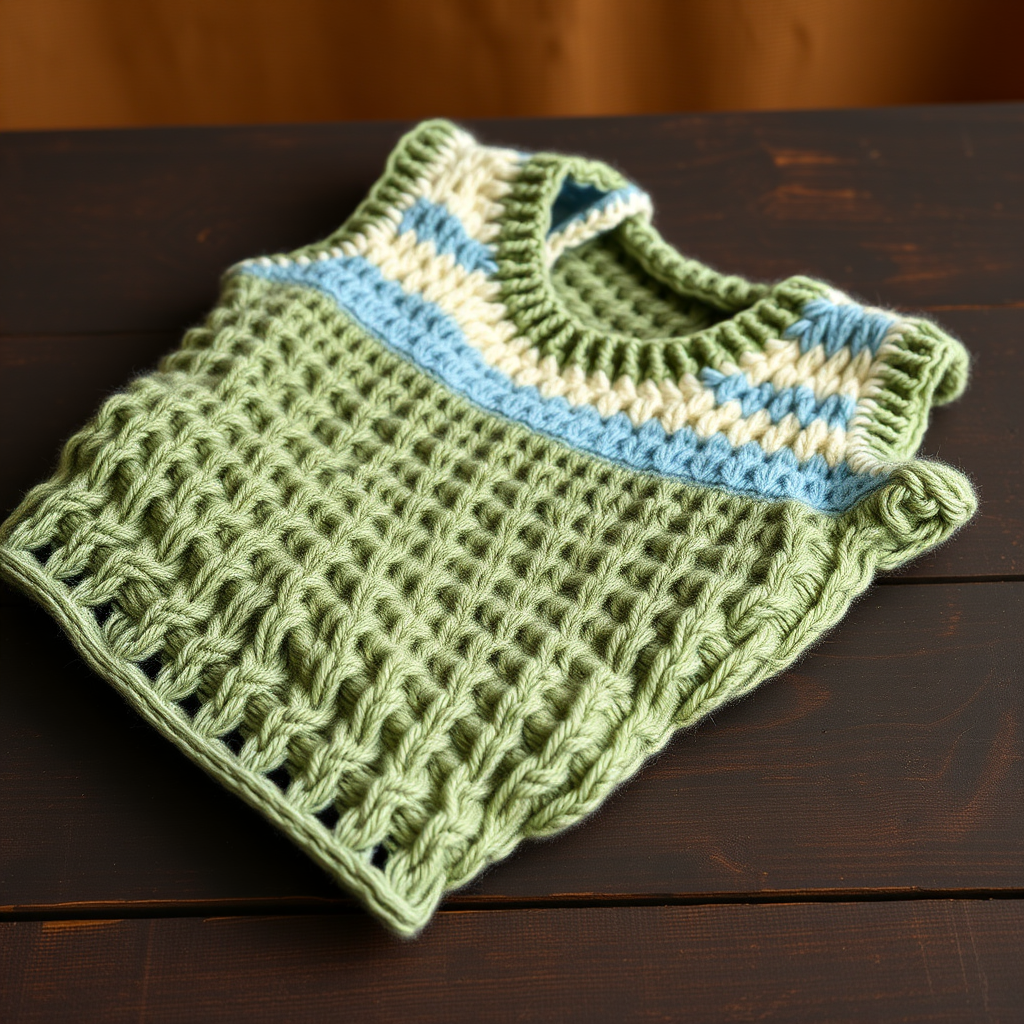
Welcome to a world of breezy elegance and artisanal charm! Today, I'm thrilled to share a pattern that has captured my heart—the Meadow Breeze Linen Stitch Vest. This isn't just any vest; it's a lightweight, open-sided layer that feels like a gentle summer breeze against your skin. Knitted with a delicate linen stitch and a soft gradient of sage, cream, and sky blue, this piece is perfect for cool summer evenings, adding a touch of handcrafted sophistication to any outfit.
Whether you're a seasoned knitter looking for a quick, satisfying project or a beginner eager to expand your skills, this pattern is designed with you in mind. The linen stitch creates a dense, woven-like texture that drapes beautifully, and the simple construction means you'll have a stunning, wearable piece in no time. Let's dive into this delightful project together!
Materials Needed
Before we begin our knitting journey, let's gather all the necessary supplies. Having everything ready will make the process smooth and enjoyable.
- Yarn: Worsted weight cotton or cotton-blend yarn (approx. 600-700 yards total). You'll need three colors:
- Color A (Sage Green): Approx. 200-250 yards
- Color B (Cream): Approx. 250-300 yards
- Color C (Sky Blue): Approx. 150-200 yards
- Needles: US 7 (4.5 mm) knitting needles. You can use straight needles, or a circular needle (24" or longer) for larger sizes to accommodate the stitches comfortably.
- Stitch Markers: At least 2 markers to help track your sections.
- Tapestry Needle: For weaving in ends and seaming.
- Stitch Holders or Waste Yarn: To hold stitches while you work on the neckline.
Gauge: 20 stitches and 28 rows = 4 inches in linen stitch (after blocking). It's crucial to check your gauge to ensure the vest fits as intended. If your gauge is off, adjust your needle size accordingly.
Understanding the Linen Stitch
The linen stitch is a beautiful, textured pattern that mimics the look of woven linen fabric. It's surprisingly simple once you get the hang of it, and it creates a dense, stable fabric with a lovely drape. Here's the magic formula:
Stitch Pattern (Linen Stitch):
- Row 1 (Right Side): *K1, sl1 wyif* repeat from * to end of row.
- Row 2 (Wrong Side): *P1, sl1 wyib* repeat from * to end of row.
Repeat these two rows for the pattern. The key is to always slip the stitch with the yarn on the opposite side of the work, which creates that lovely woven effect. Take a moment to practice this on a swatch—it's meditative and rewarding!
Step-by-Step Instructions
This vest is worked flat in two panels (front and back) and then seamed together at the shoulders and sides, leaving openings for the armholes. The construction is straightforward, making it an excellent project for building confidence. Let's get started!
Back Panel
Step 1: Cast On
With Color A (Sage Green), cast on 90 stitches. Ensure your cast-on is not too tight, as the linen stitch has a tendency to pull in slightly.
Step 2: Bottom Band
Work in the linen stitch pattern for 2 inches. This will form the beautiful sage green base of your vest.
Step 3: First Color Transition
Switch to Color B (Cream) and continue in the linen stitch for 4 inches. Remember to change colors at the beginning of a right-side row for a clean, seamless transition.
Step 4: Second Color Transition
Switch to Color C (Sky Blue) and continue in the linen stitch for 4 inches. The sky blue will bring a fresh, airy feel to the middle of the vest.
Step 5: Third Color Transition
Switch back to Color B (Cream) and work for 4 inches. This will create a beautiful mirror effect as we approach the top.
Step 6: Final Color Section
Switch to Color A (Sage Green) and work for 2 inches. This completes the gradient, bringing the sage green back to the shoulders.
Step 7: Bind Off
Bind off all stitches loosely. You want the bind-off edge to be flexible so it doesn't pull the shoulders. Set the back panel aside.
Front Panel
Step 1: Cast On and Work
With Color A, cast on 90 stitches and work exactly as the back panel until the piece measures 12 inches from the cast-on edge. This is where we'll begin shaping the neckline.
Step 2: Begin Neckline Shaping (Right Side)
Now we'll work on the right side of the neckline. Work across the first 35 stitches in pattern. Place the remaining 55 stitches onto a stitch holder or waste yarn. Turn your work and continue on these 35 stitches only.
Step 3: Shape the Neckline
Decrease 1 stitch at the neck edge (the edge closest to the center) every other row, 5 times. You'll have 30 stitches remaining. To decrease, you can K2tog on the right side or P2tog on the wrong side, depending on which row you're on. This creates a gentle curve for the crew neckline.
Step 4: Continue Straight
Continue working in the linen stitch pattern without further decreases until the front panel matches the length of the back panel. Bind off loosely.
Step 5: Work Left Side of Neckline
Return to the held stitches. Place the center 20 stitches on a holder (these will form the back of the neckline). You should have 35 stitches remaining on the left side. Rejoin your yarn and work these 35 stitches to match the first side, decreasing 1 stitch at the neck edge every other row 5 times. You'll have 30 stitches. Continue straight until the panel matches the back panel length, then bind off.
Finishing Touches
Step 1: Seam the Shoulders
With your tapestry needle and matching yarn, sew the shoulder seams. The top 10 stitches on each side should be seamed together, leaving the center stitches open for the neckline.
Step 2: Seam the Sides
Sew the side seams from the bottom up to 8 inches from the shoulder seam. This leaves an 8-inch opening for the armholes. Make sure your seams are neat and secure.
Step 3: Weave in Ends
Weave in all loose ends carefully with your tapestry needle. This is a crucial step for a professional finish—take your time and hide those ends well within the fabric.
Step 4: Block to Shape
Block the vest gently to shape. Since this is a cotton blend, you can wet block it. Soak the vest in lukewarm water with a gentle wool wash, then gently squeeze out excess water (never wring!). Lay it flat on a towel, shape it to the correct dimensions, and let it dry completely. Blocking will even out the stitches and enhance the beautiful drape of the linen stitch.
Optional Edging
For a polished, finished look, you can add a simple edging around the armholes and neckline. With Color A, pick up stitches evenly around the armhole and neckline openings. Work 3 rows of garter stitch (knit every row), then bind off. This adds a subtle, clean frame to your vest and helps it lay flat.
Final Thoughts
And there you have it—your very own Meadow Breeze Linen Stitch Vest! This project is a joy to knit, and the result is a stunning, versatile piece that you'll reach for again and again. The gradient colors create a unique, artisanal look that's sure to turn heads.
I hope you've enjoyed this pattern as much as I've enjoyed sharing it. Remember, knitting is a journey, and every stitch brings you closer to a beautiful creation. Don't hesitate to reach out with questions, and be sure to share your finished vest with our community—I'd love to see your beautiful work!
Happy knitting, and may your days be filled with breezy meadow vibes and creative joy!