Moonpetal Thread Bracelet Free Pattern
Introduction
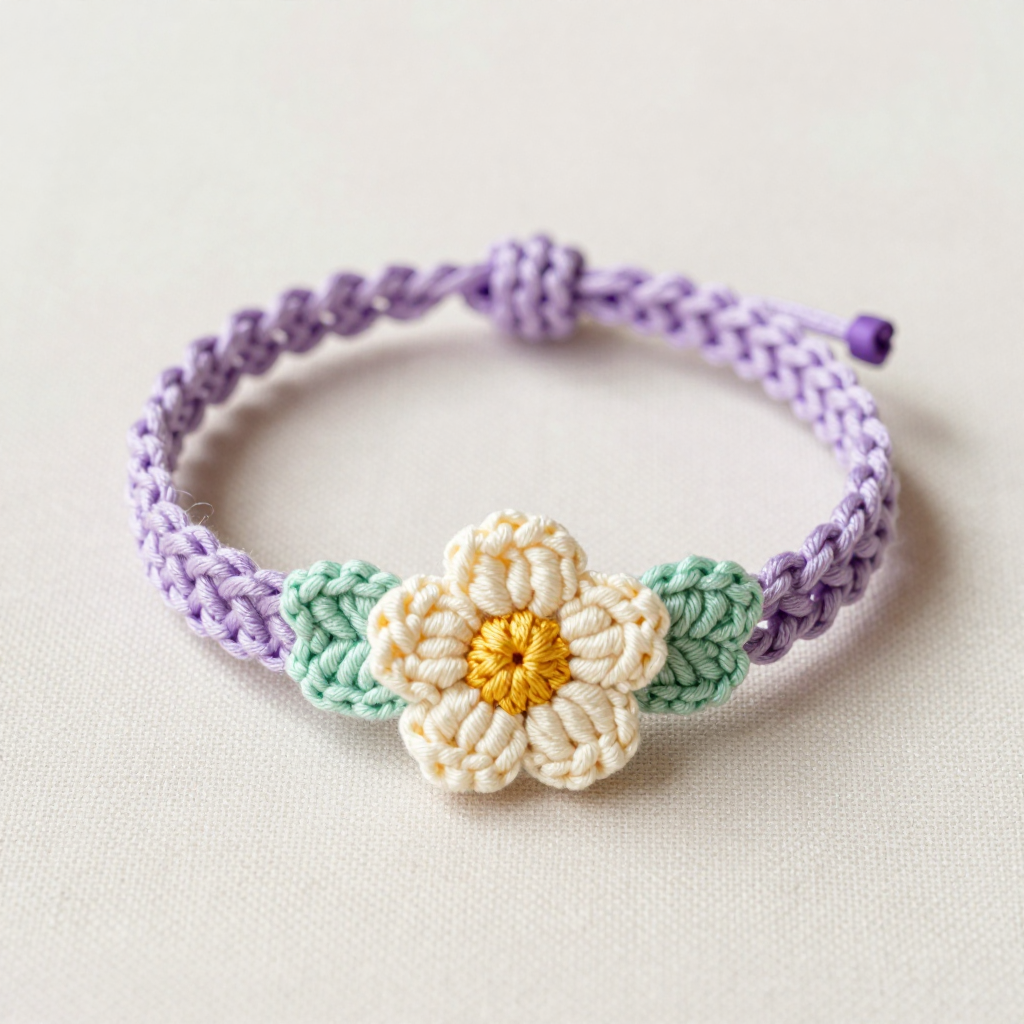
Welcome! If you have never held a crochet hook before, you are in exactly the right place. This Moonpetal Thread Bracelet is one of the friendliest first projects you can make: it uses only a handful of basic stitches, it is small enough to finish in an evening, and the finished bracelet is a delicate little treasure — a tiny five-petal cream flower with a golden center, two mint-green leaves peeking out behind it, and a slim lavender cord band that ties with adjustable sliding knots. It looks like something from a boutique, but it is made from just a few yards of cotton thread. It is perfect for absolute beginners, for gifting to a friend, or for making a whole stack in different colors. Let's make one together, one stitch at a time.
Materials Needed
- Yarn (thread): Size 10 cotton crochet thread (also called bedspread weight). You will need approximately 12 yards of lavender (main band color), 3 yards of pale cream (petals), 1 yard of golden yellow (flower center), and 2 yards of mint green (leaves). Total: about 15–20 yards. One small ball of size 10 thread is far more than you need.
- Hook: 1.3 mm steel crochet hook (US size 10). Steel hooks are the short metal ones used with fine thread — they are labeled differently from the larger aluminum hooks used with yarn.
- Stitch markers: 2–3 small markers (you can also use a contrasting scrap of thread or a small safety pin). These help you keep track of where each round begins.
- Tapestry needle: A blunt-tipped needle with a large eye, small enough to pass through the crochet fabric. Used for sewing pieces together and weaving in ends.
- Scissors: Small, sharp embroidery scissors work best for snipping fine thread.
- Finished size: The flower motif measures approximately 0.75 inch (2 cm) across after blocking. The band is approximately 6 inches (15 cm) long before the adjustable ties, and the sliding knots let it fit wrists of roughly 5.5–7.5 inches (14–19 cm).
Abbreviations and Beginner Glossary
Every abbreviation used in this pattern is listed here. Read through it once before you begin — you do not need to memorize anything, just come back to this list whenever you need it.
- ch – chain. Make a loop of thread over the hook and pull it through the loop already on your hook. Each one you make looks like a tiny "V" or braid link. Chains are the foundation you build on.
- sl st – slip stitch. Insert your hook into the stitch, wrap the thread over the hook (this is called a "yarn over," even though you are using thread), and pull it through both the stitch and the loop on your hook in one motion. It makes an almost invisible joining stitch.
- sc – single crochet. Insert hook into the stitch, yarn over, pull up a loop (you now have 2 loops on the hook), yarn over again, pull through both loops. One single crochet made.
- hdc – half double crochet. Yarn over first, insert hook into the stitch, yarn over, pull up a loop (3 loops on hook), yarn over, pull through all 3 loops at once.
- dc – double crochet. Yarn over, insert hook into the stitch, yarn over, pull up a loop (3 loops on hook), yarn over, pull through 2 loops, yarn over, pull through the last 2 loops.
- tr – treble crochet. Yarn over twice, insert hook into the stitch, yarn over, pull up a loop (4 loops on hook), then yarn over and pull through 2 loops, three times in a row, until one loop remains.
- sc2tog – single crochet two stitches together (a decrease). Insert hook into the first stitch, yarn over, pull up a loop; insert hook into the next stitch, yarn over, pull up a loop (3 loops on hook); yarn over and pull through all 3 loops. Two stitches have become one.
- st / sts – stitch / stitches. One completed stitch, or several of them.
- sp – space. The little gap formed under a chain (for example, a "ch-3 sp" is the hole beneath three chains).
- ch-3 sp – chain-3 space. The opening created by a group of three chains in the previous round.
- magic ring – an adjustable loop of thread that you crochet into, then pull closed so no hole remains in the center. To make one: wrap the thread twice around two fingers, slide the ring off, hold it between thumb and finger, and work your stitches into the ring itself (not into a chain). After the first round, pull the short tail firmly to close the hole.
- join with sl st – finish a round by making a slip stitch into the first stitch of that round, so the round closes into a circle.
- fasten off – cut the thread a few inches from your work, then pull the tail all the way through the last loop on your hook to lock it. This is how you end a piece.
- turn – flip your work over so you can work back along the row you just made.
- lark's head knot – fold a length of thread in half, push the folded loop through a stitch, then pull the two loose ends through that loop and tighten. It attaches a strand of thread to your work.
- blocking – dampening a finished piece and pinning or shaping it flat so it dries in its final, neat shape.
Gauge
Gauge is not critical for this project. The flower motif measures approximately 0.75 inch (2 cm) across after blocking. Because the bracelet closes with adjustable sliding knots, small differences in your tension will not affect the fit.
Why does gauge usually matter? Gauge is how many stitches and rows you get in a set measurement (for example, "14 stitches and 20 rows = 4 inches"). If your gauge is looser or tighter than the designer's, your finished item will come out bigger or smaller than expected. That matters a lot for a sweater; it matters very little for a tiny flower.
How to check gauge anyway (a good habit to learn): Crochet the flower motif exactly as written. Lay it flat and measure across the widest point of the petals with a ruler. If it is close to 0.75 inch (2 cm), you are right on track. If it is much larger, try pulling your thread a little more firmly; if much smaller, relax your grip. Do not worry about being exact — this is practice, not a test.
Beginner Tips Before You Start
- Use a stitch marker to mark the first stitch of every round. In the round flower, it is very easy to lose track of where a round began. Place a marker in the very first stitch you make in Round 1, and move it up each round.
- Do not pull the thread too tight. Fine thread tempts you to grip hard. Hold the thread with gentle, even tension — tight enough that the hook does not slip out, loose enough that the hook slides easily through each loop. Tight stitches are very hard to work into on the next round.
- Work the magic ring loosely at first. If your stitches into the ring are tight, you will not be able to pull the center closed. Keep them relaxed, then pull the tail firmly at the end of Round 1.
- Count out loud (or in a whisper). Every round in this pattern ends with a stitch count in parentheses, like (10 sc). Count your stitches at the end of each round and compare. Catching a mistake immediately is far easier than finding it three rounds later.
- Keep your starting and ending tails at least 4–6 inches long. Short tails are impossible to thread onto a needle. Long tails give you plenty to weave in securely.
- Good light is your best tool. Size 10 thread is fine and dark colors are hard to see. Sit near a window or a bright lamp, and take breaks if your eyes get tired.
Step-by-Step Instructions
Important note before you begin: All rounds of the flower are worked in the round without turning — you always work in the same direction, spiraling around, and join each round with a slip stitch. The bracelet band is worked flat in rows (turning at the end of each row) as a narrow cord, and is joined to the flower at the end.
Part 1: Flower Motif (make 1)
Work with the golden yellow thread first, then change to cream.
Setup: With golden yellow thread, make a magic ring (see glossary above).
Round 1: Ch 1 (this chain does not count as a stitch — it just lifts your thread up to the right height). Work 5 sc into the ring. Join with a sl st to the first sc. (5 sc) Now pull the short ring tail gently but firmly to close the center hole completely.
Round 2: Change to cream thread (cut the yellow, leaving a 4-inch tail, and simply begin working with cream — you will weave both tails in later). Ch 1. Work 2 sc in each stitch around — that means two single crochets into every one of the 5 stitches. Join with a sl st to the first sc. (10 sc)
Round 3 (petal spaces): *Ch 3, skip the next stitch, sl st in the next stitch; repeat from * around, ending with a sl st in the base of the first ch-3 (the same spot where your first chain began). (5 ch-3 spaces) You have now made five little loops — each loop will become one petal.
Round 4 (petals): Sl st into the first ch-3 space so your hook is sitting inside the loop. Then, into that same ch-3 space, work: sc, hdc, dc, tr, dc, hdc, sc — all seven stitches into the one loop. This makes one rounded petal. Now work the same group of seven stitches (sc, hdc, dc, tr, dc, hdc, sc) into each of the remaining four ch-3 spaces. Join with a sl st to the first sc of the round. (5 petals, 35 sts total)
Fasten off the cream thread, leaving a 4-inch tail. Weave in the ends later (see Assembly).
Part 2: Leaves (make 2)
Work with the mint green thread. Each leaf is worked in one row, first along one side of a foundation chain and then back along the other side — this makes a small pointed oval.
Setup: Ch 5. (5 ch)
Row 1, first side: Sc in the 2nd ch from the hook, hdc in the next ch, dc in the next ch, tr in the last ch. (4 sts worked) Do not turn.
Row 1, second side: Now work along the opposite side of the same foundation chain (the unused loops on the underside). Work tr in the first ch (the very first chain you made), dc in the next ch, hdc in the next ch, sc in the last ch. Join with a sl st to the first sc of the row. (8 sts total around the leaf)
Fasten off, leaving a 4-inch tail for sewing. Make a second leaf the same way.
Part 3: Bracelet Band
Work with the lavender thread. Leave a 6-inch starting tail before you make your first chain — you will need it later.
Setup: Ch 2. (2 ch)
Row 1: Sc in the 2nd ch from the hook. (1 sc)
Row 2: Ch 1, turn. Work 2 sc in the same stitch (the one right below your chain). (2 sc)
Row 3: Ch 1, turn. Sc in each stitch across. (2 sc)
Rows 4–40 (or until length): Repeat Row 3 — that is, ch 1, turn, sc in each of the 2 stitches across — until the band measures approximately 6 inches (15 cm) long, or about 1 inch shorter than your wrist circumference. (2 sc in every row) Do not fasten off. Count your rows as you go so you can make a matching second bracelet later if you like.
Final row (taper the end): Ch 1, turn. Sc2tog over the 2 stitches. (1 sc) Fasten off, leaving a 6-inch tail.
Taper the beginning end: Thread your tapestry needle with the 6-inch starting tail. Run the needle through the starting chain and pull gently to draw the first row into a point, then secure with a small knot. (Alternatively, join a short length of lavender thread to the starting chain and work one sc2tog across it, then fasten off.) Weave in the short ends.
Part 4: Adjustable Closure
Cut two 10-inch lengths of lavender thread.
Step 1: Fold the first length in half. Push the folded loop through the end stitch at one tapered end of the band, then pull the two loose ends through that loop and tighten — this is a lark's head knot. (2 loose strands at one end)
Step 2: Repeat at the other tapered end with the second length. (2 loose strands at the other end)
Step 3: Lay the bracelet around your wrist (or a friend's) and bring the four loose strands together. Tie them in a simple square knot: right strand over left, then left strand over right. Slide the knot along the strands to adjust the fit, then trim the tails to about 1 inch so they do not fray too far.
Assembly and Finishing
1. Block the pieces first. Lightly mist the flower and both leaves with water (a clean spray bottle is ideal) and pin them flat on a towel or blocking mat, shaping the petals with your fingers so each one is rounded and even. Let them dry completely — usually a few hours. Blocking is what makes the petals lie flat and look crisp.
2. Sew on the leaves. Thread a tapestry needle with one mint green tail. Hold a leaf behind the flower so it peeks out at roughly the 4 o'clock position (lower right). Sew through the base of the leaf and the back of the flower several times, catching only the back of the flower so the front stays neat. Repeat with the second leaf at roughly the 8 o'clock position (lower left). Secure each with a small knot and trim.
3. Attach the flower to the band. Center the flower on the bracelet band. Thread your needle with lavender thread and sew the flower to the band, again catching only the back loops of the flower stitches — this keeps the petals raised and three-dimensional instead of squashed flat. Sew around the center of the flower two or three times for security.
4. Weave in all ends. Thread each remaining tail onto the tapestry needle. Run the needle back and forth through the back of the work for about half an inch, changing direction once, then trim close to the fabric. Never knot and cut right at the surface — the change of direction is what keeps ends from working loose.
5. Final block and care. Mist the finished bracelet lightly once more, shape the petals, and let it dry flat. To clean: hand wash gently in cool water with a drop of mild soap, rinse, press in a towel, and lay flat to dry. Do not wring or tumble dry.
Pro Tips and Variations
- Change the colors. Make the petals any color you like — soft pink, sky blue, or white — and swap the center for a deep orange or chocolate brown. For a bolder look, work the band in a contrasting color to the flower. Keep a notebook of your color combinations so you can repeat favorites.
- Adjust the size. The band length is the only thing that changes the fit. Measure your wrist, subtract 1 inch, and work rows until the band reaches that length before the final decrease row. The sliding knots give you about 2 inches of adjustment either way, so a single pattern can fit most wrists.
- Substitute the thread. Size 10 cotton thread is the standard, but size 20 or 30 thread will make an even finer, more delicate bracelet — just use a smaller steel hook (1.1 mm or 1.0 mm) and expect the flower to come out smaller. Sport-weight cotton yarn with a 3.5 mm (US E-4) hook makes a chunkier, faster version that is lovely as a summer anklet.
- Make a matching set. Work two flowers and join them with a short length of chained thread to make a necklace, or attach a flower to a purchased hair elastic or a plain metal ring for an instant gift. The flower motif alone takes only about 15 minutes once you have practiced it.