Prairie Squiggle Fisherman Beret Free Pattern: Mohair Silk Knit with Squiggle Appliqués
Prairie Squiggle Fisherman Beret: A Free Beginner-Friendly Knitting Pattern
Introduction
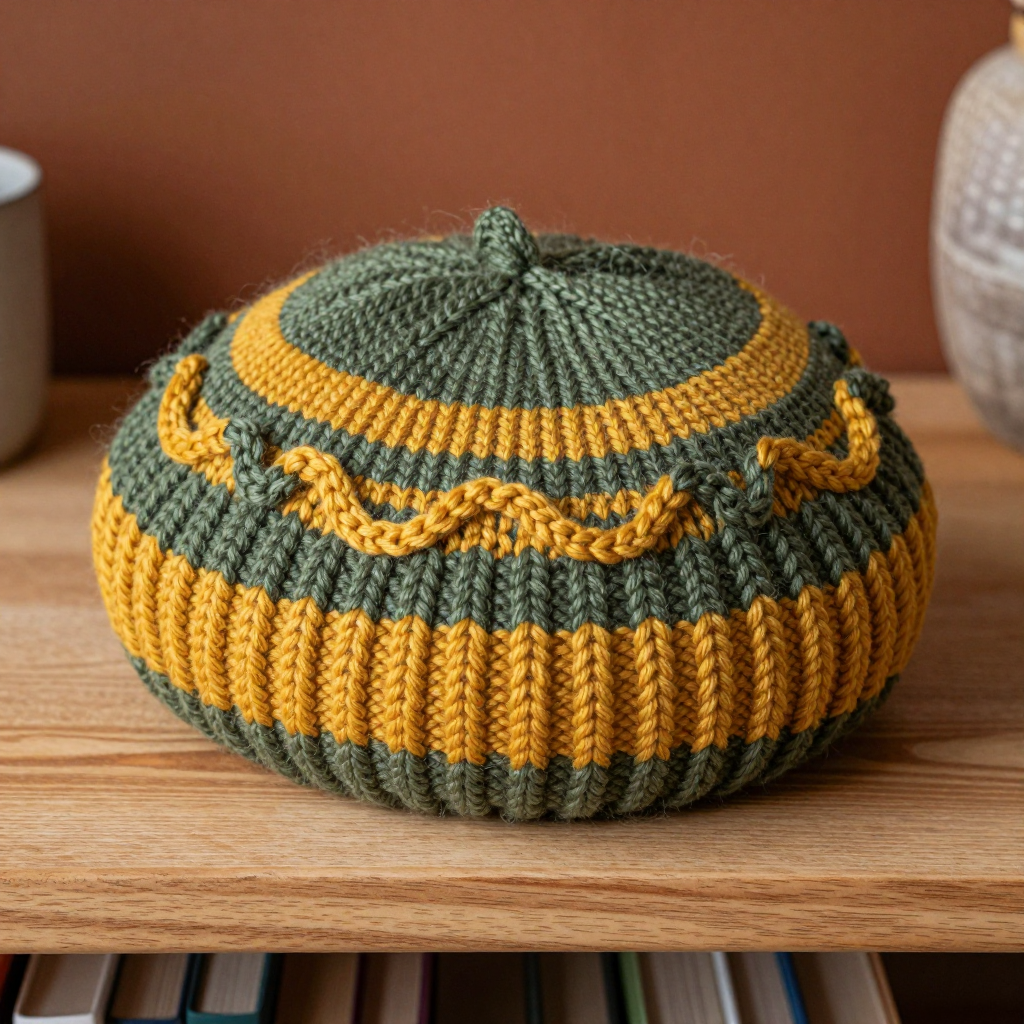
If you have ever looked at a soft, fuzzy beret in a shop window and thought, "I could never make that," this pattern is for you. The Prairie Squiggle Fisherman Beret is a flat, circular hat knit in deep, squishy fisherman rib and striped in warm olive and ochre mohair silk, then topped with a smooth stockinette crown and finished with two tiny knitted squiggle appliqués for a Western-inspired, abstract touch. It is perfect for a confident first-time hat knitter who knows how to knit and purl and wants to learn a few new skills in a forgiving, low-pressure project. The finished beret is soft as a cloud, gently fuzzy from the mohair halo, and stretchy enough to fit most adult heads comfortably. Best of all, it looks far more complicated than it actually is, so you get to wear something that feels handmade and special without needing years of experience.
Materials Needed
- Yarn: Lace-weight mohair silk blend (approximately 70% mohair, 30% silk; about 420 m / 50 g per skein), held double throughout (two strands worked together as if they were one). Color A (olive): approximately 35 g (2 skeins). Color B (ochre): approximately 25 g (1–2 skeins).
- Needles for the band: US 4 (3.5 mm) 16" (40 cm) circular needle.
- Needles for the body: US 6 (4.0 mm) 16" (40 cm) circular needle.
- Needles for the crown: a set of 4 double-pointed needles (DPNs) in US 6 (4.0 mm). These are short needles with points at both ends, used when the hat becomes too small to fit around a circular needle.
- Stitch markers: at least 1, to mark the beginning of the round.
- Row counter: optional but very helpful for keeping track of rounds.
- Tapestry needle: a large, blunt-tipped sewing needle with an eye big enough for yarn, used for weaving in ends and sewing on appliqués.
- Scissors for cutting yarn.
- Finished size: One size fits most adults, 21–23" (53–58 cm) head circumference. The finished beret measures approximately 11" (28 cm) flat diameter across the widest point, 8" (20 cm) diameter at the band, and 3" (7.5 cm) deep at the band.
Abbreviations and Beginner Glossary
- st / sts – stitch / stitches. One stitch is one loop on your needle.
- k – knit. Insert the right needle into the front of the stitch from left to right, wrap the yarn around, and pull it through to make a new stitch.
- p – purl. Insert the right needle into the front of the stitch from right to left, wrap the yarn around, and pull it through.
- k1, p1 rib – a pattern of alternating one knit stitch and one purl stitch, which makes a stretchy, textured fabric.
- kfb (knit into the front and back) – an increase. Knit into the front of the stitch as normal but do not slip it off; then knit into the back of the same stitch, then slip it off. This turns one stitch into two.
- k2tog (knit two together) – a decrease. Insert the right needle into the next two stitches at once and knit them together as one. This turns two stitches into one.
- fisherman rib – a deep, squishy rib pattern where you knit into the stitch one row below the next stitch (explained fully in the instructions). It creates thick horizontal ridges.
- stockinette stitch – when knitting in the round, simply knit every round. The fabric is smooth on the outside.
- round – one complete pass around the circular needle, from the beginning marker back to the marker.
- cast on – the very first step, creating the starting loops on your needle.
- bind off – the final step that locks the stitches so they cannot unravel.
- long-tail cast on – a common, stretchy cast-on method where you make a slip knot and use two strands (one from the ball, one a long tail) to create the stitches.
- whipstitch – a simple sewing stitch where you pass the needle over the edge of the fabric and back through, making small diagonal stitches that hold a piece in place.
- blocking – gently wetting and shaping the finished knit so it holds its final size and shape.
Gauge
Fisherman rib on US 6 (4.0 mm) with yarn held double: 18 sts and 24 rows = 4" (10 cm) after gentle blocking.
Stockinette on US 6 (4.0 mm) with yarn held double: 20 sts and 28 rows = 4" (10 cm).
Why gauge matters: Gauge is how many stitches and rows fit into a 4" square of your knitting. If your stitches are bigger than the pattern expects, your beret will come out too large; if they are smaller, it will be too tight. How to make a gauge swatch: Using your US 6 needles and two strands held together, cast on about 26 stitches. Work in fisherman rib for about 4" (10 cm), then bind off. Lay the swatch flat, gently pat it into shape, and measure across the middle: count how many stitches fit in 4" (10 cm). If you have more than 18 stitches, go up a needle size; if you have fewer, go down a needle size. Repeat until your gauge matches.
Beginner Tips Before You Start
- Hold two strands together at all times. Treat the two strands as one single yarn. If you lose track, check that both strands always travel together to the needle.
- Use a stitch marker to track the beginning of the round. Slip it from the left needle to the right needle each time you reach it. This tells you exactly where each round starts and stops.
- Do not pull the yarn too tight. Mohair silk is delicate and fuzzy; tight tension makes the fabric stiff and hard to work. Keep your stitches relaxed and even.
- Change colors at the beginning of a round. Simply drop Color A, pick up Color B, and start knitting. Do not carry the unused color up the side; leave a tail to weave in later.
- Fisherman rib pulls in a lot. The beret will look small and narrow while you knit it. Trust the pattern: it relaxes and opens up after blocking.
- Count your stitches after every increase or decrease round. The stitch counts in parentheses tell you exactly how many stitches you should have.
Step-by-Step Instructions
Yarn Prep
Hold two strands of the same color together throughout. Do not carry colors up the side; change colors at the beginning of a round and weave in the ends later.
Stitch Guide: Fisherman Rib
Worked in the round on an even number of stitches.
Round 1 (setup): *K1, p1; repeat from * to end.
Round 2: *K1, then knit into the stitch one row below the next purl stitch (insert the right needle into the purl bump below, knit it, slip the old stitch off); repeat from * to end.
Round 3: *Knit into the stitch one row below the next knit stitch, slip the old stitch off, p1; repeat from * to end.
Repeat Rounds 2–3 for fisherman rib. The fabric is deep, squishy, and elastic, and it pulls in significantly, which is why the beret is worked with more stitches than a plain stockinette hat.
Band (Color A, olive)
With the US 4 (3.5 mm) circular needle and two strands of olive held together, cast on 96 sts using the long-tail cast on. Join in the round, being careful not to twist the stitches. Place a marker for the beginning of the round.
Rounds 1–8: Work in 1x1 rib (*k1, p1; repeat from *) for 8 rounds, approximately 1.25" (3 cm).
Change to the US 6 (4.0 mm) circular needle.
Lower Beret: Fisherman Rib Stripe Blocks
Round 9 (increase round): *K1, p1, k1, p1, then kfb in the next stitch; repeat from * to end — (112 sts).
Rounds 10–15: Work fisherman rib as established for 6 rounds in olive (Color A). (112 sts)
Change to ochre (Color B).
Rounds 16–23: Work fisherman rib for 8 rounds. (112 sts)
Change to olive (Color A).
Rounds 24–31: Work fisherman rib for 8 rounds. (112 sts)
Change to ochre (Color B).
Rounds 32–39: Work fisherman rib for 8 rounds. (112 sts)
Change to olive (Color A).
Rounds 40–45: Work fisherman rib for 6 rounds. (112 sts)
The striped fisherman rib section measures approximately 3.5" (9 cm) from the top of the band.
Transition to Stockinette Crown
Next round (decrease and smooth): *K2tog, k2tog, k1; repeat from * to end — (67 sts). This closes the fisherman rib texture and begins the plain crown.
Change to stockinette stitch (knit every round) in olive (Color A).
Crown Shaping (stockinette, olive)
Round 1: Knit. (67 sts)
Round 2: *K5, k2tog; repeat from * to last 4 sts, k4 — (58 sts)
Round 3: Knit. (58 sts)
Round 4: *K4, k2tog; repeat from * to last 4 sts, k4 — (49 sts)
Round 5: Knit. (49 sts)
Round 6: *K3, k2tog; repeat from * to last 4 sts, k4 — (40 sts)
Round 7: Knit. (40 sts)
Round 8: *K2, k2tog; repeat from * to end — (30 sts)
Round 9: Knit. (30 sts)
Round 10: *K1, k2tog; repeat from * to end — (20 sts)
Round 11: *K2tog; repeat from * to end — (10 sts)
Round 12: *K2tog; repeat from * to end — (5 sts)
Break yarn, leaving a 6" (15 cm) tail. Thread the tail through the remaining 5 sts with the tapestry needle, pull tight, and secure on the inside.
Squiggle Appliqués (make 2: one olive, one ochre)
With US 6 (4.0 mm) needles and two strands of the chosen color held together, cast on 6 sts.
Row 1: Knit. (6 sts)
Row 2: Purl. (6 sts)
Row 3: K1, kfb, k2, kfb, k1 — (8 sts)
Row 4: Purl. (8 sts)
Row 5: K1, kfb, k4, kfb, k1 — (10 sts)
Row 6: Purl. (10 sts)
Row 7: Knit. (10 sts)
Row 8: Purl. (10 sts)
Row 9: K1, k2tog, k4, k2tog, k1 — (8 sts)
Row 10: Purl. (8 sts)
Row 11: K1, k2tog, k2, k2tog, k1 — (6 sts)
Row 12: Purl. (6 sts)
Bind off all sts. The piece forms a soft S-curve squiggle approximately 3" (7.5 cm) long and 1" (2.5 cm) wide. Make one in olive and one in ochre. Block lightly.
Assembly and Finishing
Weave in ends: Thread each yarn tail onto the tapestry needle and pass it through the back of several stitches on the wrong side of the fabric, then trim close to the fabric. Work each tail in a different direction so the ends do not create a lump.
Attach the appliqués: Pin the olive squiggle to the right side of the band, centered vertically on the ribbed band, with the curve pointing upward. Using matching yarn and the tapestry needle, whipstitch around the entire edge with small, even stitches, passing the needle over the edge and back through the fabric each time. Repeat with the ochre squiggle on the left side, mirroring the curve. Secure all ends on the inside of the beret.
Block the beret: Soak the beret in cool water with a drop of wool wash for about 15 minutes. Gently squeeze out the water without wringing, roll it in a towel to remove excess moisture, then stretch it gently over a 10" (25 cm) plate or an inflated balloon. Smooth the band and crown into shape and allow it to dry completely. The fisherman rib will relax and the crown will lie flat.
Care: Hand wash cold, reshape, and dry flat.
Pro Tips and Variations
- Change the stripe colors: Swap olive and ochre for any two colors you love, such as cream and rust or charcoal and dusty pink. Keep the same stripe widths for the same look, or make the blocks wider or narrower for a different rhythm.
- Adjust the size: For a smaller beret, cast on 88 sts instead of 96 and work the increase round as written (you will have 104 sts). For a larger beret, cast on 104 sts and work the increase round as written (you will have 120 sts). The crown decreases will still work because the stitch counts divide evenly.
- Substitute the yarn: Any lace-weight yarn held double will work, but a mohair silk blend gives the signature fuzzy halo. A smooth lace-weight yarn will make a crisper, less fuzzy beret. Always check your gauge with the substitute yarn.
- Make it a slouchy tam: Work the striped fisherman rib section for 4 extra rounds before the transition round, then continue with the crown as written. The extra depth gives a softer, slouchier shape.