Rippling Shoreline Knitted Tote Free Pattern – Textured Lakeside Carryall
Rippling Shoreline Knitted Tote: A Free Pattern for a Textured Lakeside Carryall
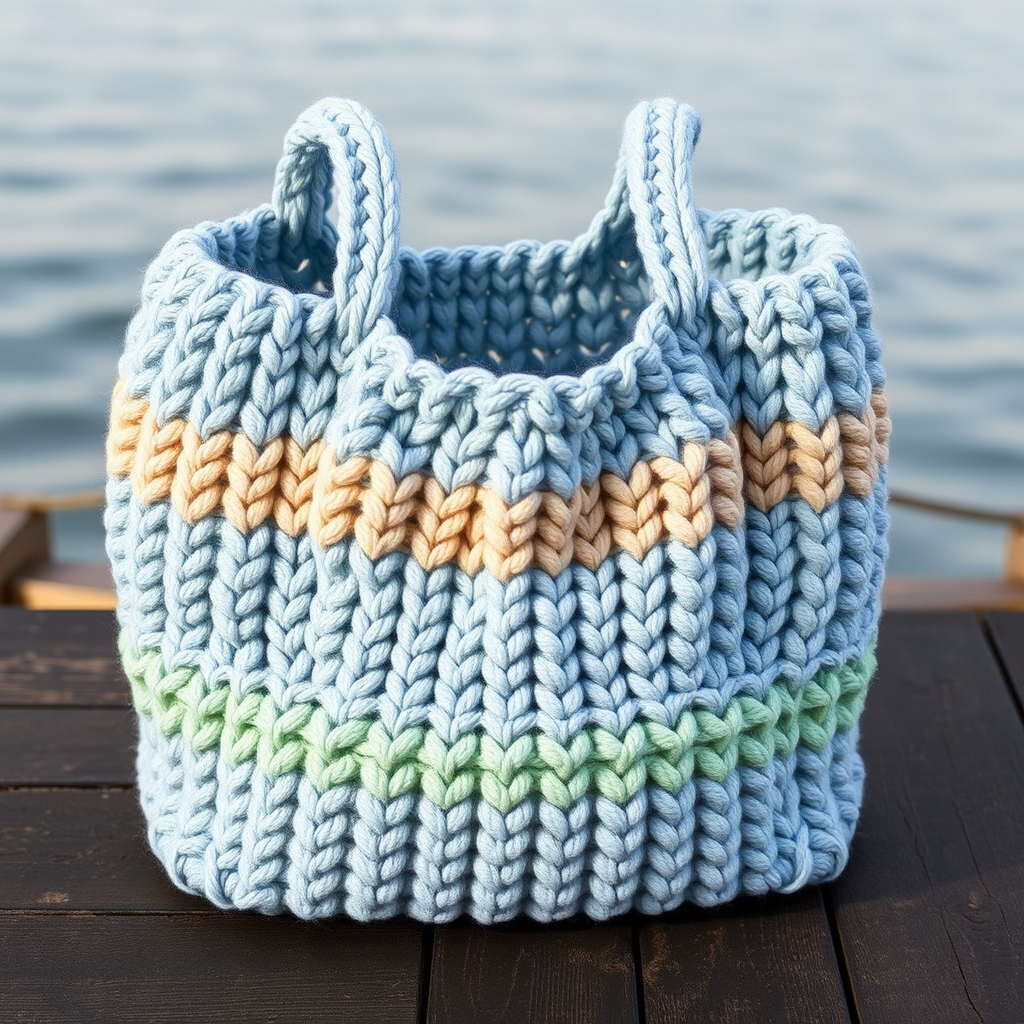
Imagine strolling through a farmers market or along a sandy beach with a bag that captures the serene, rhythmic motion of water. The Rippling Shoreline Knitted Tote is more than just a carryall—it's a wearable piece of coastal tranquility. This free knitting pattern uses a unique ripple stitch to create gentle, wavy horizontal ridges across the fabric, evoking the calm surface of a lake on a breezy day. Crafted from durable, worsted-weight cotton yarn, this tote is sturdy enough for groceries, books, or beach essentials, yet stylish enough to become your go-to everyday accessory.
With its soothing palette of misty blue, sandy beige, and seafoam green, this bag brings an organic, handcrafted aesthetic to any outfit. Whether you're a seasoned knitter looking for a satisfying textured project or a beginner eager to expand your skills, this pattern is designed to be approachable and rewarding. Let's dive in and create a beautiful, functional piece that you'll be proud to carry.
Materials Needed
Before you begin, gather the following supplies to ensure a smooth knitting experience. All materials are readily available at most craft stores or online yarn retailers.
Yarn
- Worsted weight cotton yarn (e.g., Lion Brand 24/7 Cotton) in three colors:
- Misty Blue (MC - Main Color): Approximately 250 grams (about 5 skeins)
- Sandy Beige (CC1 - Contrast Color 1): Approximately 100 grams (about 2 skeins)
- Seafoam Green (CC2 - Contrast Color 2): Approximately 100 grams (about 2 skeins)
Note: Cotton yarn is ideal for this project because it's sturdy, washable, and holds its shape well. The worsted weight ensures the bag is thick enough to carry heavier items without stretching out of shape.
Needles & Tools
- US 7 (4.5 mm) knitting needles – straight or circular (if you prefer, you can use circular needles for flat knitting)
- Tapestry needle – for seaming and weaving in ends
- Scissors
- Stitch markers (optional, but helpful for keeping track of pattern repeats)
Gauge
20 stitches x 28 rows = 4 inches (10 cm) in stockinette stitch. It's crucial to check your gauge before starting to ensure your tote comes out the correct size. If your gauge is off, adjust your needle size accordingly (use a larger needle if you have too many stitches per inch, smaller if you have too few).
Step-by-Step Instructions
This tote is knitted flat in two identical panels, which are then seamed together. The ripple stitch pattern is simple to memorize and creates a beautiful, textured fabric. Follow these detailed instructions carefully, and you'll have a gorgeous tote in no time.
Understanding the Ripple Stitch Pattern
The ripple stitch is the heart of this project. It's a simple 2-row repeat that creates a wavy, textured surface. Here's the breakdown:
Ripple Stitch (multiple of 10 + 2 stitches):
- Row 1 (Right Side): *K2tog (knit 2 together), k2, yo (yarn over), k1, yo, k2, ssk (slip, slip, knit)*; repeat from * to last 2 stitches, k2.
- Row 2 (Wrong Side): Purl all stitches.
Repeat Rows 1 and 2 for the pattern. The combination of decreases (k2tog and ssk) and increases (yo) creates the ripple effect. The yarn overs add a subtle, lacy texture that mimics water catching the light.
Panel 1 (Front)
- Cast On: With your Main Color (Misty Blue), cast on 42 stitches.
- Begin Ripple Pattern: Work in the ripple stitch pattern as described above for 60 rows (approximately 15 inches of fabric). This will create the main body of the tote.
- Add Contrasting Stripes (Optional but Recommended): To achieve the beautiful striped look shown in the photos, you'll incorporate your contrast colors at specific points. Here's how:
- Sandy Beige Stripe (CC1): After completing 10 rows of the ripple pattern in MC, switch to CC1 and work 14 rows (which will create a stripe about 2 inches wide). Then, switch back to MC and continue for another 36 rows.
- Seafoam Green Stripe (CC2): After completing 50 rows total (including the beige stripe), switch to CC2 and work 14 rows. Then, switch back to MC and work the final 10 rows to complete the 60-row total.
Tip: When changing colors, don't cut the yarn you're not using—just carry it up the side of the work. This will minimize ends to weave in later. If you prefer, you can cut and weave in ends, but carrying is simpler for stripes.
- Bind Off: After completing 60 rows, bind off all stitches loosely. Set this panel aside.
Panel 2 (Back)
- Repeat the exact same process as Panel 1 to create the back panel of the tote. Ensure your stripe placement matches Panel 1 so the bag looks symmetrical when seamed.
Seaming the Panels
Now it's time to join the two panels together to form the bag body.
- Prepare the Panels: Lay both panels flat with the right sides facing each other (the wrong sides should be on the outside). Align the edges carefully.
- Seam the Sides and Bottom: Using your tapestry needle and a length of MC yarn, use the mattress stitch to sew the side seams and the bottom seam. Leave the top edge open—this will be the opening of your tote.
- Reinforce the Seams: For extra durability (especially since this bag will carry items), consider sewing the seams twice or using a slightly thicker thread. Cotton yarn is strong, but reinforcing the bottom seam is a good idea.
Creating the Handles (Make 2)
The handles are knitted separately and then attached to the bag. They're simple stockinette strips that are folded and sewn for strength.
- Cast On: With MC, cast on 8 stitches.
- Knit the Handle: Work in stockinette stitch (knit on the right side, purl on the wrong side) for 40 rows (approximately 10 inches).
- Bind Off: Bind off all stitches. Repeat to make a second handle.
Assembling the Handles
- Fold and Sew: Take one handle strip and fold it in half lengthwise (with the right side facing out). Using your tapestry needle and a length of MC yarn, sew the long edges together using a whip stitch. This creates a sturdy, double-thickness strap. Repeat for the second handle.
- Position the Handles: Turn your tote right side out. Place each handle on the inside of the tote, positioning them about 3 inches from the side seams. Make sure they're evenly spaced and not twisted.
- Attach the Handles: Using a whip stitch and MC yarn, securely sew each end of the handle to the inside of the tote. Sew through both the handle and the bag fabric, making several passes to ensure it's very secure. Repeat for all four handle ends.
Finishing Touches
- Weave in All Ends: Using your tapestry needle, carefully weave in all loose yarn ends on the inside of the bag. This includes the ends from color changes and the cast-on/bind-off edges.
- Optional Lining: For extra durability and to prevent small items from slipping through the stitches, you can add a fabric lining. Cut a piece of cotton fabric to fit the inside of the bag, sew it into a pouch shape, and hand-stitch it to the inside top edge of the tote.
- Blocking (Optional): If desired, you can gently block your tote to even out the stitches and enhance the ripple pattern. Lay it flat, mist with water, and shape it as desired. Allow it to dry completely.
Your Lakeside Companion Awaits
Congratulations! You've just completed your very own Rippling Shoreline Knitted Tote. This beautiful, textured bag is not only a practical accessory but also a testament to your knitting skill. The soothing colors and wavy pattern make it a joy to carry, whether you're heading to the beach, the market, or just out for a walk.
This pattern is perfect for knitters of all levels. The ripple stitch is easy to learn and memorize, and the construction is straightforward. Plus, the use of cotton yarn makes it durable and easy to care for—just toss it in the washing machine on a gentle cycle and lay it flat to dry.
We hope you enjoyed this project and love your new tote! Feel free to experiment with different color combinations to make it your own. Happy knitting!


