Snowdrift Lace Wreath Free Pattern – A Knitted Winter Heirloom
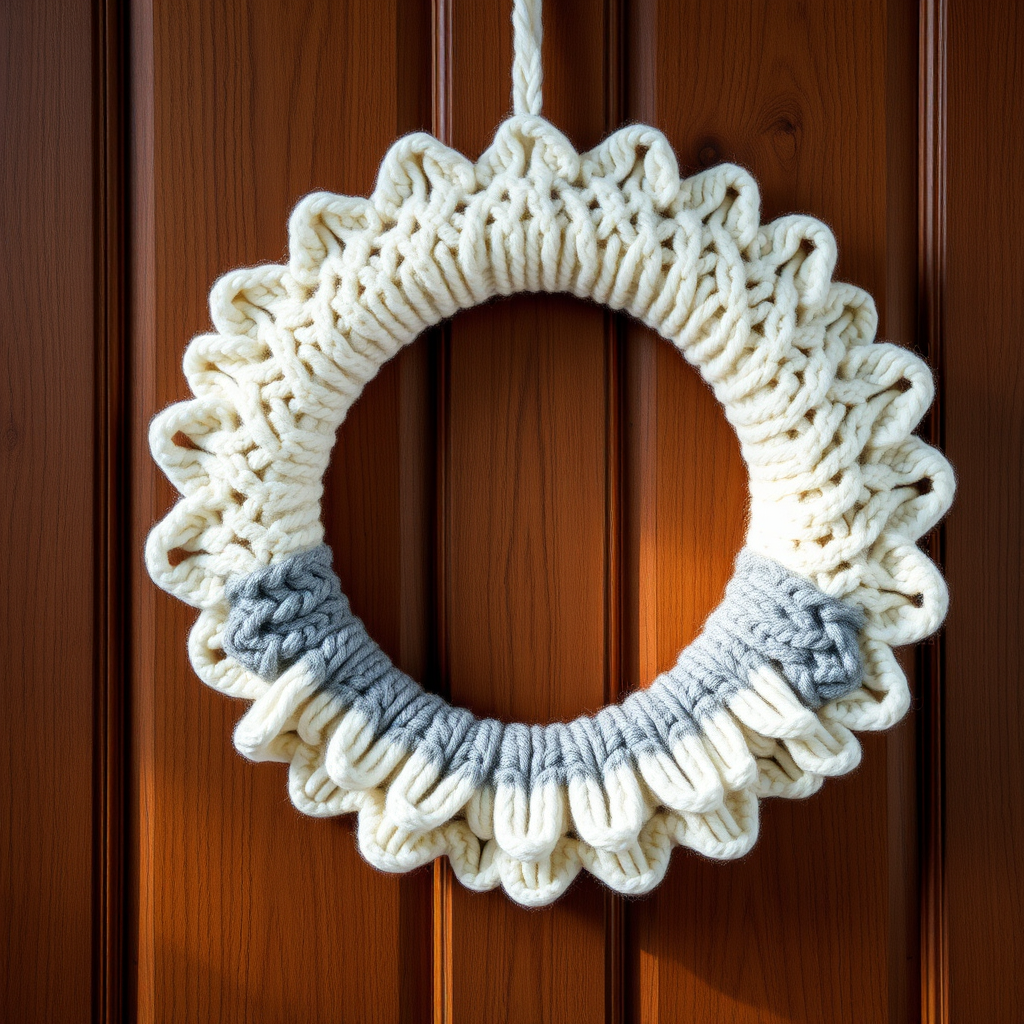
Snowdrift Lace Wreath Free Pattern – A Knitted Winter Heirloom
Wrap your door in the delicate beauty of a hand-knitted lace wreath, where each loop and yarn-over mimics the quiet sparkle of fresh snowfall. This pattern creates a soft, textured ring that brings cozy elegance to any winter entryway. Whether you're an experienced knitter looking for a unique home decor project or a beginner ready to stretch your skills, this wreath is a rewarding weekend project that will become a cherished seasonal decoration for years to come.
The Snowdrift Lace Wreath combines classic lace techniques with modern home decor sensibility. The ivory body with its silver-grey accent stripe evokes the serene beauty of a winter landscape—crisp, clean, and quietly stunning. As you knit, you'll watch the delicate yarn-over holes and twisted decreases form a pattern reminiscent of frost on a windowpane, creating a piece that's as much art as it is decoration.
Materials Needed
Before you begin, gather these supplies to ensure a smooth knitting experience:
Yarn
- Worsted weight yarn in ivory white: approximately 200g (about 400 yards)
- Contrasting silver-grey yarn: approximately 50g (about 100 yards) for the accent stripe
Pro tip: Choose a soft, slightly pliable yarn that will drape well around the wreath frame. A wool-blend or acrylic-wool mix works beautifully—it blocks well and holds its shape.
Needles and Tools
- US 7 (4.5mm) circular knitting needle with a 24-inch cable
- Stitch markers (at least 4)
- Tapestry needle for weaving in ends and seaming
- 12-inch diameter wire wreath frame (or foam wreath form)
- Pins for blocking
- Spray bottle with water for blocking
Gauge
18 stitches and 24 rows = 4 inches in stockinette stitch (blocked). Adjust your needle size if needed to achieve this gauge. While gauge isn't critical for a wreath, it ensures your strip will be the right width and length to wrap your frame beautifully.
Abbreviations
- K = knit
- P = purl
- YO = yarn over
- K2tog = knit two together (right-leaning decrease)
- SSK = slip, slip, knit (left-leaning decrease)
- PM = place marker
- SM = slip marker
Step-by-Step Instructions
This wreath is knitted as a long strip, then seamed into a ring and shaped with a wire frame. Follow these detailed instructions carefully, and you'll create a stunning heirloom piece.
Step 1: Cast On
With ivory yarn, cast on 30 stitches loosely. Use a loose cast-on method like the long-tail or knitted cast-on, being careful not to pull too tightly. This loose edge will make seaming easier later.
Step 2: Establish the Lace Pattern
Follow these rows carefully. The pattern repeat is marked with asterisks (*). Work the stitches between the asterisks across the row, then finish with the final stitches listed.
Row 1 (RS): K all 30 stitches.
Row 2 (WS): P all 30 stitches.
Row 3: K3, *YO, K2tog, K1, SSK, YO, K1, YO, SSK, K1, K2tog, YO, K3*; repeat from * to * across (should end with K3).
Let's break this down: You'll knit 3 stitches, then work the pattern between the asterisks. The sequence YO, K2tog creates a right-leaning decrease with a yarn-over hole. Then K1, SSK creates a left-leaning decrease. The YO, K1, YO creates two yarn-overs with a knit between them, making a small eyelet. Then SSK, K1, K2tog, YO completes the motif, and you end with K3. This creates a beautiful diamond-shaped lace pattern.
Row 4: P all 30 stitches.
Row 5: K2, *YO, K2tog, K1, SSK, YO, K3, YO, SSK, K1, K2tog, YO, K1*; repeat from * to * across (end with K2).
Notice how the pattern shifts slightly—you start with K2 instead of K3, and the center section has K3 between the yarn-overs. This creates the staggered, organic feel of the lace.
Row 6: P all 30 stitches.
Row 7: K1, *YO, K2tog, K1, SSK, YO, K5, YO, SSK, K1, K2tog, YO*; repeat from * to * across (end with K1).
Now you start with K1, and the center section expands to K5. This widening creates the ruffled, scalloped edge that makes this wreath so special.
Row 8: P all 30 stitches.
Row 9: K all 30 stitches.
Row 10: P all 30 stitches.
Step 3: Repeat the Pattern
Repeat Rows 3–10 until the strip measures approximately 36 inches (or long enough to wrap around your wreath form with a 1-inch overlap). End with a WS row (a purl row).
Helpful tip: As you knit, the lace pattern will naturally ruffle and curl. Don't worry—this is exactly what you want! The blocking process will tame it into the perfect shape.
Step 4: Add the Accent Stripe
When your strip reaches the desired length, it's time to add the silver-grey accent:
- Cut the ivory yarn, leaving a 6-inch tail.
- Join the silver-grey yarn with a slip knot.
- Knit 4 rows in stockinette stitch (K on RS, P on WS). This creates a clean, solid band that contrasts beautifully with the lace.
- Cut the silver-grey yarn, leaving a 6-inch tail.
- Rejoin the ivory yarn and continue the lace pattern for another 2 inches, ending with a WS row.
Step 5: Bind Off
Bind off all stitches loosely on the RS. Use a loose bind-off method like the standard bind-off but work it loosely, or use a stretchy bind-off like Jeny's Surprisingly Stretchy Bind-Off. This ensures the edge won't pucker when you shape the wreath.
Weave in all ends using your tapestry needle. Be sure to weave them in securely but invisibly, following the path of the yarn through the stitches.
Step 6: Block the Knitted Strip
Blocking is crucial for this project—it opens up the lace pattern and gives the wreath its beautiful, airy quality.
- Lay the knitted strip on a flat, padded surface (a blocking mat or a towel-covered table works well).
- Pin the strip to the desired width and length. Gently stretch the lace pattern to open up the yarn-over holes. The strip should be about 3-4 inches wide and 36-37 inches long.
- Mist the strip thoroughly with water from your spray bottle until it's damp but not soaking.
- Let it dry completely—this can take 12-24 hours depending on your environment.
Step 7: Assemble the Wreath
Once your strip is completely dry, it's time to transform it into a wreath:
- Wrap the blocked strip around the wire wreath frame, overlapping the ends by about 1 inch. Position the silver-grey accent stripe where you'd like it—near the bottom of the wreath looks lovely, or you can place it slightly off-center for visual interest.
- Use your tapestry needle and matching ivory yarn to sew the ends together securely. Use a whip stitch or mattress stitch, working through the cast-on and bind-off edges. Make several passes to ensure a strong seam.
- Gently stretch the lace pattern evenly around the frame. The knitted fabric should cover the frame completely, with the lace ruffles creating a full, textured look. Pin in place if needed to hold the fabric while you work.
- Adjust the gathers and ruffles so they're distributed evenly around the entire wreath. The lace pattern should look organic and flowing, not bunched in one area.
Step 8: Add a Hanging Loop
To hang your wreath:
- Cut a 10-inch piece of ivory yarn.
- Fold it in half to create a loop.
- Thread the folded end through the top of the wreath frame from back to front.
- Pull the two loose ends through the loop and tighten to create a secure hanging loop.
- Weave in the ends on the back of the wreath.
Step 9: Final Finishing
Fluff the lace loops with your fingers to enhance the texture. Gently pull apart any yarn-overs that may have flattened during blocking or assembly. This final step brings the wreath to life, making the lace pattern pop and giving the wreath its signature airy, elegant appearance.
Your Snowdrift Lace Wreath Is Ready to Hang!
Step back and admire your handiwork. The delicate lace pattern, the subtle silver-grey accent, the soft, ruffled edges—you've created a true winter heirloom that will grace your door for years to come. The openwork lace catches the light beautifully, casting gentle shadows that evoke the quiet sparkle of fresh snow.
This wreath makes a thoughtful handmade gift for housewarmings, weddings, or holiday celebrations. It's also a wonderful way to use up small amounts of worsted weight yarn from your stash—try it in different color combinations to match your decor or the seasons.
Care instructions: To store your wreath, place it flat in a box or hang it in a cool, dry closet. If it gets dusty, gently shake it or use a lint roller. Avoid getting it wet—if it needs refreshing, a light steaming (holding a steamer several inches away) can help restore its shape.
Happy knitting, and may your home be filled with the cozy elegance of handmade beauty this winter!


