The Celestial Slouch Beanie Free Pattern – Crochet a Starry Night Sky Hat
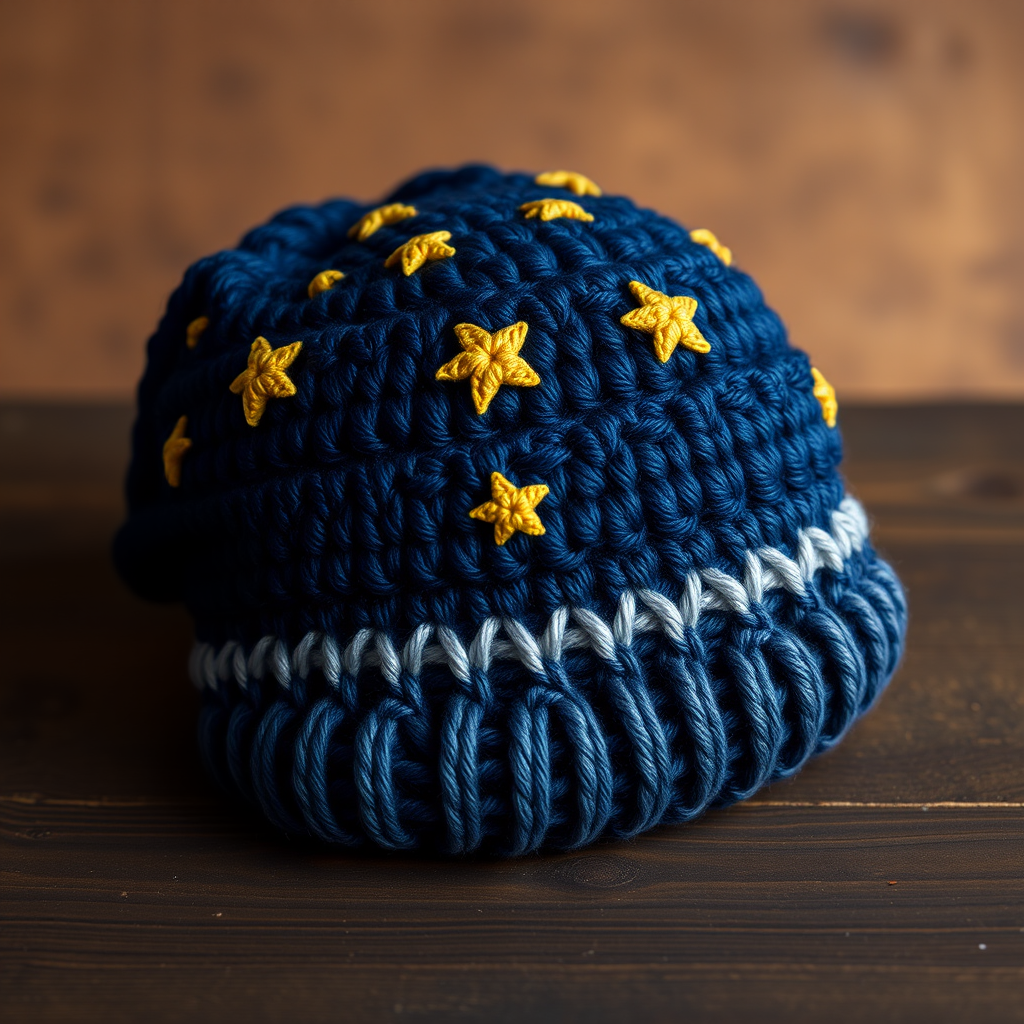
Wrap Yourself in the Night Sky: The Celestial Slouch Beanie
Imagine wrapping your head in a cozy, wearable galaxy. That's the magic of the Celestial Slouch Beanie. This free crochet pattern combines the deep, calming hues of a midnight sky with the playful sparkle of silver and gold, creating a hat that's as dreamy as it is practical. Whether you're a seasoned crocheter looking for a quick, satisfying project or a beginner ready to tackle a new skill, this slouch beanie is the perfect choice. With its chunky yarn and simple single crochet stitches, you'll create a stunning, textured hat that looks like it was plucked straight from the stars.
This pattern is designed to be your trusty guide. We'll walk you through every step, from the very first magic ring to the final starry embellishment, ensuring you end up with a beautiful, handcrafted hat you'll be proud to wear all winter long.
Materials Needed: Gathering Your Cosmic Toolkit
Before we dive into the stitches, let's gather everything you'll need to bring this celestial vision to life. The beauty of this pattern is its simplicity—you only need a few basic supplies.
- Yarn: Worsted weight yarn in three colors:
- Color A (Midnight Blue): Approximately 200-250 yards for the main body of the hat.
- Color B (Silver/Light Gray): Approximately 50-75 yards for the striking stripe bands.
- Color C (Gold): A small amount (scrap yarn is perfect) for the star embellishments.
- Crochet Hook: 5.5 mm (I-9) crochet hook. This size is perfect for worsted weight yarn, giving you a nice, dense fabric that's still soft and drapey.
- Stitch Markers: Essential for keeping track of your rounds, especially when working in a continuous spiral.
- Yarn Needle: For weaving in those pesky ends and sewing on your gold stars.
- Scissors: To snip your yarn.
Step-by-Step Instructions: Crafting Your Celestial Masterpiece
Let's get started! This pattern is worked in continuous rounds, which means you'll be working in a spiral without joining at the end of each round. It's crucial to use a stitch marker to mark the first stitch of each round so you don't lose your place. Let's begin our journey from the crown of the hat.
Part 1: The Crown (Creating the Top of the Hat)
We'll start by creating a flat circle that will form the top of your beanie. The magic ring technique gives you a tight, seamless center.
- Round 1: With Color A, make a magic ring. Chain 1 (this does not count as a stitch), then work 6 single crochet (sc) into the ring. Pull the tail to tighten the ring closed. (6 stitches)
- Round 2: Work 2 sc in each stitch around. (12 stitches)
- Round 3: *Sc in the next stitch, 2 sc in the next stitch.* Repeat from * to * around. (18 stitches)
- Round 4: *Sc in the next 2 stitches, 2 sc in the next stitch.* Repeat from * to * around. (24 stitches)
- Round 5: *Sc in the next 3 stitches, 2 sc in the next stitch.* Repeat from * to * around. (30 stitches)
- Round 6: *Sc in the next 4 stitches, 2 sc in the next stitch.* Repeat from * to * around. (36 stitches)
- Round 7: *Sc in the next 5 stitches, 2 sc in the next stitch.* Repeat from * to * around. (42 stitches)
- Round 8: *Sc in the next 6 stitches, 2 sc in the next stitch.* Repeat from * to * around. (48 stitches)
- Round 9: *Sc in the next 7 stitches, 2 sc in the next stitch.* Repeat from * to * around. (54 stitches)
- Round 10: *Sc in the next 8 stitches, 2 sc in the next stitch.* Repeat from * to * around. (60 stitches)
- Round 11: *Sc in the next 9 stitches, 2 sc in the next stitch.* Repeat from * to * around. (66 stitches)
- Round 12: *Sc in the next 10 stitches, 2 sc in the next stitch.* Repeat from * to * around. (72 stitches)
Your circle should now measure about 6 inches in diameter. This is the perfect size for an adult beanie. If it's a bit smaller, you can add another increase round (e.g., *sc in next 11, 2 sc in next*). If it's larger, you can skip the last increase round.
Part 2: The Body (Building the Slouch)
Now we'll stop increasing and work even to create the height of the hat. This is where the slouchy shape begins to form.
- Rounds 13-20: With Color A, sc in each stitch around. (72 stitches)
- Round 21: Switch to Color B (Silver). Sc in each stitch around. (72 stitches)
- Round 22: With Color B, *sc in the next 5 stitches, 2 sc in the next stitch.* Repeat from * to * around. (84 stitches) This increase round will give the hat a bit more flare for the slouch.
- Rounds 23-24: With Color B, sc in each stitch around. (84 stitches)
- Round 25: Switch back to Color A. Sc in each stitch around. (84 stitches)
- Rounds 26-27: With Color A, sc in each stitch around. (84 stitches)
- Round 28: Switch to Color B. Sc in each stitch around. (84 stitches)
- Rounds 29-30: With Color B, sc in each stitch around. (84 stitches)
- Round 31: Switch back to Color A. Sc in each stitch around. (84 stitches)
- Rounds 32-33: With Color A, sc in each stitch around. (84 stitches)
Part 3: Slouch Shaping (Adding the Drape)
To give your beanie that beautiful, relaxed slouch, we'll add a few more increases to widen the body slightly.
- Round 34: *Sc in the next 12 stitches, 2 sc in the next stitch.* Repeat from * to * around. (91 stitches)
- Rounds 35-37: Sc in each stitch around. (91 stitches)
- Round 38: *Sc in the next 13 stitches, 2 sc in the next stitch.* Repeat from * to * around. (98 stitches)
- Rounds 39-41: Sc in each stitch around. (98 stitches)
Part 4: The Ribbed Band (A Snug, Stretchy Finish)
Now we'll create the brim. By working in the back loops only, we create a ribbed effect that's stretchy and comfortable, ensuring your hat stays put.
- Round 42: Working in the back loop only (BLO) of each stitch, sc in each stitch around. (98 stitches)
- Rounds 43-47: Continuing to work in the back loop only, sc in each stitch around. (98 stitches)
After Round 47, fasten off your yarn, leaving a long tail (about 6 inches). Thread this tail onto your yarn needle and weave it through the stitches of the last round. Pull tight to cinch the top of the hat closed, then weave in the end securely. Weave in all other loose ends from your color changes.
Part 5: Star Embellishments (Adding the Magic)
Now for the fun part—bringing your night sky to life! We'll make a few simple gold stars and sew them onto the hat.
- Make 3-5 stars: With Color C (Gold), make a magic ring. Chain 1, work 10 single crochet into the ring. Slip stitch to the first single crochet to join. Fasten off, leaving a long tail for sewing.
- Shaping the star: To create the points, you'll gently pinch the circle of stitches. The 10 stitches will naturally form 5 points when you pull the center tight. You can also use your yarn needle to weave the tail through the center of the circle and pull to cinch it, then use the same tail to sew the star onto the hat.
- Attaching the stars: Using the long tail, sew the stars onto the body of the hat in a scattered pattern, just like stars in the sky. Place them on the blue sections for maximum contrast.
And there you have it—your very own Celestial Slouch Beanie! A cozy, stylish, and truly unique accessory that captures the beauty of a starry night. This pattern is perfect for gifting, and once you've made one, you'll want to make them in every color combination imaginable. Happy crocheting!


