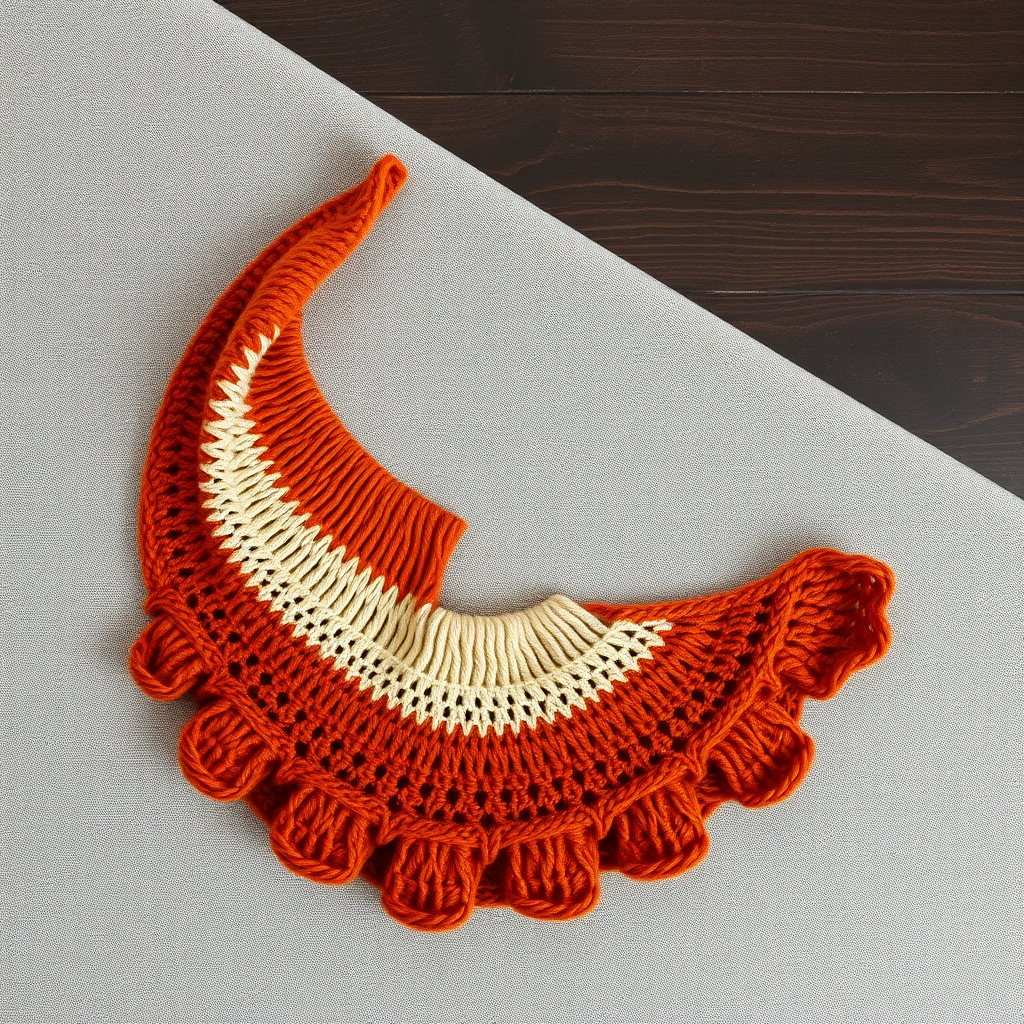
The Emberfall Crescent Knit Shawl Free Pattern – A Gradient Fade Wrap

The Emberfall Crescent Knit Shawl: A Free Gradient Fade Wrap Pattern
Wrap yourself in the warm hues of a sunset with this stunning crescent-shaped knit shawl. The Emberfall Crescent features a seamless gradient fade from deep burgundy through burnt orange to golden yellow, finished with a delicate lace edge that catches the light beautifully. This pattern is perfect for intermediate knitters seeking a meditative, rewarding project that produces a truly wearable piece of art.
Whether you're looking for a cozy autumn layer or a thoughtful handmade gift, this shawl delivers both warmth and elegance. The crescent shape drapes gracefully over the shoulders, and the gradient color transition creates a mesmerizing ombré effect that will have everyone asking where you bought it. Best of all, this is a free pattern you can knit at home with just a few materials.
Materials Needed
Before you begin, gather the following supplies. All items are readily available at your local yarn shop or online.
Yarn
- Fingering weight yarn in 3 colors (approximately 400g total / 1400 yards):
- Color A: Deep burgundy (approx. 467 yards)
- Color B: Burnt orange (approx. 467 yards)
- Color C: Golden yellow (approx. 467 yards)
Tip: Choose a soft, wool-blend fingering weight yarn for best stitch definition and drape. Merino or a merino-silk blend works beautifully.
Needles
- US 6 (4.0 mm) circular knitting needle, 32-inch (80 cm) or longer. The long cord is essential to accommodate the growing number of stitches.
- US 8 (5.0 mm) needle for bind off (or any larger needle to ensure a stretchy edge).
Other Supplies
- Stitch markers (at least 2)
- Tapestry needle for weaving in ends
- Blocking mats and pins
- Lukewarm water and wool wash for blocking
Gauge
20 stitches and 28 rows = 4 inches (10 cm) in stockinette stitch, after blocking. Gauge is important for achieving the correct size and drape, so take a moment to knit a swatch first.
Step-by-Step Instructions
This shawl is knit from the top center outwards, increasing stitches on every right-side row to create the crescent shape. The gradient is achieved by changing colors every 20 rows, blending seamlessly from A to B to C. Follow along carefully, and you'll have a beautiful shawl in no time.
Abbreviations
- k = knit
- p = purl
- yo = yarn over (increase)
- k2tog = knit two together (right-leaning decrease)
- ssk = slip, slip, knit (left-leaning decrease)
- pm = place marker
- sm = slip marker
- RS = right side
- WS = wrong side
Setup Section
Cast on 5 stitches with Color A. This small cast-on will grow quickly as you work the increases.
Row 1 (RS): k2, yo, k1, yo, k2 — 7 stitches
Row 2 (WS): k2, p3, k2
Row 3 (RS): k2, yo, k3, yo, k2 — 9 stitches
Row 4 (WS): k2, p5, k2
Row 5 (RS): k2, yo, k5, yo, k2 — 11 stitches
Row 6 (WS): k2, p7, k2
Row 7 (RS): k2, yo, k7, yo, k2 — 13 stitches
Row 8 (WS): k2, p9, k2
Row 9 (RS): k2, yo, k9, yo, k2 — 15 stitches
Row 10 (WS): k2, p11, k2
You now have 15 stitches and have completed the setup section. The 2-stitch garter border on each edge (knit on both RS and WS) will continue throughout the entire shawl, creating a neat, rolled-free edge.
Body Section – Color A
Continue with Color A for 10 more rows (rows 11–20 total). Work in stockinette stitch (knit on RS, purl on WS) with the 2-stitch garter border on each edge. On every RS row, increase by 2 stitches using this pattern:
RS rows: k2, yo, knit to last 2 stitches, yo, k2
WS rows: k2, purl to last 2 stitches, k2
Repeat these two rows 5 times (10 rows total). After completing row 20, you will have 25 stitches.
Important: The increases happen on every RS row throughout the entire body of the shawl. This consistent increase rate is what creates the gentle crescent curve.
Body Section – Color B
After completing 20 rows total with Color A, switch to Color B. Do not cut Color A yet—you can carry it up the side if you prefer, or cut and weave in later. For a cleaner edge, cut and weave in ends at the end.
Continue the same increase pattern for 20 rows:
RS rows: k2, yo, knit to last 2 stitches, yo, k2
WS rows: k2, purl to last 2 stitches, k2
Repeat these two rows 10 times (20 rows total). After completing row 40, you will have 45 stitches.
Body Section – Color C
Switch to Color C and work another 20 rows with the same increases:
RS rows: k2, yo, knit to last 2 stitches, yo, k2
WS rows: k2, purl to last 2 stitches, k2
Repeat these two rows 10 times (20 rows total). After completing row 60, you will have 65 stitches.
Note: The shawl will look small at this point, but blocking will open it up significantly, especially the lace edge.
Lace Edge Section
Now it's time to add the delicate lace edging. Continue with Color C and keep the same increase pattern on RS rows, but now incorporate the lace pattern between the edge stitches. Work the following 4-row repeat 5 times (20 rows total).
Row 1 (RS): k2, yo, *k2tog, yo* repeat from * to * until last 2 stitches, yo, k2
Row 2 (WS): k2, purl to last 2 stitches, k2
Row 3 (RS): k2, yo, *ssk, yo* repeat from * to * until last 2 stitches, yo, k2
Row 4 (WS): k2, purl to last 2 stitches, k2
Repeat these 4 rows 5 times (20 rows total). The increases at the beginning and end of each RS row are maintained, so the shawl continues to grow. The lace pattern creates a series of small eyelets along the bottom edge.
Tip: The number of stitches between the edge increases will vary as you work the lace pattern. Don't worry if the pattern doesn't perfectly align every row—the increases naturally shift the lace, and the final result will look organic and beautiful.
Bind Off (Loosely)
Bind off all stitches knitwise on the RS using a larger needle (US 8 or 5.0 mm) to ensure a stretchy, flexible edge. This is crucial for the shawl to drape properly and for the lace to open up.
To bind off: Knit the first two stitches, then pass the first stitch over the second. Knit the next stitch, pass the previous stitch over, and continue until all stitches are bound off. Cut yarn, leaving a 6-inch tail, and pull through the last loop.
Finishing
Weave in all ends using a tapestry needle. Take care to weave in securely but invisibly, especially at the color changes.
Blocking (Essential Step):
- Fill a basin or sink with lukewarm water and add a drop of wool wash.
- Submerge the shawl and let it soak for 20–30 minutes. Do not agitate or wring.
- Gently squeeze out excess water (do not twist). Roll the shawl in a clean towel to remove more moisture.
- Lay the shawl flat on blocking mats. Gently stretch it to shape, focusing on the crescent curve and the lace edge.
- Pin the lace edge open to reveal the eyelets. Use blocking pins every 2–3 inches along the bottom edge.
- Allow to dry completely (24–48 hours) before unpinning.
Once dry, your Emberfall Crescent Shawl is ready to wear. The gradient will blend beautifully, and the lace will have a lovely open, airy quality.
Final Thoughts
The Emberfall Crescent Shawl is a joy to knit—meditative in its repetition, rewarding in its progress, and stunning in its final form. The gradient fade from burgundy to gold evokes the warm glow of a sunset, making it the perfect accessory for cool autumn days or cozy evenings by the fire.
This pattern is ideal for intermediate knitters who want to practice consistent increases and learn a simple lace pattern. The result is a versatile wrap that can be worn draped over the shoulders or wrapped snugly around the neck.
Happy knitting, and enjoy your beautiful Emberfall Crescent!