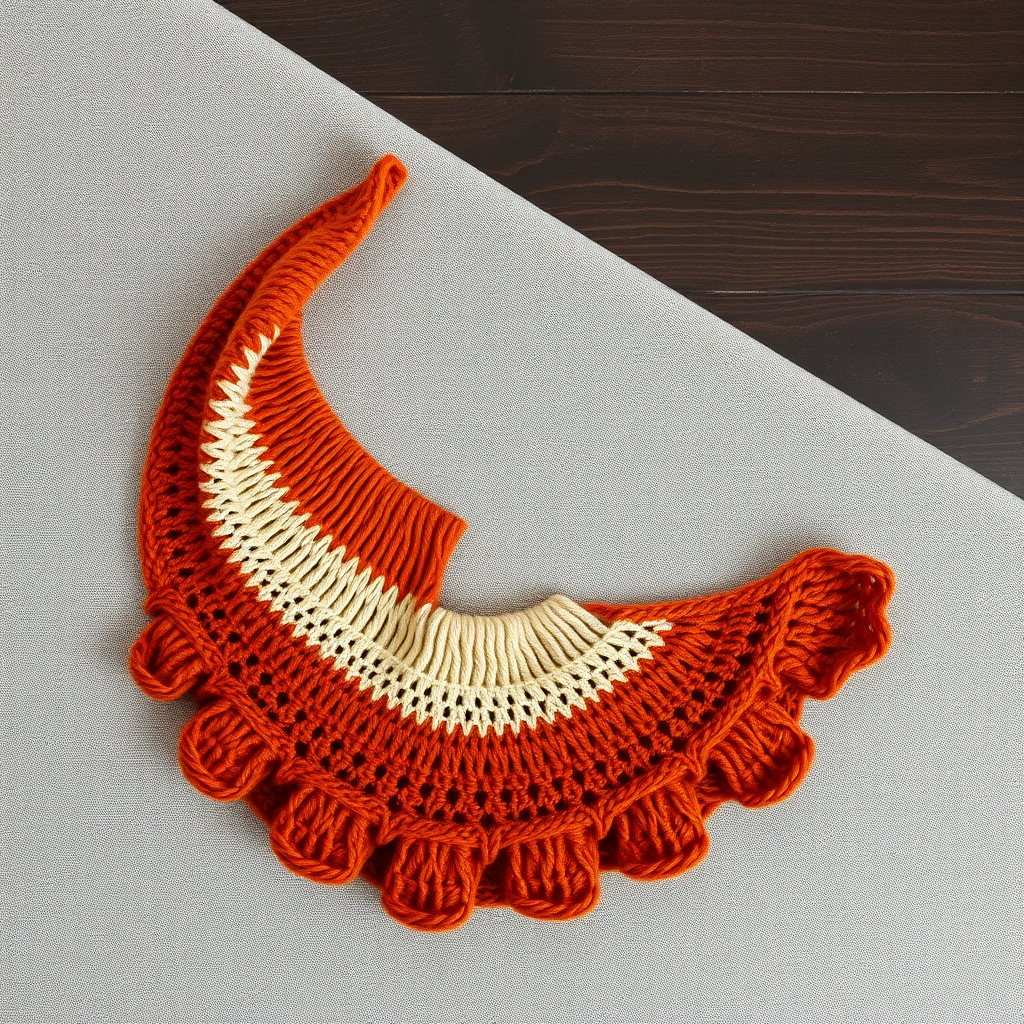
The Emberglow Dune Shawl Free Pattern – A Gradient Knitted Wrap with Woven Sand Ripples

Wrap Yourself in Desert Warmth: The Emberglow Dune Shawl
Imagine the last rays of sunlight painting the desert in shades of terracotta, amber, and sand. That breathtaking transition is now something you can wear. The Emberglow Dune Shawl is a gradient knitted wrap that captures the serene beauty of wind-swept dunes in every stitch. This crescent-shaped shawl isn't just a cozy accessory; it's a textured masterpiece featuring a unique "woven ripple" pattern that adds depth and movement to the fabric. Whether you're a seasoned knitter looking for a meditative project or a confident beginner ready for a new challenge, this free pattern will guide you through creating a stunning statement piece perfect for cool evenings.
This pattern is designed to be both rewarding and relaxing. The rhythmic repetition of slipped stitches and yarn overs creates a fabric that feels as beautiful as it looks, while the gradual color changes keep your interest piqued from the first cast-on to the final bind-off. Let's gather our materials and begin this journey into the heart of the desert.
Materials Needed: Your Palette of Dunes
Before you begin, ensure you have all the necessary tools and yarn. The beauty of this project lies in its simplicity—you only need three shades of the same yarn to create the stunning gradient effect.
Yarn
- Worsted weight yarn in three gradient shades:
- Yarn A: Terracotta (approx. 133g / 250 yards)
- Yarn B: Amber (approx. 133g / 250 yards)
- Yarn C: Sand (approx. 134g / 250 yards)
- Total yarn needed: approximately 400g (750 yards) of worsted weight yarn.
Needles & Notions
- US 9 (5.5 mm) circular knitting needle with a 32-inch cable. The long cable is essential to accommodate the growing number of stitches as the shawl expands.
- Stitch markers (optional, but helpful for tracking pattern repeats).
- Tapestry needle for weaving in ends.
- Blocking mats and pins for the finishing touches.
Gauge
- 16 stitches and 24 rows = 4 inches in stockinette stitch (knit on RS, purl on WS).
- While gauge is important for size, this shawl is forgiving. A slightly different gauge will simply result in a larger or smaller wrap.
Step-by-Step Instructions: Knitting the Dunes
This shawl is worked flat from the top center down. The increases at the edges and center create the crescent shape, while the "woven ripple" texture emerges from a simple combination of slipped stitches and yarn overs. Follow these detailed instructions carefully, and you'll be amazed at the fabric you create.
Getting Started: The Foundation
With Yarn A (Terracotta), cast on 3 stitches.
- Row 1 (Right Side - RS): K1, yo, k1, yo, k1. (You now have 5 stitches on your needle.)
- Row 2 (Wrong Side - WS): Purl all stitches.
- Row 3 (RS): K2, yo, k1, yo, k2. (You now have 7 stitches.)
- Row 4 (WS): Purl all stitches.
Your foundation is set. Now we'll begin the magical ripple pattern.
The Woven Ripple Pattern
This is the heart of the shawl. The pattern is a 4-row repeat that creates the illusion of woven sand. Pay close attention to the yarn position for the slipped stitches (wyif = with yarn in front, wyib = with yarn in back).
Row 5 (RS - Increase Row): K2, yo, *sl1 wyif, k1, yo, k2tog, yo, sl1 wyif, k1, yo, repeat from * to last 2 sts, k2.
- Explanation: Knit 2, yarn over (this is your edge increase). Then repeat the sequence: slip 1 stitch purlwise with yarn in front, knit 1, yarn over, knit 2 together, yarn over, slip 1 purlwise with yarn in front, knit 1, yarn over. Continue this repeat until only 2 stitches remain, then knit those last 2 stitches.
Row 6 (WS): Purl all stitches.
Row 7 (RS): K2, yo, *k1, sl1 wyib, k2tog, yo, k1, sl1 wyib, k1, yo, repeat from * to last 2 sts, k2.
- Explanation: Knit 2, yarn over. Then repeat: knit 1, slip 1 purlwise with yarn in back, knit 2 together, yarn over, knit 1, slip 1 purlwise with yarn in back, knit 1, yarn over. Repeat until 2 stitches remain, then knit those last 2 stitches.
Row 8 (WS): Purl all stitches.
Repeat Rows 5-8 to continue the pattern. You will notice the stitch count increasing on the right-side rows (Rows 5 and 7) due to the yarn overs, which creates the shawl's crescent shape.
Creating the Gradient
To achieve the beautiful desert sunset effect, you will change yarn colors at specific intervals. Follow this sequence:
- Yarn A (Terracotta): Work the Ripple Pattern for 12 rows total (this includes the setup rows 1-4, then rows 5-8 repeated twice).
- Yarn B (Amber): Cut Yarn A and join Yarn B. Work the Ripple Pattern for 12 rows.
- Yarn C (Sand): Cut Yarn B and join Yarn C. Work the Ripple Pattern for 12 rows.
- Repeat the sequence: Work Yarn A for 12 rows, Yarn B for 12 rows, and Yarn C for 12 rows once more.
Pro Tip: When changing colors, do so at the beginning of a right-side row (Row 5 or 7) for the cleanest transition. Leave a 6-inch tail to weave in later.
Continue working the pattern until the shawl measures approximately 28 inches from the cast-on edge, measured down the center. It's best to end after completing a Wrong Side row (Row 6 or 8).
The Garter Stitch Edging
This simple border adds structure and a subtle ruffle to the shawl's edge, beautifully framing the ripple texture.
- With Yarn C (Sand) still attached (or rejoin if you ended on a different color), work 3 rows of garter stitch (knit every stitch across).
- Increase Row: On each of these 3 rows, increase 1 stitch at each edge. (e.g., K1, M1L, knit to last stitch, M1R, K1). This will gently flare the edge.
Bind off loosely. A loose bind-off is crucial to prevent the edge from being too tight and stiff. You can use a larger needle to bind off or use a stretchy bind-off method like "knit two together and pass back" or the "Jeny's Surprisingly Stretchy Bind-Off."
Finishing Touches: Blocking Your Masterpiece
Blocking is where the magic truly happens. It opens up the yarn overs, defines the ripple texture, and gives the shawl its final, elegant drape.
- Weave in all loose ends using your tapestry needle, being careful to weave them in on the wrong side of the work.
- Soak the shawl in lukewarm water with a gentle wool wash for 15-20 minutes.
- Gently squeeze out excess water (do not wring or twist). Roll the shawl in a clean towel to remove more moisture.
- Lay the shawl flat on blocking mats. Gently stretch it to its final dimensions, focusing on opening up the points and curves of the crescent shape. Pin the edges to secure the shape.
- Allow it to dry completely before unpinning. This can take 24-48 hours depending on your environment.
Once dry, your Emberglow Dune Shawl is ready to be worn. Drape it over your shoulders and let the warm, textured waves of color transport you to a serene desert evening. This shawl is not just a knitting project; it's a wearable piece of art that you created with your own hands. Enjoy every stitch and the beautiful journey it took to get here!