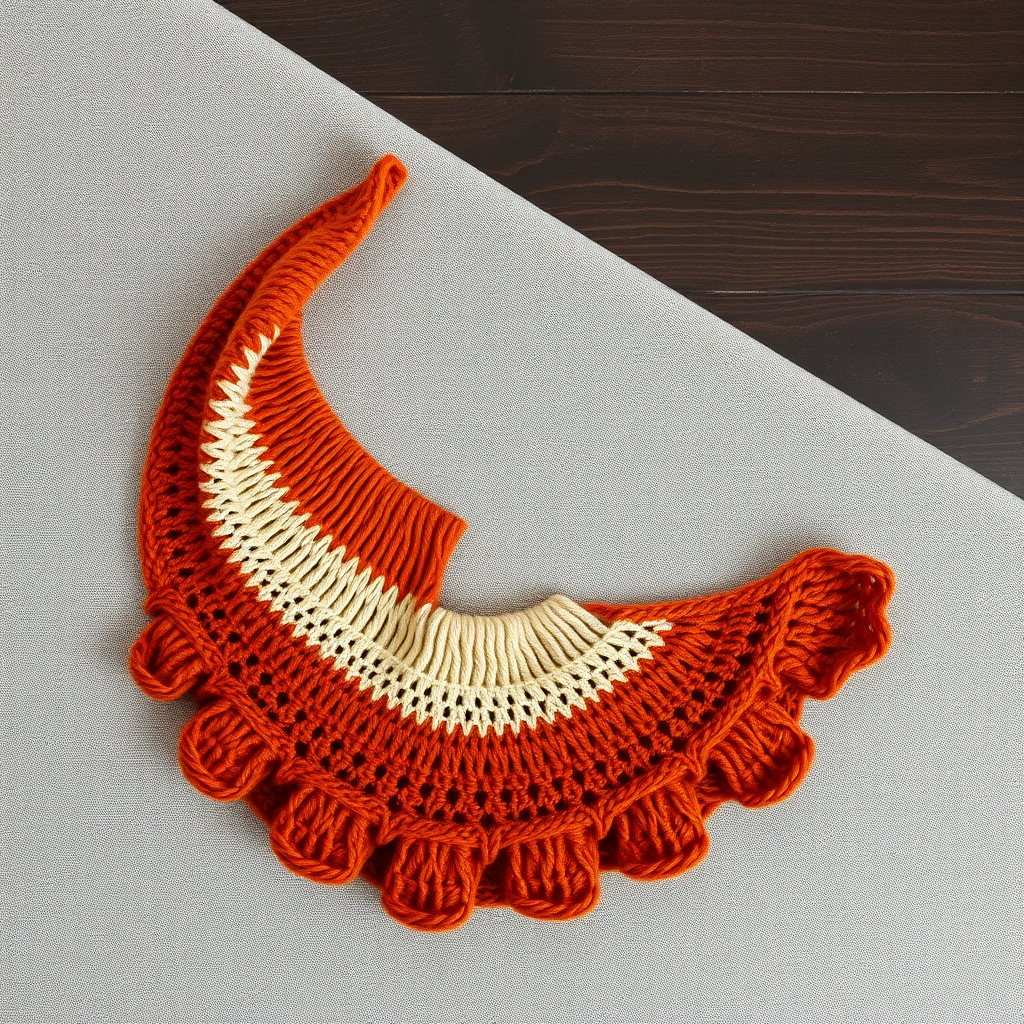
The Solstice Fern Lace Shawl Free Pattern – A Botanical Knit with Leaf Motifs

The Solstice Fern Lace Shawl: A Botanical Knit with Cascading Leaf Motifs
Wrap yourself in the quiet elegance of a forest floor with this botanical-inspired shawl, where cascading fern lace meets a soft, earthy gradient. This pattern offers a meditative knit with a stunning, organic drape that feels like a gentle embrace. Whether you're a seasoned lace knitter or a confident beginner looking for a rewarding project, the Solstice Fern Lace Shawl is a beautiful addition to your handmade wardrobe. The combination of a deep moss green transitioning into a warm cream creates a striking visual effect that highlights the intricate leaf patterns.
This free knitting pattern is designed to be accessible yet engaging, with clear instructions that guide you through every step. The result is a soft, flowing triangle with a gentle curve at the bottom, perfect for draping over shoulders on cool evenings. Let's dive into this botanical knitting adventure!
Materials Needed
Before you begin, gather the following materials to ensure a smooth knitting experience:
- Yarn: Fingering weight yarn in two complementary shades:
- Color A: 400 yards of a deep moss green
- Color B: 350 yards of a warm cream or heather beige
- Needle: US 6 (4.0 mm) circular knitting needle, 32 inches or longer (to accommodate the growing number of stitches)
- Notions: Stitch markers (at least 2), tapestry needle for weaving in ends, blocking pins and mat (for finishing)
Gauge: 20 stitches and 28 rows = 4 inches in stockinette stitch (blocked). Gauge is important for achieving the correct size and drape, so take a moment to knit a swatch and adjust your needle size if necessary.
Step-by-Step Instructions
This shawl is worked top-down in a triangular shape, with a central spine and two mirrored lace panels. The pattern combines simple knit/purl textures with a repeating fern lace motif. Follow along carefully, and you'll be amazed at how the lace unfolds.
Abbreviations
- k = knit
- p = purl
- yo = yarn over
- k2tog = knit two together (right-leaning decrease)
- ssk = slip, slip, knit (left-leaning decrease)
- kfb = knit front and back (increase)
- pm = place marker
- sm = slip marker
- rep = repeat
Setup
With Color A (moss green), cast on 3 stitches.
Row 1 (RS): kfb, k1, kfb (5 stitches)
Row 2 (WS): k2, p1, k2
Row 3 (RS): kfb, k1, yo, k1, yo, k1, kfb (9 stitches)
Row 4 (WS): k2, p5, k2
Row 5 (RS): kfb, k2, yo, k1, yo, k2, kfb (13 stitches)
Row 6 (WS): k2, p9, k2
Row 7 (RS): kfb, k3, yo, k1, yo, k3, kfb (17 stitches)
Row 8 (WS): k2, p13, k2
You now have 17 stitches and a nice foundation for your shawl.
Body (Repeat Sections)
Now establish the pattern. Place markers after the first 2 stitches and before the last 2 stitches. These edge stitches are always knit on the RS and purled on the WS, creating a neat, stable border.
Section A (Increase Rows)
Row 1 (RS): k2, pm, kfb, k to 1 stitch before marker, kfb, sm, k2 (increase 2 stitches)
Row 2 (WS): k2, p to marker, sm, p to last 2 stitches, k2
Repeat these 2 rows until you have 61 stitches total (including edge stitches). This section builds the base of your shawl and establishes the rhythm of the increases.
Section B (Fern Lace Pattern)
Now the magic begins! The fern lace pattern creates the cascading leaf motifs. Work the following 8 rows, repeating them until the shawl measures approximately 20 inches from the cast-on edge, or until you have used most of Color A. Always end with a WS row.
Row 1 (RS): k2, pm, kfb, *yo, k2tog, k3, ssk, yo, k1; rep from * to 1 stitch before marker, kfb, sm, k2
Row 2 (WS): k2, p to marker, sm, p to last 2 stitches, k2
Row 3 (RS): k2, pm, kfb, *k1, yo, k2tog, k1, ssk, yo, k2; rep from * to 1 stitch before marker, kfb, sm, k2
Row 4 (WS): k2, p to marker, sm, p to last 2 stitches, k2
Row 5 (RS): k2, pm, kfb, *k2, yo, k2tog, ssk, yo, k3; rep from * to 1 stitch before marker, kfb, sm, k2
Row 6 (WS): k2, p to marker, sm, p to last 2 stitches, k2
Row 7 (RS): k2, pm, kfb, *k3, yo, ssk, k2tog, yo, k2; rep from * to 1 stitch before marker, kfb, sm, k2
Row 8 (WS): k2, p to marker, sm, p to last 2 stitches, k2
Tip: The pattern repeats between the asterisks (*). On each RS row, you'll work the repeat until you reach the stitch before the marker, then do a kfb increase. The WS rows are simple purl rows, which gives your hands a rest and lets the lace shine.
Color Transition
Cut Color A, leaving a 6-inch tail. Join Color B (cream).
Work 4 rows in stockinette (knit on RS, purl on WS) with edge stitches as established, increasing 2 stitches every RS row (kfb after first marker and before last marker). This smooths the transition between colors and adds a subtle texture change.
Section C (Leaf Edge)
Now we'll work the leaf edge pattern, which is similar to Section B but creates a more pronounced botanical edge. Repeat these 8 rows until you have used most of Color B, ending with a WS row.
Row 1 (RS): k2, pm, kfb, *yo, k2tog, k3, ssk, yo, k1; rep from * to 1 stitch before marker, kfb, sm, k2
Row 2 (WS): k2, p to marker, sm, p to last 2 stitches, k2
Row 3 (RS): k2, pm, kfb, *k1, yo, k2tog, k1, ssk, yo, k2; rep from * to 1 stitch before marker, kfb, sm, k2
Row 4 (WS): k2, p to marker, sm, p to last 2 stitches, k2
Row 5 (RS): k2, pm, kfb, *k2, yo, k2tog, ssk, yo, k3; rep from * to 1 stitch before marker, kfb, sm, k2
Row 6 (WS): k2, p to marker, sm, p to last 2 stitches, k2
Row 7 (RS): k2, pm, kfb, *k3, yo, ssk, k2tog, yo, k2; rep from * to 1 stitch before marker, kfb, sm, k2
Row 8 (WS): k2, p to marker, sm, p to last 2 stitches, k2
Edging
For a delicate, scalloped finish, work the following edging:
Row 1 (RS): k2, pm, kfb, *yo, k2tog; rep from * to 1 stitch before marker, kfb, sm, k2
Row 2 (WS): k2, p to marker, sm, p to last 2 stitches, k2
Repeat these 2 rows until the edging measures 2 inches. This creates a lovely, airy border that complements the lace body.
Bind Off (Loosely)
On the RS, bind off all stitches knitwise, but do not pull tight. This is crucial for maintaining the stretch and drape of the lace. Cut yarn, leaving a 6-inch tail, and weave in all ends with a tapestry needle.
Blocking
Blocking is the secret to a professional-looking lace shawl. It opens up the stitches and transforms your knitting into a beautiful, flowing piece.
- Soak the shawl in lukewarm water with a drop of wool wash for 20 minutes.
- Gently squeeze out excess water (do not wring or twist).
- Lay the shawl flat on a clean towel and roll it up to remove additional moisture.
- Place the shawl on a blocking mat and pin out the edges to create a gentle crescent shape. Focus on the points of the lace motifs and the scalloped edges.
- Allow it to dry completely, preferably overnight. Once dry, unpin and enjoy your stunning Solstice Fern Lace Shawl!
This shawl is a joy to knit and an even greater joy to wear. The gradient from moss green to cream evokes the transition from deep forest to sunlit clearing, making it a versatile accessory for any season. Happy knitting!