The Whispering Willow Seamless Crochet Capelet Free Pattern – A Forest-Fresh Layer
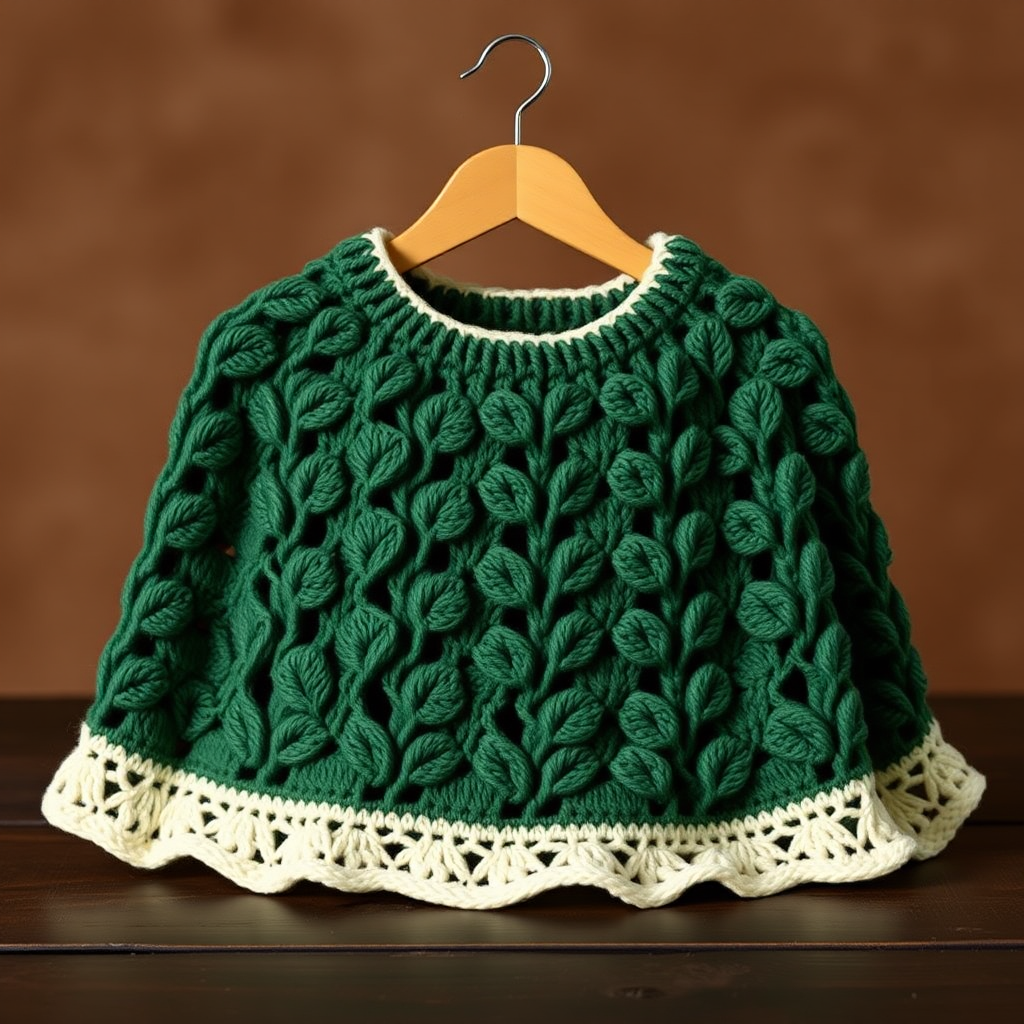
The Whispering Willow Seamless Crochet Capelet: A Forest-Fresh Layer
Wrap yourself in the soft embrace of a woodland-inspired capelet, worked seamlessly from the top down with a delicate leaf-and-vine stitch pattern. This cozy, modern layer drapes beautifully over any outfit, bringing a touch of enchanted forest charm to your everyday wear. Whether you're strolling through crisp autumn air or welcoming the first hints of spring, the Whispering Willow Capelet is the perfect handmade companion. With its gentle A-line silhouette and intricate-looking (yet surprisingly simple) stitch work, this pattern is designed to make you feel like you've stepped straight out of a storybook.
Materials Needed
Before you begin your crafting journey, gather these essential supplies. The Whispering Willow Capelet uses worsted weight yarn in two complementary shades to create that stunning forest-meets-cream aesthetic.
Yarn Requirements
- Main Color (MC): Forest Green – Worsted weight yarn (e.g., Lion Brand Wool-Ease in 'Forest Green') – approximately 400g (about 4 skeins)
- Contrast Color (CC): Soft Cream – Worsted weight yarn (e.g., Lion Brand Wool-Ease in 'Cream') – approximately 200g (about 2 skeins)
Tools & Notions
- 5.5 mm (I-9) crochet hook
- Stitch markers (at least 2)
- Yarn needle for weaving in ends
- Scissors
Gauge
14 dc x 8 rows = 4 inches (10 cm) in leaf stitch pattern (after blocking). Always check your gauge before starting to ensure your capelet fits perfectly.
Step-by-Step Instructions
Important Pattern Notes
- Worked in continuous rounds from the neck down – no seams to sew at the end!
- The capelet is seamless, with increases placed at the shoulders to create a gentle A-line shape.
- The leaf stitch pattern is a 4-row repeat that you'll work with increasing stitch counts.
- Use a stitch marker to mark the beginning of each round.
- Ch 3 counts as a dc throughout the entire pattern.
Foundation & Neck Shaping
Foundation: With MC, make a magic ring.
Round 1: Ch 3 (counts as dc), 11 dc into ring. Join with sl st to top of ch-3. (12 dc)
Round 2: Ch 3, dc in same st, 2 dc in each st around. Join. (24 dc)
Round 3: Ch 3, dc in same st, dc in next st, *2 dc in next st, dc in next st* repeat around. Join. (36 dc)
Round 4: Ch 3, dc in same st, dc in next 2 sts, *2 dc in next st, dc in next 2 sts* repeat around. Join. (48 dc)
Round 5: Ch 3, dc in same st, dc in next 3 sts, *2 dc in next st, dc in next 3 sts* repeat around. Join. (60 dc)
Round 6: Ch 3, dc in same st, dc in next 4 sts, *2 dc in next st, dc in next 4 sts* repeat around. Join. (72 dc)
Round 7: Ch 3, dc in same st, dc in next 5 sts, *2 dc in next st, dc in next 5 sts* repeat around. Join. (84 dc)
Round 8: Ch 3, dc in same st, dc in next 6 sts, *2 dc in next st, dc in next 6 sts* repeat around. Join. (96 dc)
You've now created a beautiful circular yoke that will form the neckline and upper shoulders of your capelet. The increases in these first 8 rounds create the foundation for the A-line shape.
Begin Leaf Stitch Pattern (Worked in Rounds)
Now comes the magical part – watching the leaf pattern emerge! This stitch creates delicate, overlapping leaf shapes with openwork spaces between them, giving your capelet that woodland feel.
Round 9 (Leaf base): Ch 3, dc in next 3 sts, *ch 2, skip 2 sts, dc in next 4 sts* repeat around, ending with ch 2, skip 2 sts, join with sl st to top of ch-3. (16 groups of 4 dc, 16 ch-2 spaces)
Round 10 (Leaf formation): Ch 3, dc in next 3 sts, *ch 1, sc in ch-2 space, ch 1, dc in next 4 sts* repeat around, join. (16 leaves forming)
Round 11 (Leaf shaping): Ch 3, dc in next 3 sts, *ch 1, sc in next ch-1 space, ch 1, dc in next 4 sts* repeat around, join. (Leaves become more defined)
Round 12 (Leaf completion): Ch 3, dc in next 3 sts, *ch 1, sc in next sc, ch 1, dc in next 4 sts* repeat around, join. (Leaf points are formed)
Congratulations! You've completed your first leaf pattern repeat. Notice how the single crochet stitches create the "veins" of the leaves while the chain spaces form the openwork between them.
Increasing the Leaf Pattern
Now we'll begin the increase rounds that will gradually widen your capelet. Each increase round adds one more double crochet to each leaf group, making the capelet flare beautifully as it falls.
Round 13 (Increase round): Ch 3, dc in same st, dc in next 3 sts, *ch 2, skip 2 sts, dc in next 4 sts, 2 dc in next st* repeat around, ending with ch 2, skip 2 sts, join. (Increases added at the center of each leaf group – you now have 5 dc per group)
Rounds 14-16: Repeat Rounds 10-12, but now with the increased stitch count (5 dc per group). This means you'll work: Ch 3, dc in next 4 sts, *ch 1, sc in ch-2 space, ch 1, dc in next 5 sts* repeat around for Round 14, then continue the leaf shaping and completion rounds.
Round 17 (Increase round): Ch 3, dc in same st, dc in next 4 sts, *ch 2, skip 2 sts, dc in next 5 sts, 2 dc in next st* repeat around, join. (6 dc per group)
Rounds 18-20: Repeat Rounds 10-12 with 6 dc per group. (Ch 3, dc in next 5 sts, *ch 1, sc in ch-2 space, ch 1, dc in next 6 sts* for the formation round)
Round 21 (Increase round): Ch 3, dc in same st, dc in next 5 sts, *ch 2, skip 2 sts, dc in next 6 sts, 2 dc in next st* repeat around, join. (7 dc per group)
Rounds 22-24: Repeat Rounds 10-12 with 7 dc per group. (Ch 3, dc in next 6 sts, *ch 1, sc in ch-2 space, ch 1, dc in next 7 sts* for the formation round)
Round 25 (Increase round): Ch 3, dc in same st, dc in next 6 sts, *ch 2, skip 2 sts, dc in next 7 sts, 2 dc in next st* repeat around, join. (8 dc per group)
Rounds 26-28: Repeat Rounds 10-12 with 8 dc per group. (Ch 3, dc in next 7 sts, *ch 1, sc in ch-2 space, ch 1, dc in next 8 sts* for the formation round)
Continuing to Desired Length
Continue increasing every 4th round (meaning: work 3 plain leaf pattern rounds, then 1 increase round) until the capelet reaches your desired length. For a standard capelet that falls gracefully over the shoulders, aim for approximately 18-20 inches from the neck edge.
Remember the pattern for each increase round: Ch 3, dc in same st (this creates the increase), then work dc in each st of the group, ch 2, skip 2 sts, and continue around. The key is that each increase round adds one more dc to each leaf group.
Edging – Adding the Cream Finish
Once your capelet reaches the desired length, it's time to add that beautiful cream edging that frames the piece so elegantly.
Switch to CC (Soft Cream).
Round 1: Ch 1, sc in each st and ch-space around, join with sl st to first sc.
Round 2: Ch 1, *sc in next st, ch 3, skip 1 st* repeat around, join. Fasten off.
This creates a lovely scalloped edge that echoes the leaf pattern and gives your capelet a polished, finished look.
Neckband – The Perfect Frame
Now let's finish the neckline to match. With CC, join yarn at the neck edge.
Round 1: Ch 1, sc evenly around neck opening, join with sl st to first sc.
Round 2: Ch 1, *sc in next st, ch 2, skip 1 st* repeat around, join. Fasten off.
This creates a delicate picot-style neckband that mirrors the bottom edging and ties the whole design together beautifully.
Finishing Touches
Weave in all ends carefully with your yarn needle. Take your time with this step – properly secured ends will ensure your capelet lasts for years to come.
Block your capelet gently to open up the leaf stitch pattern and even out the edges. Lay it flat on a blocking mat, pin the edges to your desired shape, and mist with water. Allow to dry completely before wearing.
Wearing Your Whispering Willow Capelet
This versatile layer works beautifully over dresses, tunics, or simple tees. The forest green and cream colorway pairs wonderfully with denim, earth tones, and even a pop of mustard or rust for autumn. The openwork leaf pattern makes it perfect for transitional weather – cozy enough for cool spring mornings, yet breathable for mild autumn afternoons.
Your Whispering Willow Capelet is more than just a garment – it's a piece of wearable art that carries the magic of the forest with you wherever you go. The seamless construction means no bulky seams to irritate you, and the gentle A-line shape flatters every body type.
Happy crocheting, and may your stitches always be blessed with the whisper of the willow!


