The Woven Harvest Basket Free Pattern – Knit a Chunky Textured Storage Basket
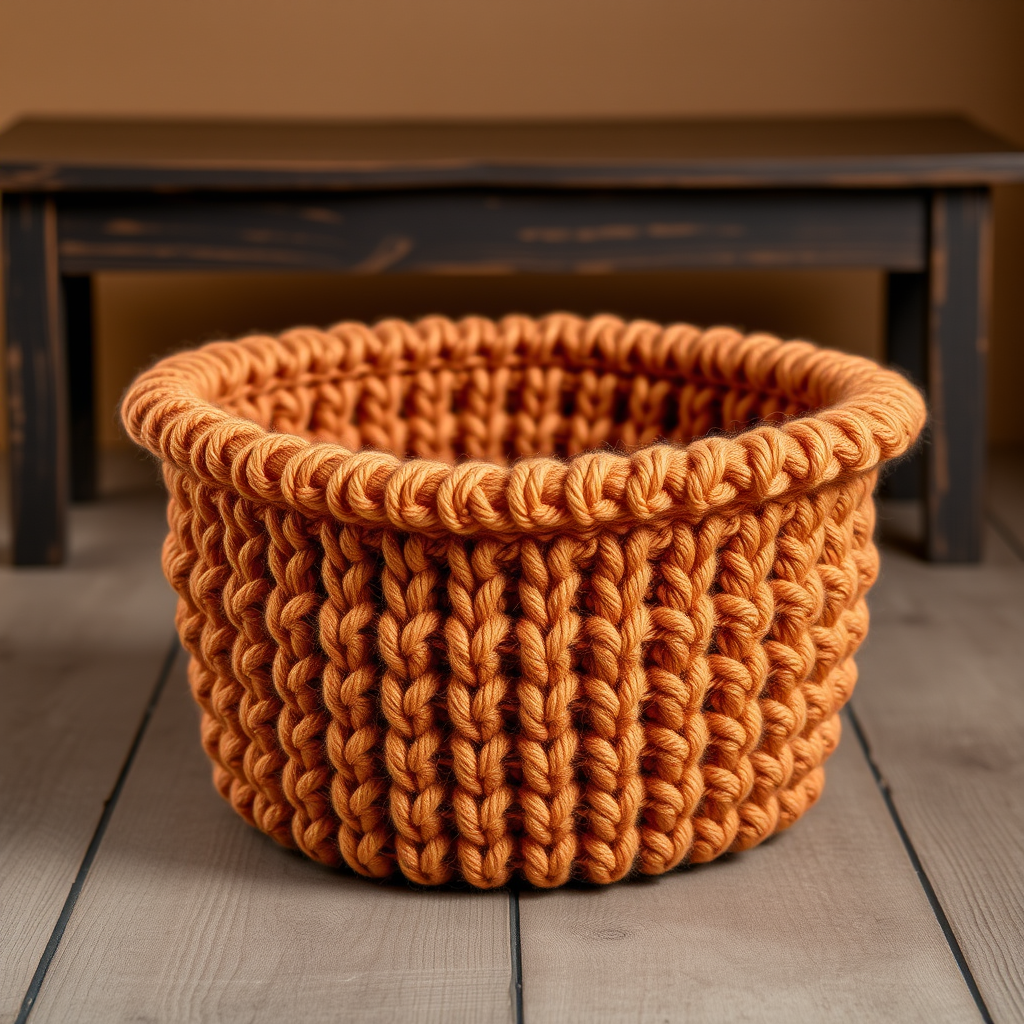
The Woven Harvest Basket Free Pattern – Knit a Chunky Textured Storage Basket
Bring rustic warmth to your home with this chunky knitted basket, featuring a rich basketweave stitch that mimics handwoven wicker. Perfect for storing yarn, blankets, or cozy essentials, this pattern is both stylish and functional. Whether you're a seasoned knitter looking for a quick weekend project or a beginner ready to tackle your first home decor piece, this basket delivers stunning results with simple techniques.
The thick, super bulky yarn creates a sturdy yet soft basket that stands beautifully on its own. The basketweave pattern—alternating blocks of knit and purl stitches—gives it that handcrafted, woven appearance that fits perfectly in farmhouse, boho, or modern interiors. Best of all, this free pattern is designed to be approachable, with clear instructions that guide you from cast-on to finished basket.
Materials Needed
Before you begin, gather the following supplies. All items are readily available at your local yarn shop or online.
Yarn
- Super bulky weight yarn (approx. 250-300 yards) in a warm terracotta or oatmeal color. Look for a yarn labeled as "super bulky" (weight category 6) or "jumbo" (category 7). A wool-blend or cotton-blend works best for structure and durability.
Needles
- US 13 (9 mm) circular knitting needle (24-inch length) – for working the sides in the round
- US 13 (9 mm) double-pointed needles – for the bottom of the basket (worked flat)
Notions
- Stitch markers (at least 4)
- Tapestry needle for weaving in ends
- Scissors
- Measuring tape or ruler
Gauge
10 stitches and 14 rows = 4 inches in basketweave stitch (knit 4, purl 4 rib pattern). Always check your gauge before starting to ensure your basket comes out the correct size. If your gauge is off, adjust your needle size accordingly.
Step-by-Step Instructions
This pattern is worked in two main parts: the flat square base, then the sides worked in the round. Follow along carefully, and you'll have a beautiful basket in no time.
Abbreviations
- CO: cast on
- K: knit
- P: purl
- St(s): stitch(es)
- Rnd(s): round(s)
- K2tog: knit two together (decrease)
- P2tog: purl two together (decrease)
- PM: place marker
Part 1: Bottom of Basket (Worked Flat)
Step 1: Using your double-pointed needles, CO 36 stitches. You can use any cast-on method you prefer, but a long-tail cast-on gives a nice, firm edge.
Step 2: Row 1 (Right Side): Knit all stitches across.
Step 3: Row 2 (Wrong Side): Purl all stitches across.
Step 4: Repeat Rows 1 and 2 until the piece measures 8 inches from the cast-on edge. This will create a square base. To check, measure from the cast-on edge to your working needle—it should be 8 inches. The width should also be approximately 8 inches (based on your gauge).
Step 5: Do not bind off. Leave the stitches on the needle. You'll be picking up stitches from this edge shortly.
Pro Tip: Place a stitch marker on the right side of your work so you can easily identify it later when picking up stitches.
Part 2: Sides of Basket (Worked in the Round)
Step 1: Transfer your 36 stitches from the double-pointed needles onto your circular needle. The working yarn should be attached to the last stitch you worked.
Step 2: With the right side facing you, pick up and knit 36 stitches along each of the other three sides of the square. Here's how:
- Along the cast-on edge (opposite your live stitches): pick up 36 stitches evenly.
- Along each of the two side edges: pick up 36 stitches evenly.
To pick up stitches evenly, insert your needle into the edge of the work, wrap the yarn around, and pull through a loop. Aim for roughly 1 stitch per row edge—since you have about 28 rows (14 rows per 4 inches × 2 for 8 inches), you'll need to pick up slightly more than 1 per row to reach 36. Space them evenly.
Step 3: After picking up all stitches, you should have a total of 144 stitches on your needle (36 from the original live stitches + 108 picked up).
Step 4: Place a stitch marker (PM) at the beginning of the round, and then PM after every 36 stitches to mark the four sides. This will help you keep track of your pattern repeats.
Step 5: Rnd 1: *K4, P4* repeat from * to * around the entire round. You'll repeat this 18 times total (144 ÷ 8 = 18 repeats).
Step 6: Rnds 2-4: Continue in the established basketweave pattern (K4, P4) for 4 rounds total. This means you'll work Rnd 1 once, then repeat it three more times.
Step 7: Rnd 5: *P4, K4* repeat from * to * around. This shifts the pattern to create the basketweave effect—the knit blocks will now sit above the purl blocks from the previous section.
Step 8: Rnds 6-8: Continue in this new pattern (P4, K4) for 4 rounds total (Rnd 5 once, then repeat three more times).
Step 9: Repeat Rnds 1-8 until the sides measure 6 inches from the base. Measure from the base (where you picked up stitches) to your current round. This will take approximately 10-12 full pattern repeats, depending on your gauge.
Remember: The basketweave pattern alternates every 4 rounds. When you switch from K4/P4 to P4/K4, you're creating the woven checkerboard effect. Keep your markers in place to track your sides.
Part 3: Shaping the Top Edge
Now we'll decrease stitches to create a gently tapered top edge that gives the basket a polished, finished look.
Step 1: Rnd 1: *K2tog, K2, P4* repeat from * to * around. This decreases 1 stitch in each 8-stitch repeat, bringing you from 144 to 126 stitches.
Step 2: Rnd 2: *K3, P4* repeat from * to * around. (No decreases—just maintaining the pattern with your new stitch count.)
Step 3: Rnd 3: *K2tog, K1, P4* repeat from * to * around. This decreases again, bringing you to 108 stitches.
Step 4: Rnd 4: *K2, P4* repeat from * to * around.
Step 5: Rnd 5: *K2tog, P4* repeat from * to * around. Now you're at 90 stitches.
Step 6: Rnd 6: *K1, P4* repeat from * to * around.
Step 7: Rnd 7: *K1, P2tog, P2* repeat from * to * around. This decreases the purl section, bringing you to 72 stitches.
Step 8: Rnd 8: *K1, P3* repeat from * to * around.
Step 9: Bind off all stitches loosely in pattern. This means: knit the knit stitches and purl the purl stitches as you bind off, keeping the bind-off loose so the edge doesn't pucker.
Part 4: Finishing
Step 1: Cut your yarn, leaving a 6-inch tail. Thread the tail through your tapestry needle and pull it through the last stitch to secure.
Step 2: Weave in all ends using your tapestry needle. Thread each end through the wrong side of the work, weaving back and forth through the stitches for about 2 inches. Trim any excess.
Step 3: Fold the top edge down about 1 inch to create a rolled rim, or leave it as is for a straight edge. Both options look beautiful—the rolled rim adds a softer, more casual feel, while the straight edge looks more structured.
Step 4: Block the basket lightly to shape, if desired. To block, gently wet the basket with a spray bottle, then shape it with your hands. Let it air dry completely. This helps the basket hold its form and smooths out any uneven stitches.
Care Tip: To keep your basket looking its best, avoid overstuffing it. The super bulky yarn will stretch slightly with use, but it will bounce back when emptied. Spot clean with a damp cloth if needed—avoid machine washing.
Customization Ideas
Once you've mastered the basic basket, feel free to experiment:
- Change the size: Cast on more or fewer stitches (in multiples of 8) for a larger or smaller basket. Adjust the base length proportionally.
- Add handles: Before binding off, work a few extra rounds and create buttonhole-style openings for handles, then attach leather or rope handles.
- Play with colors: Use two colors and alternate every 4 rounds for a striped basketweave effect, or use a gradient yarn for a subtle ombré look.
- Line it: For a more finished interior, sew in a fabric liner to protect delicate items.
Final Thoughts
This Woven Harvest Basket is more than just a storage solution—it's a statement piece that adds warmth and texture to any room. The basketweave stitch is surprisingly simple once you get into the rhythm, and the chunky yarn means this project works up quickly. Whether you're making it for yourself or as a handmade gift, this basket is sure to be treasured.
Happy knitting! We'd love to see your finished baskets—share your photos and tag us so we can admire your handiwork.



