Whispering Pines Textured Mug Cozy Free Pattern
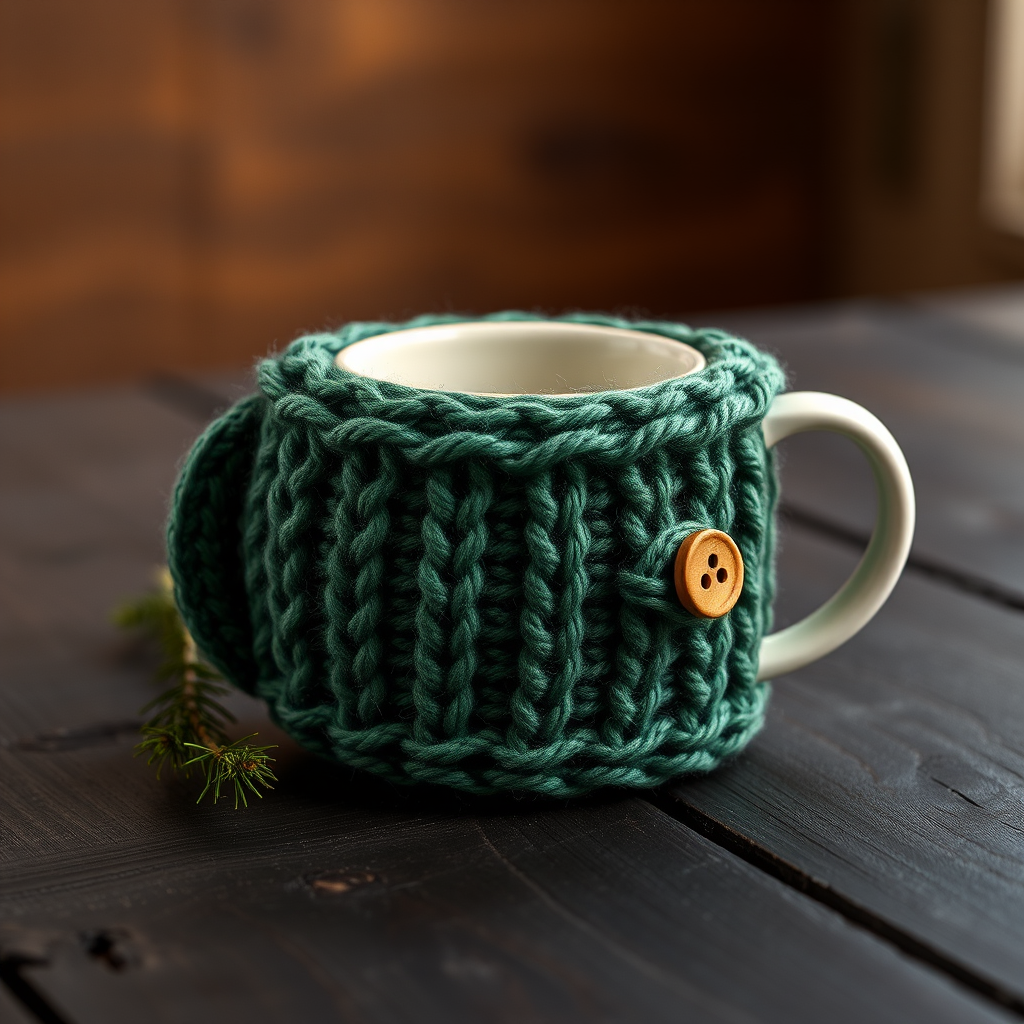
Wrap Your Mug in Woodland Warmth: The Whispering Pines Textured Mug Cozy
There's something deeply comforting about wrapping your hands around a warm mug on a chilly morning. Now, imagine that mug wrapped in a rich, cable-knit cozy that evokes the quiet beauty of a pine forest. The Whispering Pines Textured Mug Cozy is a quick, satisfying project that adds a touch of woodland charm to your daily tea or coffee ritual. This pattern is perfect for beginners looking to try their hand at cables, or for experienced knitters seeking a delightful, giftable project. With its deep forest green hue and intricate braided texture, this cozy transforms an ordinary mug into a treasured keepsake.
This free knitting pattern is worked flat and seamed, featuring a clever button closure that ensures a perfect fit on any mug. The design showcases a prominent central panel of intertwining cables, flanked by ribbed borders that create a snug, textured fit. Whether you're crafting for yourself or creating a heartfelt handmade gift, this pattern is sure to bring a touch of rustic elegance to any kitchen.
Materials Needed
Before you begin, gather the following materials to ensure a smooth and enjoyable knitting experience:
- Yarn: Worsted weight yarn in a deep forest green (approximately 50g/100m). A wool or wool-blend yarn works beautifully to show off the cable texture.
- Knitting Needles: 4.5mm (US 7) knitting needles. You can use straight needles or a circular needle for flat knitting.
- Cable Needle: A small cable needle or double-pointed needle for holding stitches.
- Button: One wooden button (approximately 1 inch or 2.5 cm in diameter) for the closure.
- Yarn Needle: A tapestry needle for weaving in ends and sewing on the button.
- Scissors
- Measuring Tape
Gauge: 20 stitches and 26 rows over 4 inches in stockinette stitch. While gauge is important for fit, this cozy is quite forgiving due to the button closure. However, matching gauge will ensure the cozy wraps your mug perfectly.
Step-by-Step Instructions
This cozy is worked flat and seamed, with a button closure for a perfect fit on any mug. Follow these detailed instructions carefully, and you'll have a beautiful mug cozy in no time.
Abbreviations
- CO: Cast on
- K: Knit
- P: Purl
- C4F: Cable 4 front (slip 2 stitches to cable needle, hold in front, knit 2, knit 2 from cable needle)
- C4B: Cable 4 back (slip 2 stitches to cable needle, hold in back, knit 2, knit 2 from cable needle)
- K2tog: Knit two together
- YO: Yarn over
- BO: Bind off
- RS: Right side
- WS: Wrong side
Getting Started
Step 1: Cast On
CO 30 stitches using your preferred method (long-tail cast on works well). Leave a tail of about 6 inches for weaving in later.
The Cable Pattern
Now, you'll work the main cable pattern. This pattern creates a beautiful, textured fabric with three distinct cable panels separated by purl ridges.
Row 1 (RS): K2, P2, K6, P2, K6, P2, K6, P2, K2
This row sets up the ribbed borders and the stockinette sections where the cables will form.
Row 2 (WS): P2, K2, P6, K2, P6, K2, P6, K2, P2
This row mirrors Row 1, creating the reverse side of the ribbing and purling the stockinette sections.
Row 3 (RS): K2, P2, C4F, K2, P2, C4B, K2, P2, C4F, K2, P2, K2
This is the first cable row. On the first and third cable sections, work C4F (cable front). On the middle cable section, work C4B (cable back). This creates the intertwining effect.
Row 4: Repeat Row 2
Row 5: Repeat Row 1
Row 6: Repeat Row 2
Row 7 (RS): K2, P2, K2, C4B, P2, K2, C4F, P2, K2, C4B, P2, K2
This is the second cable row, offset from the first. Notice how the cables now twist in the opposite direction, creating a beautiful braided effect.
Row 8: Repeat Row 2
Row 9: Repeat Row 1
Row 10: Repeat Row 2
Row 11: Repeat Row 3
Row 12: Repeat Row 2
Repeat Rows 1-12 until the piece measures approximately 8 inches from the cast-on edge, ending with a WS row. This should give you about 4 full pattern repeats, depending on your gauge.
Creating the Buttonhole
Now, you'll add buttonholes to one edge of the cozy. This allows you to adjust the fit and secure the cozy around your mug.
Buttonhole Row (RS): K2, P2, K6, P2, K2tog, YO, K2, P2, K6, P2, K2tog, YO, K2, P2, K2
This row creates two buttonholes. The K2tog decreases a stitch, and the YO creates a new stitch, forming a small hole. You'll have two buttonholes for adjustability.
Next Row (WS): Work in pattern as established, knitting into the yarn overs.
When you reach the YO from the previous row, simply knit into it as a normal stitch. This closes the buttonhole and maintains your stitch count.
Work 2 more rows in pattern (Rows 1 and 2). This gives you a nice finished edge above the buttonholes.
Binding Off
BO all stitches in pattern. This means you'll knit the knit stitches and purl the purl stitches as you bind off. This creates a neat, stretchy edge that matches the ribbing.
Finishing Touches
Step 1: Weave in All Ends
Using your yarn needle, carefully weave in the cast-on tail and the bind-off tail on the wrong side of the fabric. Make sure to weave through the purl bumps to hide the ends securely.
Step 2: Sew on the Button
Sew the wooden button onto the left edge of the cozy, opposite the buttonholes. Position it at the center of the cozy, both vertically and horizontally. Make sure it aligns with the buttonholes when the cozy is wrapped around the mug.
Step 3: Wrap and Button
Wrap the cozy around your mug, overlapping the edges so that the buttonholes sit on top of the button. Button through the buttonholes to secure. The cozy should fit snugly but not too tightly.
Step 4: Block Gently
To even out the cables and give your cozy a professional finish, gently block the piece. You can wet block by soaking the cozy in lukewarm water, gently squeezing out excess water, and laying it flat to dry. Or, you can simply steam block with an iron held above the fabric (do not press directly on the cables). This will help the cables relax and lay flat.
Tips for Success
- Keep your tension even: Cables can pull in the fabric, so try to keep your tension consistent throughout.
- Use a cable needle: While you can cable without one, a cable needle makes the process much easier and prevents dropped stitches.
- Count your stitches: After each cable row, count your stitches to ensure you haven't accidentally dropped or added any.
- Customize the fit: If your mug is larger or smaller, you can adjust the length by working more or fewer pattern repeats. You can also adjust the width by adding or removing stitches in multiples of 6 (to maintain the cable pattern).
Your Whispering Pines Textured Mug Cozy is now complete! This beautiful, functional piece is perfect for adding a touch of woodland warmth to your daily routine or for gifting to a loved one. The rich cable texture and deep forest green color make it a timeless accessory that will be cherished for years to come. Enjoy your cozy creation, and happy knitting!



